What Is the Concept of Rooting/Privileged Access and Their Risks?
Rooting an Android device means unlocking its system to gain privileged access, similar to having administrator rights on a computer. This process removes restrictions imposed by manufacturers and operating system developers, allowing users to modify core system files, uninstall pre-installed apps, and install software that normally wouldn’t be permitted.
Many users root their devices to enhance performance, customize the interface, or install specialized applications. However, rooting comes with significant risks. By bypassing Android’s built-in security measures, the device becomes more vulnerable to malware, hacking attempts, and unauthorized access. Malicious apps with root access can manipulate sensitive data or compromise system integrity.
Additionally, rooting may lead to unexpected system instability, causing apps or essential functions to malfunction. It often voids the manufacturer’s warranty and can prevent users from receiving critical security updates, leaving the device exposed to new threats. While rooting provides more control over the device, it also demands a strong understanding of its risks and potential consequences.
Conclusion
Jailbreaking in iOS – while interesting from a device owner’s perspective – poses a serious challenge for mobile app developers concerned about security. A jailbroken device can undermine an app’s protections, opening the door to data breaches, fraud, and intellectual property theft. As we’ve explored, understanding what jailbreaking is and how it’s achieved is the first step. From there, implementing robust iOS jailbreak detection mechanisms is critical for any app that handles sensitive data or transactions.
By using a combination of the techniques discussed – from simple file checks to advanced RASP tools – developers can detect jailbroken devices with a high degree of confidence. The goal isn’t to cat-and-mouse forever, but to make your app a less attractive target. Effective jailbreak detection and response (such as disabling certain features or refusing to run on jailbroken devices) significantly strengthens your app’s security posture. It ensures that the app’s own defenses (encryption, authentication, etc.) haven’t been rendered ineffective by a compromised OS. In essence, jailbreak detection acts as a guardian: if the platform is untrustworthy, the app can take precautions or shut down to prevent further damage.
In practice, a clear mobile app security policy should include jailbreak/root detection alongside other measures like secure communication, code obfuscation, and intrusion detection. Many industries (finance, healthcare, enterprise) now consider jailbreak detection a must-have, and users are often educated that for safety, certain apps won’t run on modified devices. By staying updated on the latest jailbreak developments and using the right tools (for example, integrating services like freeRASP or upgrading to enterprise solutions like RASP+ for more comprehensive protection), developers can keep up in this ever-evolving security battle.
To conclude, effective jailbreak detection strengthens mobile app security by ensuring your application only runs in trusted environments. It protects your app from running under conditions where it could be exploited or misused. For developers, investing time in jailbreak detection and response is well worth it — it’s about safeguarding your users and your business from the risks that come with jailbroken devices. With the knowledge from this guide, you can implement a layered jailbreak protection strategy that makes your app resilient against one of the most prevalent iOS security threats. Secure apps mean safer data and happier users, and that ultimately benefits everyone in the mobile ecosystem.
Why is Hook Detection Crucial for Mobile App Security?
Hook detection is crucial because it’s often the last line of defense against a sophisticated attacker. Modern mobile apps already employ many security measures – encryption, authentication, secure coding practices, etc. However, if an attacker can hook into an app, they may bypass or undermine all those measures from the inside. Here’s why robust hook detection is so important for mobile app security:
• Protecting Sensitive Data: Apps like mobile banking, payment wallets, healthcare, or enterprise apps deal with highly sensitive user data and transactions. If an attacker manages to hook these apps without being noticed, they could steal data or perform fraudulent transactions invisibly. Hook detection helps ensure that if an attacker is trying to do this, the app will catch it and not simply hand over the keys. In industries like finance and healthcare, failing to detect such intrusion could lead to breaches, regulatory penalties, and loss of user trust.
• Maintaining App Integrity: Even if an app isn’t handling bank details, its integrity is important (think of a game or a social media app). Attackers hooking a game can enable cheats, ruining the fair play for everyone. In social or messaging apps, hooking could lead to eavesdropping on private communications. By implementing hook detection, developers ensure their application’s code and logic aren’t being manipulated behind the scenes. It’s about making sure the app the user is running is the genuine, untampered version of the developer’s code.
• Preventing Large-Scale Abuse: Attackers often automate hooking attacks to target many users or accounts (for example, a fraud operation hooking multiple instances of a banking app to siphon money). If the app can detect hooking, it can shut down or notify server-side systems, preventing large-scale abuse. Essentially, hook detection can turn a potential silent failure into a visible alert, prompting incident response before too much damage is done.
In summary, without hook detection, an attacker with the right tools can turn an app inside out without anyone knowing. For developers and security teams, adding hook detection is crucial to raise the bar against advanced threats. Next, we’ll look at how exactly these detection systems work in practice on Android and iOS platforms.
Challenges in Hook Detection
Detecting hooks is far from simple. It’s often described as a cat-and-mouse game between app defenders and attackers. Here are some key challenges in implementing effective hook detection:
Evasion by Attackers: As developers add new detection techniques, attackers find ways to evade them. For example, if an app scans for the string “Frida” in process names or memory, an attacker might use a modified version of Frida that changes those identifiers (renaming processes, using custom payloads without the word “Frida”). In fact, security researchers have noted that attackers frequently modify tools like Frida to evade detection by apps. This means an app that only checks for the stock version of a tool might miss a tweaked version. The cat-and-mouse dynamic is continuous: Defenders introduce new checks (scanning memory, enumerating libraries, tracking suspicious threads) and attackers respond with obfuscation, custom hooks, and runtime manipulation. It’s a constantly shifting battle, requiring app developers to stay updated on the latest attack techniques.
False Positives and Compatibility: The wide variety of Android devices, OS versions, and even custom ROMs means that some detection methods can mistakenly flag benign situations as hostile. A check that works on one device might misidentify legit behavior on another. For instance, certain pre-installed system apps or debugging services on custom Android ROMs might look like hooking tools to a simple scanner. On iOS, jailbreak detection code might occasionally misfire due to some obscure system configuration. This is a challenge: if an app is too paranoid, it might lock out innocent users (false positives), hurting user experience. Tuning the detection to be accurate without hampering legitimate usage is tricky.
Performance Overhead: Thorough hook detection can be resource-intensive. Continuously verifying memory integrity or scanning for anomalies can slow down an app and drain battery. Users expect apps to be fast and smooth – heavy-handed security checks that make the app lag will frustrate users. For example, performing deep memory scans repeatedly could make an app stutter. Developers must balance security with performance, perhaps checking only at strategic times (like app startup or before sensitive operations) rather than constantly. Still, the more lightweight the detection, the less it might catch; the more heavy-duty, the more it could impact performance. Striking the right balance is an ongoing challenge.
Attacker Interference with Detection: Ironically, an advanced attacker who knows an app has hook detection might try to hook the detection code itself. This is a kind of meta-attack: use hooking to disable or manipulate the very mechanisms meant to catch hooking. For example, if an app function is responsible for checking integrity, an attacker could hook that function and force it to always report “all clear.” This is particularly a risk if the app’s detection code is not well protected (which is why code obfuscation and other techniques are recommended, as we’ll discuss in best practices). Essentially, if the attacker gets even a small foothold, they may target the detection to blind the app. Building detection that’s hard to bypass even if partially subverted is a complex task.
In summary, while hook detection is essential, it’s not a one-and-done deal. Developers must be vigilant and adaptive. They have to anticipate that attackers are actively finding ways around whatever defenses they put in place. Despite these challenges, there are known best practices that can significantly strengthen an app’s resilience to hooking, which we’ll explore next.
Why Root Detection Is Critical for Security?
Allowing a rooted device to run a sensitive application is a huge security risk. When a device is rooted, malicious apps or users with knowledge can effectively break out of Android’s security sandbox. They can read or modify data that should be protected, install spyware, or alter app behavior. For applications that deal with confidential information or perform protected actions, this is unacceptable. Below are a few key scenarios highlighting why root detection is so important:
Banking and Financial Apps — Mobile banking and payment apps handle highly sensitive information (account details, authentication data) and perform privileged operations (like transferring money). If such an app runs on a rooted phone, a piece of malware on that device could use root permissions to steal credentials or tamper with transactions. For this reason, most banking apps use root detection and will refuse to run on rooted devices.
This ensures that things like your bank transactions aren’t happening in an environment where another app could be recording your keystrokes or injecting fraudulent behavior.
Enterprise Security (MDM and Corporate Apps) — Companies that allow employees to access work email or confidential data on their phones enforce strict device policies. A rooted device is typically considered “untrusted” in enterprise settings, because an employee with a rooted phone could inadvertently allow malware to gain admin access to company resources. Mobile Device Management (MDM) solutions therefore include root detection to block rooted devices from accessing corporate email, VPNs, or files.
DRM and Protected Content — Many digital content providers (video streaming services, premium content apps) rely on device security to enforce Digital Rights Management. Rooting can undermine DRM by giving users the ability to bypass restrictions (for instance, to save streaming videos or override screenshot/recording blocks). Because of this, apps like Netflix have taken measures to disallow rooted devices from using their service.
So we can summarize this to state that Root detection plays a vital role in maintaining the security and integrity of Android devices. Here are several key reasons why root detection is essential:
1. Preservation of System Integrity
2. Protection Against Malicious Software
3. Safeguarding Sensitive Data
4. Maintaining a Secure Ecosystem
5. Mitigation of Exploitation Techniques
What is Hook Detection?
Hook detection refers to the defensive techniques and mechanisms that a mobile application (or the platform it runs on) uses to recognize when it is being hooked or tampered with at runtime. In other words, it’s like an alarm system that alerts the app if an unauthorized code is trying to latch onto it or modify its behavior. When an app has hook detection measures, it actively looks for signs that a hooking tool or framework is present either in the device environment or within the app’s process.
Conclusion
Hooking in mobile apps is a powerful technique with two faces: it can be a helpful tool for developers and security researchers, but a dangerous weapon for attackers. In this deep dive, we explored how hooking works and why it poses such a significant threat to mobile app security when used maliciously. We discussed the many risks of hooked apps – from data theft and privacy invasion to fraud and cheating – which make it clear that ignoring this threat is not an option for sensitive apps.
In conclusion, hooking in mobile apps is a deep and important topic. As we’ve dived into its depths, remember that security is an ongoing journey. By staying informed and proactive – whether through regular updates, adopting new defensive technologies, or learning from case studies – you can keep your mobile apps one step ahead of attackers. Hooking and hook detection might sound complex, but with an approachable strategy (and perhaps re-reading this guide as needed!), any developer can start incorporating these protections. Together, through better security practices, we can make the mobile ecosystem safer and more trustworthy for everyone.
Hook Detection
Learn how hook detection protects mobile apps from runtime code manipulation, blocking tools like Frida and Xposed.
Hook detection on Android and iOS is an essential security measure used to prevent malicious manipulation of app behavior at runtime. Hooking allows attackers to intercept and modify function calls, enabling activities such as bypassing authentication, altering in-app purchases, or extracting sensitive data. On Android, hooking frameworks like Frida, Xposed, and LSPosed are commonly used by attackers to inject and execute custom code. Similarly, on iOS, tools like Cycript and Frida enable runtime manipulation of app functions. To counter these threats, developers implement hook detection by monitoring for suspicious process injections, checking for known hooking libraries, and enforcing runtime integrity verification.
Despite these defenses, attackers continuously refine their evasion techniques to bypass detection mechanisms. For example, they use obfuscation, custom-built hooking tools, or even modify an app's binary to disable security checks. As a result, effective hook detection relies on a multi-layered approach, including runtime code integrity verification, API call monitoring, and heuristic analysis of suspicious behaviors. Additionally, integrating hook detection with other security measures such as jailbreak and root detection, runtime application self-protection (RASP), and app hardening significantly enhances resilience against dynamic attacks. By continuously adapting security strategies, developers can reduce the risk of unauthorized modifications and maintain the integrity of their applications.
How does an app “detect” hooking?
There are a few approaches:
• The app can check its own integrity and environment at runtime. If something doesn’t look as expected (for example, a critical function’s code has been altered in memory, or an unexpected library is loaded into the app’s process), the app might suspect a hook.
• It can also look for known footprints of hooking frameworks. Many hooking tools leave telltale signs (specific file names, process names, or injected code patterns) that can be recognized. For instance, if a well-known hooking tool is attached, the app might notice unusual debug connections or the presence of classes and methods that only exist when a framework like Xposed or Frida is in use.
• Hook detection often goes hand-in-hand with root detection or jailbreak detection. Since hooking typically requires elevated privileges, an app that finds a device is rooted/jailbroken will treat it as a higher-risk environment and may assume a hooking attack is possible. Some apps refuse to run in such cases or operate in a limited mode.
In essence, hook detection is any check or safeguard that allows an app to sense “I’m being watched or controlled by someone else’s code right now.” Once detected, the app can then respond (for example, by shutting down, disabling sensitive features, or alerting the user).
What is the Concept of Hooking and Its Security Implications
Hooking in mobile apps is a technique where an external code snippet intercepts and modifies the normal execution of an application at runtime. In simpler terms, hooking lets someone “attach” into an app’s internal functions or APIs, allowing them to see or change what the app is doing without altering the app’s original source code. This can be done using special tools or frameworks that inject code into the running app process. For example, a hooking tool might intercept a login function call to capture your password or change a value in memory before the app uses it.
Hooking is a double-edged sword. On one side, developers and researchers use hooking frameworks for legitimate purposes – debugging, performance monitoring, or testing security. These tools help inspect apps on the fly and can be invaluable for finding bugs. On the other side, malicious actors can exploit hooking to tamper with apps in ways the developers never intended. A hooking framework essentially gives an attacker the power to intercept and modify app behavior at runtime
This means an attacker could read sensitive data in memory, bypass security checks, or alter how the app functions. In short, hooking can turn an otherwise secure app into a vulnerable one if misused.
Security implications: Because hooking enables runtime tampering, its implications are serious. If an attacker successfully hooks into a mobile app, they might gain unauthorized access to user data, trick the app into bypassing critical security measures, or insert new malicious behaviors. Often, performing hooking requires the device to be in a state that allows such deep intervention – for instance, an Android device might be rooted or an iPhone jailbroken to remove the usual restrictions on apps. Such devices are more susceptible to hooking because the operating system’s normal security barriers are lowered. For this reason, many secure apps already warn against or outright block usage on rooted/jailbroken devices. However, sophisticated attackers have found ways to hook some apps even without full device compromise (using virtual environments or clever injection techniques), making hook detection an important consideration on all devices.
Root Detection
Learn what root detection is, how rooted Android devices increase security risk, and how to choose the right root detection solution for your mobile app, from free tools to advanced RASP protection.
Imagine having the keys to your Android kingdom — rooting your device gives you exactly that level of control. Rooting (gaining privileged “superuser” access) lifts the built-in restrictions of the Android operating system, allowing you to modify system files, install unauthorized apps, and customize your device in ways that ordinary users can’t.
However, this freedom is a double-edged sword — bypassing Android’s security safeguards also exposes the device to serious risks.
With root access, malware or malicious apps have a much easier time breaching your phone’s defences, potentially compromising sensitive data and system integrity.
In short, rooting grants great power over your device, but it also brings great responsibility (and danger) in terms of security.
From an app developer standpoint, a rooted device isn’t just the owner’s concern — it’s a red flag for any application running on it. When a device is rooted, attackers or even curious users can bypass app-level restrictions, tamper with code, or steal data that would normally be shielded by Android’s sandbox. To combat these threats, developers employ root detection mechanisms to determine if an app is running on a rooted (and thus potentially compromised) device.
Many security-critical apps — from mobile banking to corporate email clients — will restrict functionality or refuse to run altogether if they detect a rooted device, in order to safeguard data and prevent fraud
Implementing such detection is easier said than done, however. Sophisticated rooting tools can hide their tracks to evade detection, creating a cat-and-mouse game between app security defences and would-be attackers
This constant battle makes it clear why strong root detection is crucial for anyone serious about Android security and app protection.
In the sections that follow, we’ll explore both sides of this coin — the allure of rooting and the necessity of root detection. We begin by demystifying the concept of rooting and the privileges it grants (along with the risks involved). Next, we delve into the security dangers posed by rooted devices and explain what root detection is and why it’s so important. From there, we’ll examine how root detection works under the hood and the challenges developers face in staying ahead of clever root hideing techniques. We’ll also discuss best practices for implementing root detection in apps and introduce some popular tools and services that can help. By the end, you’ll have a clear understanding of why rooting appeals to many Android enthusiasts yet comes with significant security trade-offs — and why robust root detection mechanisms are an essential safeguard for keeping your apps and data safe
Choose the root detection solution that aligns with your goals. Free tools like RootBeer, freeRASP, or Play Integrity provide basic protection — but premium offerings like Talsec RASP+ bring robust features and peace of mind.
Root Detection Solution
Pros
Cons
How Does Jailbreaking Impact Mobile App Security?
When an iOS device is jailbroken, the security model of the OS is fundamentally altered This has several implications for mobile app security:
Untrusted Operating Environment
Apps on a jailbroken phone run in an environment where system integrity can’t be guaranteed. Malicious tweaks or processes could be running with root privileges alongside your app. As a result, your app cannot assume that critical security barriers (like the app sandbox or entitlements) are intact. As noted by security researchers, the presence of a jailbreak means the OS security can no longer be adequately trusted by applications
Elevated Risk of Data Breaches
Jailbreaking removes many of the iOS restrictions that protect user data. For example, an attacker with physical or remote access could read files from your app’s sandbox or Keychain which would normally be protected. Apple warns that jailbreaking eliminates layers of security designed to protect personal information. This could lead to data theft, where hackers steal sensitive information from a jailbroken device
Ease of App Tampering and Reverse Engineering
In a jailbroken device, a user or attacker can hook into the app’s process or modify it at runtime. Tools like Frida, Cycript, or tweaks installed via Cydia/Substrate can intercept function calls or modify an app’s behavior on the fly. This means features like anti-cheat mechanisms, license checks, or cryptographic routines in your app could be bypassed or altered. The barrier to reverse-engineer the app’s code is also lower, since jailbreak users have easier access to the app’s binary and memory. Mobile app security is undermined when attackers can inspect and modify the app freely in a jailbroken environment.
Potential for Malware Injection
Since jailbreaking allows installation of apps from outside Apple’s ecosystem, a jailbroken device may inadvertently run unvetted, malicious software. Such malware could target other apps on the device (including yours) by injecting code or logging keystrokes/API calls. For instance, spyware could attach to a banking app on a jailbroken phone and capture login credentials. This jailbreak-enabled malware is a real threat, and it’s one reason many enterprise or banking apps refuse to run on jailbroken devices as a security precaution.
Jailbreak enthusiasts often hold off on updating iOS to maintain their jailbreak, since each iOS update may patch the exploit they rely on. this means jailbroken devices are frequently running outdated versions of iOS with unpatched security flaws. From a developer’s perspective, not only is the device compromised by the jailbreak itself, but it may also be vulnerable to known iOS exploits that Apple has already fixed in newer releases. In a corporate environment or any context where device compliance matters, a jailbroken (and likely outdated) device poses a serious risk.
In summary, jailbreaking undermines the security assumptions that iOS apps rely on. Mobile app security defenses like encryption, code signing, and sandboxing can be subverted. This is why many developers implement jailbroken device detection in their apps and may restrict functionality or block usage if a jailbreak is detected. Next, let’s look at how jailbreaking is done and which tools are popular, to better understand what we’re up against.
Best Practices for Implementing Hook Detection
Implementing hook detection effectively requires a multi-pronged and thoughtful approach. Here are some best practices for developers and security teams to keep in mind when building hook-resistant mobile apps:
Defense in Depth: Use multiple detection techniques rather than relying on a single check. For example, combine root/jailbreak detection, integrity checks, and checks for known hooking frameworks. An attacker might bypass one layer (say, hiding root status), but still be caught by another (an integrity check catching a modified function). Layers of different checks significantly increase an attacker’s workload to remain undetected.
Secure Critical Code Paths: Identify which parts of your app are most sensitive (login logic, payment processing, encryption, etc.), and apply extra scrutiny and protection to those. You might run additional integrity checks on these functions or even duplicate checks (fail-safe validations) to ensure they haven’t been altered. Some apps implement critical logic on the server-side as much as possible, to reduce what a hook on the client can achieve. For what must reside on the client, consider techniques like code obfuscation and anti-tamper controls so that hooking that code or finding the right spot to hook is more difficult for an attacker.
Obfuscate and Hide Your Detection Logic: If you write hook detection code in your app, assume attackers will try to locate and neutralize it. Use code obfuscation tools (which rename and restructure code) to make it hard for an attacker to identify the detection functions. You can also design your app so that security checks are performed in multiple places and in indirect ways (making it harder to simply patch out one function to disable detection). The goal is to avoid having a single obvious “HookDetector()” function that attackers can target.
Use Tamper-Resistant Tools and SDKs: Consider leveraging specialized security SDKs or services (often called Mobile App Security or RASP solutions, like Talsec and) that provide built-in hook detection and prevention. These can be libraries you include in your app that continuously monitor for threats. They often receive updates from the vendor as new threats emerge. Examples include commercial services that offer mobile app shielding or attestation. If budget allows, this can offload the heavy lifting of implementing detection from your team, and they typically use advanced techniques under the hood.
Regular Testing (Think Like an Attacker): Continuously test your own app’s security. Use the same tools attackers use (Frida, Xposed modules, etc.) in a controlled environment to see if your detection triggers. This can be part of your quality assurance for security. There are open-source tools and frameworks that can simulate hooking attempts; integrate those into your testing cycle. By doing this, you might discover bypasses or weaknesses in your detection before the bad guys do.
Secure the Entire Ecosystem: Hook detection in the app is important, but also consider server-side measures. For example, if your app suddenly stops sending certain heartbeat signals or attestation proofs that it normally does (perhaps because a hook disabled those), the server can flag the session as potentially compromised and limit actions. Similarly, monitor usage patterns: if someone using hooking bypasses a UI flow (things happen in the app faster or in a weird sequence not possible normally), you might catch it via analytics. This goes beyond the app code itself but is part of a holistic security approach.
By following these best practices, developers can create a robust shield against hooking. It’s about making your app a hard target – so that attackers either give up or find that any attempt to hook results in them being detected and thwarted.
Talsec's Perspective: A Pragmatic Approach to Obfuscation
At Talsec, we firmly believe that a layered security approach is the most effective way to protect mobile applications. Obfuscation is a crucial component of this strategy, acting as a vital deterrent against static analysis. However, we also recognize the trade-offs associated with different obfuscation techniques.
Our Stance on Obfuscation Types
Class Name Obfuscation and String Obfuscation: Must-Haves for Sensitive Apps: We consider both class name and string obfuscation as essential baseline security measures for any application handling sensitive data or implementing critical business logic. The relatively low overhead and significant increase in analysis difficulty make them highly valuable in hindering casual attackers and raising the cost for more sophisticated ones. Implementing these techniques should be a standard practice in your mobile app development lifecycle.
Control-Flow Obfuscation: Reserved for Algorithm Protection: While control-flow obfuscation can offer a higher degree of protection against reverse engineering of specific algorithms, we believe its application should be carefully considered and generally reserved for scenarios where the application's core algorithm itself is a significant intellectual property asset.
We acknowledge that control-flow obfuscation can introduce several complexities and potential issues:
Increased Integration Complexity: Integrating and configuring control-flow obfuscation tools can be more challenging compared to class and string obfuscation.
Potential for Non-Deterministic Bugs: The transformations applied by control-flow obfuscation can sometimes introduce subtle and hard-to-debug issues that may not manifest consistently.
Performance Impact: The added complexity in the control flow can potentially lead to performance overhead, impacting the application's responsiveness and battery consumption.
If your application's core algorithm is a critical asset that requires a higher level of protection than class and string obfuscation can provide, we recommend a more targeted approach:
Isolate Sensitive Code: Move the algorithm's implementation to code written in a lower-level language like C or C++.
Separate Obfuscation: Apply robust obfuscation techniques specifically designed for C/C++ code to this isolated module.
Minimize Impact: By isolating the sensitive code, you limit the potential negative impacts of complex obfuscation on the main application codebase, reducing integration challenges, performance concerns, and the risk of introducing widespread bugs.
How Can Mobile Developers Detect Jailbroken Devices?
Detecting a jailbroken device is an important part of jailbreak protection for apps. Developers have devised various methods to check if the device their app is running on has been compromised. There is no single foolproof indicator, so effective iOS jailbreak detection often combines multiple checks. Below are some common techniques mobile developers use to detect a jailbreak:
Checking for File System Artifacts
Jailbreaking usually leaves behind certain files, directories, or apps that are not present on a normal iOS device. By attempting to locate these, an app can infer a jailbreak. Classic examples include checking for the existence of Cydia or other installer apps on the system. For instance, one can check if the path /Applications/Cydia.app exists, or if directories like /private/var/lib/apt/ (which indicates the presence of the APT package manager used by Cydia) are present.
Many jailbreak tools install files in known locations; the presence of any of those “known jailbreak files” is a strong indicator. (Developers often maintain a list of known file paths to check, including Cydia, Substrate, SSH daemons, etc.)
Checking for Sandbox Violation (Write Test)
Under normal conditions, an app is confined to its sandbox and cannot write to system directories. On a jailbroken device, the sandbox restrictions can be lifted for apps running with root. A common detection trick is to attempt to create or write to a file in a restricted location, such as the root of the file system or /private directory. If the write operation succeeds when it should have failed, the device is jailbroken
For example, writing a dummy file to /private/jailbreak_test.txt and then checking if it was created is a simple test – on a non-jailbroken device this operation will be denied, whereas on a jailbroken device it may succeed because the app might be running with higher privileges or outside the normal sandbox.
Many jailbreaks run background processes (like SSH daemons) or load additional dynamic libraries into apps. Developers can check the process list or loaded DYLIBs for known jailbreak components. One approach is to use the dyld (dynamic linker) APIs to enumerate loaded libraries in the app’s process and scan for names associated with jailbreak tools (e.g., substratelibrary.dylib, libhooker.dylib, Frida libraries, etc.)
if your app finds a library with a name like “frida” or “cydia substrate” loaded into itself, that’s a red flag the environment is compromised. However, this method can get complex and might be considered an advanced technique (since it involves low-level C APIs and string matching).
This is more of a generic principle behind several of the above methods. If your app suddenly has access to things it shouldn’t, something is wrong. For example, try to list files in /. If you get a directory listing of the device’s root filesystem, that means the app is not properly sandboxed (indicative of a jailbreak). Apple’s security model would normally prevent that. Another indicator is the presence of symbolic links where they shouldn’t be. Some jailbreaks relocate certain folders and create symlinks (for instance, a jailbreak might symlink /Applications to a different location to make more space). Checking for known symlinks (like /Applications being a symlink instead of a real directory) can also tip you off
Each of these detection methods can be implemented in Swift/Objective-C and run at app startup or at strategic points. Keep in mind that none of them are 100% foolproof on their own. Thus, combining multiple checks will strengthen your jailbroken device detection. Also, be aware of false positives and ensure you’re not violating any App Store guidelines (Apple doesn’t forbid jailbreak detection, but be careful with private API usage).
RASP vs. Malware Detection
The Talsec SDK evaluates installation sources for two independent security products: RASP and Malware Detection. They operate separately and require distinct configurations.
How Each Product Evaluates Installation Sources
The following breakdown highlights how each product utilizes installation telemetry.
RASP
The RASP module is strictly focused on self-protection. When initialized, the SDK checks the installer of your own protected application and compares this value against your trusted sources configuration:
If it matches: The app runs normally.
If it doesn't match: RASP triggers the unofficialStore callback.
Unlike RASP, Malware Detection looks outward. It scans the installation sources of every other application residing on the user's device. Each discovered app is evaluated individually against your trusted sources configuration. Any app originating from an unknown or untrusted source is flagged in the threat report.
RASP
Malware Detection
How Root Detection Works?
Root detection employs multiple methodologies, often in combination, to improve reliability. Below, we break down the key techniques:
1. Static Analysis
Static analysis involves checking the device’s filesystem and configuration for known indicators of root access without executing code that requires root. These checks look for static artifacts left behind by rooting. Key static analysis methods include:
Checking for known root binaries and files
Rooting typically installs certain files not found on stock devices. For example, the presence of a superuser (su) binary (often in paths like /system/bin/su or /system/xbin/su) is a strong indicator of root
Identifying modifications in system partitions
Rooting usually requires altering the system partition or boot image. Static checks therefore inspect system properties and configuration for unusual values.
Detecting installed applications used for rooting
Many users install management apps after rooting to control superuser access. Static analysis can check the list of installed packages for names of known root apps
Static analysis is quick and straightforward, but by itself it can be bypassed (attackers might remove or hide these indicators). Therefore, apps often complement it with dynamic and behavioral checks.
Dynamic analysis techniques involve observing the device’s behavior at runtime and performing tests that can reveal elevated privileges. Instead of just looking for files, the app actively probes the system for root-only capabilities or anomalies. Key dynamic checks include:
Monitoring runtime behavior for signs of elevated privileges
One common approach is to attempt operations that should fail on an unrooted device but would succeed with root. For example, the app might try to execute a shell command that requires root access (such as invoking the su binary). On a non-rooted device, this either won’t execute or will prompt a failure, whereas on a rooted device the command may execute and return a root shell.
Intercepting or invoking API calls that reveal system modifications
Some root detection libraries inspect system APIs for abnormal responses that indicate tampering.
Checking process and memory modifications
More advanced dynamic analysis monitors the app’s own process and the system processes for signs of tampering. Root access often comes hand-in-hand with tools that can inject code or manipulate memory.
Dynamic analysis adds another layer of defense, because even if an attacker hides files, the act of using root often leaves some trace in behavior or system state. However, sophisticated root hiding tools aim to also neutralize these checks, leading to the need for behavioral analysis.
Behavioral analysis refers to monitoring the device or app for patterns and actions that are unusual in a non-rooted environment. Instead of specific file or API checks, this involves a broader observation of how the device and apps operate, which can indirectly signal that root access is present or being concealed. This approach is more heuristic and looks at the context of the device’s operation:
Some security solutions keep an eye on system-wide behavior that would only occur on a rooted device, especially one using root-hiding measures. For example, on a secure device certain directories and settings are off-limits — if the app notices those being accessed or changed, it’s suspicious
Analysing app permission escalations beyond normal user privileges
Apps on a rooted device can sometimes do things that should normally require special permissions or not be possible at all. A detection system might track if any app (or the OS itself) has granted itself abilities beyond the standard Android permission model.
What Are the Security Risks of Rooted Devices?
Rooted devices often face enhanced security risks, primarily because the built-in security layers are weakened or bypassed. These risks include:
1) Increased Vulnerability to Malware
Normally, apps on Android are “sandboxed” (kept separate) and your system files are protected — but rooting breaks these protections. Without them, malicious apps can gain deep access to your system. In fact, if malware runs with root permissions, it can do almost anything — it could delete important files, hijack your settings, or even install hidden programs that persist on your device. Additionally, rooted phones often stop receiving official security updates, so any new vulnerabilities remain unpatched, making infections and attacks even more likely.
2) Data Theft and Privacy Risks
When your device is rooted, apps can bypass the usual privacy controls. This means an unauthorized app (or a hacker who slips malware onto your phone) could access all of your personal data — things like saved passwords, emails, text messages, photos, and banking
information are no longer off-limits. Android’s normal data separation is undermined, so sensitive information that would typically be protected can be read or stolen by any app with root access. For example, a seemingly harmless app could secretly steal your contacts or log your keystrokes to capture passwords. In short, rooting makes it possible for attackers or rogue apps to spy on you and harvest your private data, creating serious privacy risk
With root access, a malicious actor can take complete control of your device’s system, which threatens the integrity of your phone. For instance, some malware (known as rooting trojans) are designed to gain full remote control over a rooted phone — letting an attacker do anything as if they were holding the device in their hand. This could include installing backdoor programs that secretly grant ongoing access to your phone.
In practice, an attacker who infiltrates a rooted device could modify system files, change critical settings, or install hidden spyware without you knowing. They might even install rootkits (deeply buried malicious software) to hide their presence. In essence, a rooted phone can be hijacked, meaning a hacker could remotely use your device or alter it in dangerous ways that you never intended, undermining the phone’s normal operation and security.
Which Advanced Detection Methods and Tools Can Enhance Jailbreak Detection?
Basic detection methods can be effective against casual jailbreak users, but as mentioned, advanced users may employ tools to bypass jailbreak detection. For example, tweaks like Liberty Lite or Shadow can intercept and neutralize common detection calls (making jailbreak files invisible to the app, faking fork() results, etc.). To stay ahead, developers and security companies have created more advanced jailbreak detection and protection solutions. Here are some strategies and tools for enhancing jailbreak detection:
Integrity Checks and Anti-Tampering
One advanced approach is to detect if your own app’s code has been modified or if critical functions have been hooked. For instance, you can compute a checksum of your important binary sections in memory and verify it matches the expected value. If a tweak has hooked your functions, the in-memory bytes might differ. While implementing this is quite technical, it raises the bar for attackers. Additionally, employing anti-tamper techniques (like obfuscating the jailbreak check code, detecting if someone is using a debugger to bypass your checks, etc.) falls under advanced methods. These measures make it harder for a jailbreak bypass tweak or an attacker to simply patch out the detection.
Many developers choose to integrate a professional RASP solution for robust jailbreak detection and more. RASP stands for Runtime Application Self-Protection – it’s essentially an SDK you include in your app that continuously monitors for threats (like jailbreak, rooting, hooking, debugging, emulator, etc.) and can respond accordingly. One example is Talsec’s library, which is a free-to-use mobile security SDK. According to Talsec, can detect if the app is running on a rooted/jailbroken device and give you the ability to determine the action to be triggered if one of those is detected. It also looks for runtime hooking tools like Frida and prevents debuggers from attaching
By using such a library, developers get a suite of checks out-of-the-box, maintained by security experts. FreeRASP provides basic protection for free, and Talsec also offers RASP+ (a paid, enterprise-grade version) which includes even more advanced detection capabilities (for example, more aggressive jailbreak hiding countermeasures, compliance reporting, etc.). These tools often come with cloud dashboards or callbacks so you can be alerted if one of your users has a jailbroken device or if an attack is detected.
A clever strategy is to implement multiple layers of checks throughout the app. Instead of just one check at launch, you scatter jailbreak detection routines in different parts of the codebase (and perhaps even in time intervals). This way, if an attacker patches one check, another might still catch the device later. Some apps even implement “honey traps” – checks that are not obvious, so a jailbreak bypass tweak might fail to neutralize all of them. For example, an app might perform a jailbreak check when a certain rarely-used feature is triggered, catching the attacker off-guard. The idea is to make bypassing all your detection points tedious and prone to error. By keeping these methods updated (as new jailbreaks and bypasses emerge), you maintain an edge. This is again where using maintained RASP solutions helps; their teams update the SDK to handle new jailbreak tools or bypass tricks, so you can update your app and stay secure.
Meet the Talsec Community [Apply to Join!]
Welcome to the hub of our community! This page is your go-to resource for staying connected with Talsec.
Whether you're looking for upcoming events, ways to engage on social media, or a quick overview of our key programs, you've come to the right place.
Keep up with Talsec through our social channels.
& : Follow us for quick updates, insights, and live event coverage.
: Join our professional network for industry news and event highlights.
TechTalk: Best Practices for Keeping Your App Safe with Majid Hajian (Microsoft)
The Mobile App Security Conference in Prague was a two-day, invite-only event on fraud, malware, and API abuse in modern mobile apps, held at Chateau St. Havel on November 3–4, 2025, and hosted by Talsec, freeRASP, and partners. It brought together leading experts and practitioners to strengthen the mobile AppSec community, connect engineers with attackers and defenders, and share practical techniques for high‑stakes sectors like banking, fintech, and e‑government.
In the modern technological era, mobile application security is no longer a static goal but a continuous organizational effort. As Majid Hajian, a Solution Engineer at Microsoft, emphasizes, the rapid evolution of threat landscapes—marked by a 29% increase in mobile attacks in the first half of 2025 and a staggering 2,000% surge in AI-driven mobile threats—demands a fundamental shift in how we build and defend applications. This new paradigm moves away from traditional "castle and moat" perimeter defenses toward a model of constant vigilance and automation throughout the entire software development lifecycle (SDLC).
One of the primary strategies for securing modern mobile applications is the adoption of a Zero Trust architecture. This approach operates on the principle of "always verify," assuming that no device, user, or network is inherently safe. In the mobile context, this translates to runtime protections like Runtime Application Self-Protection (RASP), which can detect real-time threats such as jailbreaking or debugger attachments. It also requires continuous identity verification, ensuring that every server request is validated rather than relying on long-lived sessions. Furthermore, data protection must be absolute; all information should be encrypted and stored in platform-trusted secure storage rather than plain text.
Opening Keynote: Safety/Security Equilibrium with Sergiy Yakymchuk (Talsec)
The Mobile App Security Conference in Prague was a two-day, invite-only event on fraud, malware, and API abuse in modern mobile apps, held at Chateau St. Havel on November 3–4, 2025, and hosted by Talsec, freeRASP, and partners. It brought together leading experts and practitioners to strengthen the mobile AppSec community, connect engineers with attackers and defenders, and share practical techniques for high‑stakes sectors like banking, fintech, and e‑government.
In the rapidly evolving landscape of mobile technology, a striking paradox has emerged: while global investment in cybersecurity continues to grow exponentially, the financial losses attributed to cybercrime are rising even faster. This disconnect suggests a fundamental flaw in our current approach to digital protection.
During a recent industry keynote, Sergiy Yakymchuk, co-founder of Talsec, challenged the community to look beyond engineering-driven solutions and address the subjective core of the problem: the human perception of safety.
The Engineering Bias and the Mobile Shift
Historically, cybersecurity expertise has been deeply rooted in infrastructure, network, and perimeter security. However, the last decade has seen a massive migration toward mobile-first applications, often leaving these new environments vulnerable.
Jailbreak Detection
Understand what jailbreak detection is, why jailbroken iOS devices put sensitive apps at risk, and how developers can detect compromised devices and strengthen mobile app security.
Jailbreak detection on iOS is a critical security measure for apps that handle sensitive data or enforce strict compliance requirements. Jailbreaking removes Apple's built-in security restrictions, allowing users to gain root access and modify system files. While this can be beneficial for customization and advanced usage, it also opens the door to security threats such as malware, unauthorized modifications, and bypassing in-app protections. Developers implement jailbreak detection to identify compromised devices and take appropriate actions, such as restricting access or triggering security alerts, to safeguard user data and prevent fraud.
However, detecting a jailbreak is increasingly challenging due to sophisticated evasion techniques. Tools like Liberty Lite and Shadow allow users to hide jailbreak status from security checks, making traditional detection methods less effective. To combat this, modern approaches rely on a combination of runtime integrity checks, file system analysis, and behavior-based monitoring. While no detection method is foolproof, a layered security strategy helps increase resilience against tampering. Ultimately, jailbreak detection is just one piece of a comprehensive mobile security framework that includes app hardening, runtime protections, and continuous monitoring to mitigate risks effectively.
A jailbroken device can introduce significant security vulnerabilities. Attackers or malicious tools could exploit the elevated access to read or modify sensitive data in your app. Jailbreaking essentially lowers the iOS defenses, making it easier for malware, spyware, or unauthorized scripts to run. For example, banking and payment apps risk exposure of private keys or customer data if the device is compromised. Even if the user’s intent is benign, a jailbroken environment creates uncertainty. Many mobile app security standards recommend blocking or at least detecting jailbroken devices to protect both the user and the service. In the next sections, we will explore how jailbreaking impacts app security, what techniques are used to jailbreak iPhones, and how developers can implement iOS jailbreak detection and jailbreak protection in their apps.
Open Content Topics
Content ideas you can turn into articles, videos, and more
New features in Talsec Portal
Recently we've rolled out Talsec Portal 1.5, bringing improvements to data visibility, workflows, and overall user experience.
This release makes it easier to understand your data, trace it to its source, and work more efficiently.
Previously, graphs in the Portal only reflected a subset of OS versions, which could lead to incomplete insights.
With the new version of Talsec Portal, graphs now include older OS versions.
This is especially useful when monitoring long-tail users or evaluating backward compatibility.
Understanding aggregated data is useful, but sometimes you need to see the raw logs behind it.
Video Injection
For many KYC (Know Your Customer) vendors, video stream injection is the "final boss" of fraud. It’s the process of bypassing a smartphone’s physical camera sensor to feed pre-recorded or AI-generated deepfakes directly into the application's media pipeline.
If successful, an attacker can register thousands of fraudulent accounts using stolen identities without ever showing their real face.
Attackers typically use three main vectors:
Hooking: Using LSPosed or VCAM modules to intercept Camera API calls and swap the live feed for a file like virtual.mp4.
Understanding the Fundamentals of Obfuscation
The primary goal of mobile app obfuscation is to render the application's code more difficult for an attacker to understand after it has been decompiled. Think of it as scrambling the blueprint of your application, making it significantly harder for someone to decipher its structure, logic, and sensitive information. While obfuscation doesn't make your application completely impenetrable – a determined attacker with enough time and resources might eventually succeed – it drastically increases the effort and expertise required, often making the attack economically unviable.
It's crucial to understand that obfuscation primarily focuses on hindering static analysis – the examination, understanding or tampering of the application's code at build time. Runtime attacks, where malicious actors attempt to manipulate the application while it's running, require a different set of defenses, which is where technologies like those offered by come into play.
Obfuscation and RASP are complementary security layers, working in tandem to provide comprehensive protection.
What are the Security Risks Associated with Hooked Apps
When an application has been “hooked” by an attacker, a range of security risks emerge. Below are some of the most significant risks associated with hooked apps:
Privacy Violations: A hooked app can betray its user’s privacy. With hooking, an attacker can monitor user interactions and device sensors through the app. They might log keystrokes and touch inputs (acting as a keylogger), or listen to sensor outputs (microphone, GPS, camera) via the app’s own permissions. This means an app you trust (like a messaging or health app) could, once hooked, be turned into a surveillance tool recording your private data and activities.
Application Tampering and Bypassed Security: By using hooks, attackers can modify an app’s behavior on the fly to bypass security checks or disable protections. For instance, a hook might disable a jailbreak detection function so that the app doesn’t realize the device is compromised. Attackers can also turn off features like certificate pinning or encryption, which are meant to secure communication, thereby enabling man-in-the-middle attacks on supposedly secure connections. In essence, any protective measure within the app (root detection, login checks, payment validations) can potentially be overridden if the hook can intercept the right method. This leads to unauthorized actions such as making in-app purchases for free, accessing content without permission, or performing restricted operations.
What is Root Detection?
Root detection is a security mechanism used by Android applications to determine if a device has been rooted — meaning the user has obtained superuser (root) access to the operating system.
For apps that handle sensitive data (like banking or enterprise apps), it’s important to know if the device is rooted because a rooted device no longer adheres to the standard security model that Android enforces.
The purpose of root detection is to protect applications and data from the risks associated with rooted devices. If an app detects that the phone is rooted, it may respond by refusing to run or by limiting certain features to safeguard information. For example, many financial apps will stop working or show a warning if they sense the device is rooted. By doing so, the app prevents attackers (or even the user) from exploiting the elevated privileges that come with rooting to compromise the app’s security. In short, root detection is about ensuring the app is running in a trusted environment — if the device is deemed untrusted (rooted), the app can take precautions or block usage to protect sensitive data and operations.
Root detection involves scanning the device to identify markers or modifications that suggest it has been rooted. This might include checking for altered system files, the presence of superuser binaries (like the su binary), or any known indicators of rooting tools such as
Introduction
Introduction to root, jailbreak, and hooking detection in mobile security, explaining how these techniques work, how attackers abuse them, and how developers can safeguard apps.
Mobile security faces constant threats from rooting, jailbreaking, and hooking—techniques that grant deep system access but also expose vulnerabilities. Attackers exploit these methods to bypass protections, steal sensitive data, and manipulate apps. Understanding how to detect and defend against these risks is crucial for developers and security professionals. Dive in to explore how , , and detection safeguard apps against sophisticated threats.
Conclusion
Obfuscation is an indispensable tool in the mobile app security arsenal. By making your application's code significantly harder to understand, you deter attackers and protect your intellectual property and sensitive data.
advocates for a pragmatic approach, emphasizing the crucial role of class name and string obfuscation as fundamental security layers for all sensitive applications. While acknowledging the potential benefits of control-flow obfuscation for specific algorithm protection, we recommend a targeted strategy involving isolating sensitive code in C/C++ and applying specialized obfuscation tools to minimize risks and ensure a robust and stable application.
At Talsec, we are dedicated to providing you with the tools and knowledge necessary to build secure and resilient mobile applications. By understanding the nuances of obfuscation and adopting a layered security products , , , and carefully chosen obfuscation techniques, you can significantly enhance your application's defenses against the ever-evolving threat landscape.
Data Exfiltration: happens when attackers steal sensitive data by tampering with how an app works. For example, they can insert malicious code (called a hook) that secretly captures personal info like login credentials, credit card numbers, or private messages while the app is running. They can also spy on all network activity—like API calls in a banking app—to collect account details or passwords. In some cases, they can even access the app’s memory to grab secret data like encryption keys or tokens, and send that information to a remote server without the user ever knowing.
In summary, a hooked app is no longer acting entirely under its developer’s control – the attacker’s hooks can manipulate or spy on nearly everything. The above risks underscore why preventing and detecting hooking is critical for any app handling sensitive data or functions. Even for less sensitive apps (like games), hooking can ruin integrity (e.g. enabling cheating). Next, we’ll discuss what hook detection means as a defense against these threats.
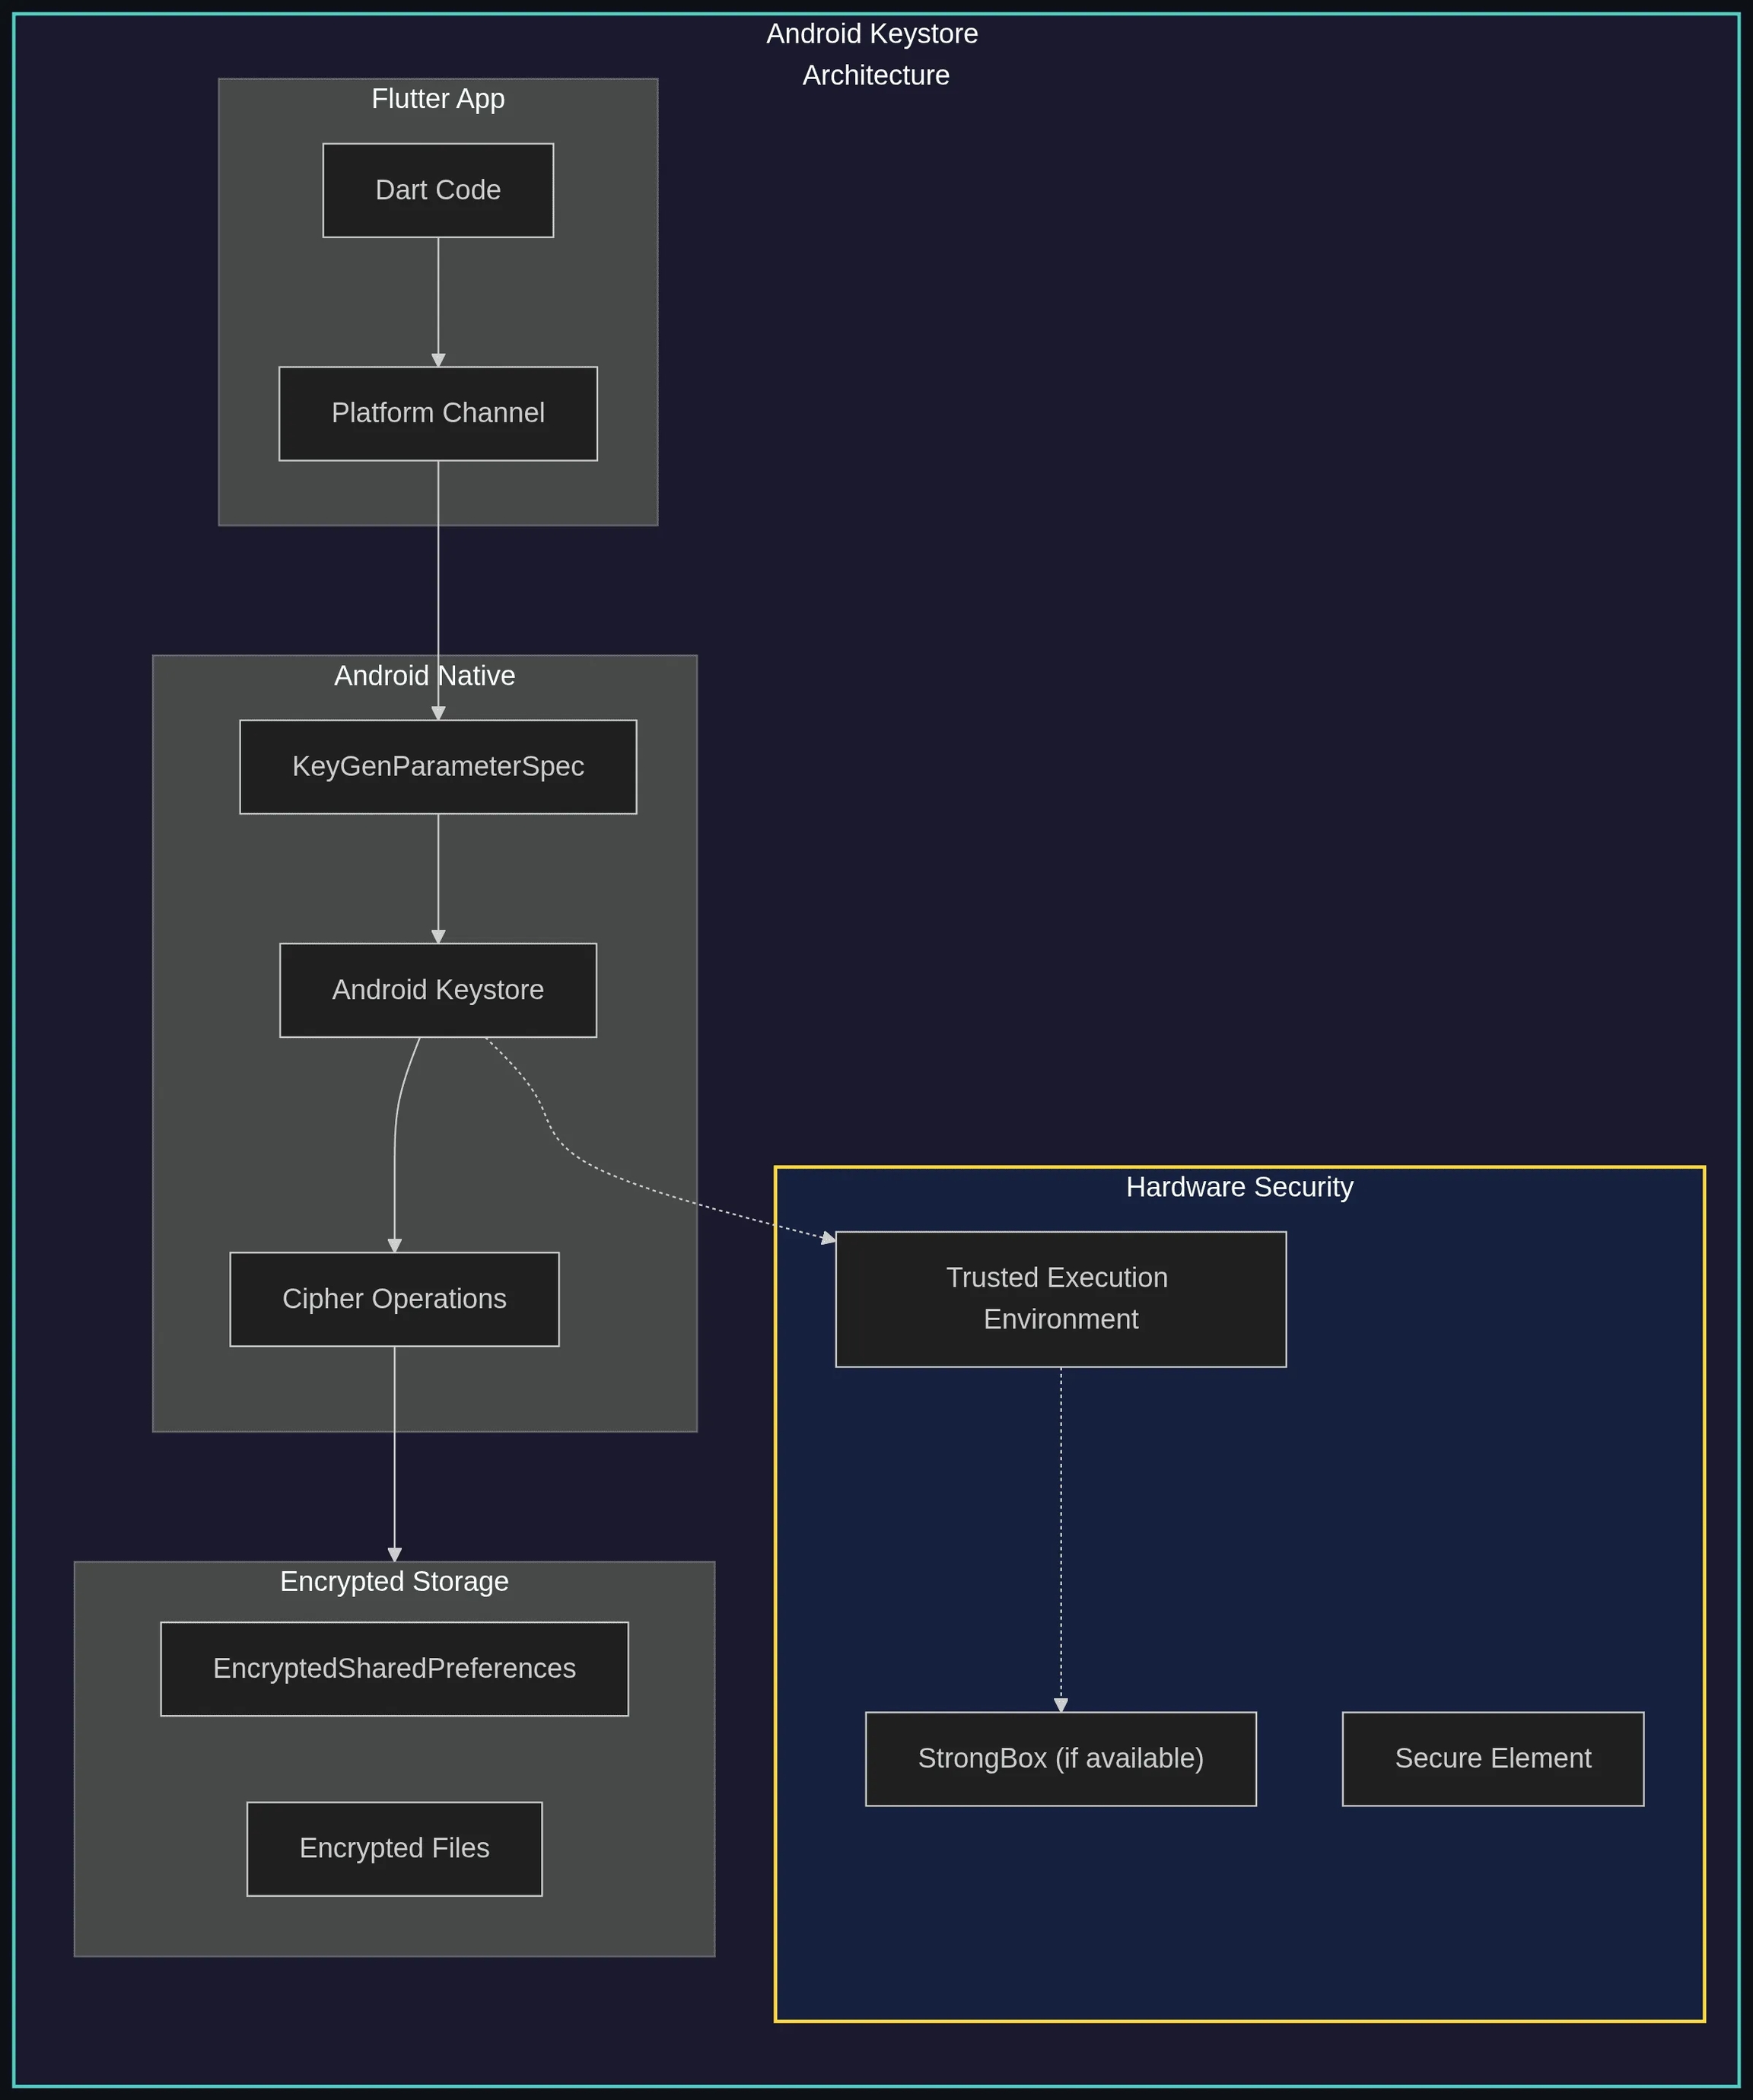
Magisk
or Franco Kernel Manager app. Essentially, it verifies that the device’s operating system is in its intended, secure state.
Delayed iOS Updates and Known Vulnerabilities
App Store Review Issues: Aggressive control-flow obfuscation techniques can sometimes be flagged by app store review processes due to the significant code modifications they introduce.
The Challenges of Control-Flow Obfuscation
Our Recommendation for Algorithm Protection
Looking for Suspicious Processes or Libraries
Detecting Root Access or Elevated Permissions
2. Dynamic Analysis
3. Behavioral Analysis
3) Compromise System Integrity
Why should developers and organizations care about jailbreaking?
GitHub Discussion: Join the conversation — share ideas, ask questions, and collaborate with fellow developers.
Join the conversation and be part of our growing community across all platforms!
Welcome to the TALSEE (TALsec SEcurity Experts) Championship Program—the premier initiative for active, high-impact Talsec community contributors focused on mobile security across all leading platforms. Whether you're working with Android, Flutter, React Native, Swift, or other mobile technologies, this is your platform to lead innovative discussions and projects that secure the future of mobile tech.
As a TALSEE Champion, you'll dive into cutting-edge discussions and create impactful content addressing the latest challenges and innovations in mobile security, including:
Platform-Specific Security Challenges: Explore the unique security requirements and vulnerabilities in Android, iOS (Swift), Flutter, and React Native. Analyze platform-specific threats and share best practices for each environment.
Secure Mobile App Development: Discuss robust, secure coding practices, from encryption and secure data storage to authentication and network security, tailored for mobile applications.
Emerging Threats & Defensive Innovations: Stay ahead by addressing the latest mobile threats—from malware and ransomware to zero-day vulnerabilities—and develop innovative defense strategies.
Cross-Platform Security Best Practices: Investigate how to build resilient, secure applications across multiple mobile platforms, ensuring consistent protection while maintaining performance and usability.
Incident Response & Forensics in Mobile: Share strategies and case studies on effective incident response, breach recovery, and mobile forensic analysis to mitigate and learn from security incidents.
Compliance & Regulatory Considerations: Dive into the evolving landscape of mobile security compliance, exploring how regulatory standards impact development and security practices across mobile ecosystems.
API Protection technologies: App and device attestation, authentication and authorization, and API security threats (bots, scraping, and more).
Do you have anything else in mind? Bring it up in our community discussion.
The TALSEE Championship is exclusive and tailored for individuals who:
Have Bold Ideas: If you’re ready to drive ongoing projects beyond one-off contributions, this program is for you.
Seek Active Engagement: Participate in meetings and collaborative sessions with fellow experts and the Talsec team.
Aim to Lead: Whether you’re a seasoned professional or an emerging leader, join us to make meaningful contributions and gain visibility in the security space.
The program accepts members by invitation and initial interview only.
Talsec Integration Professional status.
High-Impact Networking: Gain exclusive access to a closed group of top security professionals and Talsec employees, offering unparalleled networking and mentorship opportunities.
Financial Incentives: Receive competitive compensation starting at $200+ per project, content, and activity, with opportunities for bonuses based on impact and reach.
Build your professional portfolio, shape industry standards, and enjoy dedicated support from idea submission and outline review to final publishing on our trusted security platform.
As a TALSEE Champion, you’re not just generating content but driving change and innovation across mobile security. Here’s what you can expect to create and contribute:
Thought Leadership Content:
Articles & White Papers: In-depth pieces that analyze platform-specific security challenges, provide actionable insights, and share success stories.
Interactive Presentations & Webinars: Live sessions to discuss trends, demonstrate techniques, and engage directly with peers and industry experts.
Video Tutorials & Podcasts: Multimedia content that makes complex mobile security topics accessible across Android, iOS, Flutter, React Native, and more.
Impactful Initiatives Beyond Content:
Innovative Ideas & Community Building: Cultivate new thoughts and initiatives that spark dialogue, inspire change, and encourage the formation of dedicated security communities.
Collaborative Projects: Drive group projects and partnerships beyond a single piece of content—think hackathons, workshops, or security challenges that unite the community.
Open Dialogue and Brainstorming:
Idea Exchanges: Be part of a continuous brainstorming environment where fresh ideas are welcomed, discussed, and developed collaboratively.
Feedback Loops: Engage in dynamic discussions with fellow champions and Talsec experts to refine concepts and maximize their impact.
Your role as a TALSEE Champion goes beyond traditional content creation—you’re a catalyst for change, building a lasting impact on mobile security innovation. If you have other ideas or suggestions for topics and initiatives, we’re always ready to discuss and explore new avenues together!
Submit Your Idea: Propose a topic or draft an outline that aligns with our mobile security themes.
Outline Review: Our team will review your submission, provide feedback, and ensure your topic fits our quality standards.
Compensation agreement: Let's negotiate your compensation based on the final approved outline.
Draft & Feedback: Develop your complete draft and incorporate constructive feedback from our editorial team.
Publish & Promote: Once finalized, your work will be published on our platform and promoted through our channels.
Receive Compensation: Enjoy competitive payment and the satisfaction of contributing valuable insights to the mobile security community.
If you're passionate about security and eager to lead high-impact projects, the TALSEE Championship Program is your launchpad for change. Here, your innovative ideas will spark conversation and become the foundation for transformative content that resonates across the industry.
Earn your Talsec Integration Professional status. An individual discount code (and link) that you can use in your projects to get better prices for Talsec products. NB: Talsec Integration Partner status and reference fees are offered to Business Entities.
What Mobile Security Topics Will Be Explored?
Who Is It For?
Exclusive Perks of Being a TALSEE Champion
Earn your Talsec Integration Professional status. An individual discount code (and link) that you can use in your projects to get better prices for Talsec products. NB: Talsec Integration Partner status and reference fees are offered to Business Entities.
What You'll Create
How to Get Started
Ready to Transform Your Ideas Into Impact?
To manage the complexities of the "invisible supply chain," where approximately 80% of an application's code is composed of external dependencies, organizations must implement a Software Bill of Materials (SBOM). An SBOM acts as an automated "ingredient list" for software, detailing every component, version, and vendor used. By analyzing these reports on every build, development teams can instantly identify and reject code containing compromised or outdated dependencies, ensuring both security and regulatory compliance.
A critical component of modern security is the concept of "shifting left," which means integrating security checks as early as possible in the development process. Implementing DevSecOps ensures that security is a shared responsibility across every phase of the SDLC. For example, using pre-commit hooks can automatically strip out secrets or personal data before code is ever committed to a repository. Finding and remediating vulnerabilities during development is significantly less costly than addressing them after an application has reached production.
As attackers increasingly use AI for sophisticated maneuvers like deepfakes and voice cloning, defenders must adopt Defensive AI to fight back. This involves using AI-driven tools to analyze traffic patterns for suspicious activity and implementing advanced liveness detection. Traditional biometrics, such as blinking an eye, can now be deepfaked; therefore, modern apps may need to monitor human behavioral gestures( such as how a user uniquely holds their device) to ensure identity.
Ultimately, robust technology must be supported by a strong organizational culture. Security is not the task of a single team but the responsibility of every individual in the company. Organizations should foster a "no-blame" environment where security issues can be reported and addressed proactively without fear of retribution. Furthermore, companies should track meaningful metrics, such as "time to remediation," rather than vanity metrics like lines of code, to ensure that vulnerabilities are addressed with the necessary urgency.
Building this foundation can be managed through a structured 30-60-90 day plan, starting with establishing baseline security foundations and gradually moving toward fully automated security pipelines. Security is an ongoing journey, not a final destination, requiring constant adaptation to stay ahead of an ever-changing threat landscape.
Thank you Majid Hajian for your insightful presentation on best practices for app security. Your discussion on shifting the security mindset towards continuous verification and the importance of a "security above all" culture was especially impactful. We appreciate you sharing your expertise and strategies like Zero Trust and DevSecOps with the community.
Handle App Security with a Single Solution! Check Out Talsec's Premium Offer & Plan Comparison!
Compounding this shift is a persistent "engineering bias"—a tendency for developers to focus on solvable, predictive technical problems rather than the messy, unpredictable reality of human behavior. Despite sophisticated systems, statistics show that the majority of security breaches are still caused by human error.
Security vs. Safety: A Subjective Divide
One of the most critical distinctions raised is the difference between objective security and the subjective feeling of safety.
Objective Security: The technical, often mathematical, measures taken to protect a system.
Subjective Safety: An individual's personal perception and feeling of being secure.
Yakymchuk argues that for a security product to provide true value, it must serve as a precondition for this feeling of safety. When a system becomes too restrictive or surveillance-heavy in the name of security, it can lead to "overkill," causing users to abandon the service or find insecure workarounds, such as writing passwords on paper.
The Digital Social Contract
The balance between freedom and security is an age-old concept often defined by a "social contract". In the physical world, citizens may trade certain rights to a government in exchange for protection.
In the digital world, however, this contract is often fragmented and opaque. Users "sign" individual contracts with every service they use, frequently without reading the lengthy terms and conditions. Recent silent updates to terms regarding AI training on platforms like LinkedIn highlight the lack of transparency in how these digital contracts are managed.
Building for a "Safe" Future
For companies like Talsec, the goal is to move beyond being a mere "cost line in a budget" to becoming a "safe choice" for CTOs and developers. Achieving this requires a deeper understanding of what truly provides users with a sense of safety in a world of diverse digital "fortresses"—from the rigid ecosystem of the "iOS Kingdom" to the more varied "Android Union".
Ultimately, the cybersecurity industry must ask: are we solving the right problem? By centering the human experience and the subjective need for safety, developers and architects can begin to bridge the gap between technical resilience and user trust.
Handle App Security with a Single Solution! Check Out Talsec's Premium Offer & Plan Comparison!
Link to Kibana (green magnifying glass)
We’ve added a direct link to your Kibana instance, allowing you to jump straight to the relevant logs and investigate anomalies without searching manually.
We’ve also made several smaller improvements to smooth out everyday usage:
Introduced a stepper flow when creating a new MagicFile
Fixed a number of bugs
Not using Talsec Portal with your Talsec RASP yet? Try it now here.
Better Visibility: Older OS Versions Included
Direct Access to Kibana
Extended versions filters
UX Improvements and Fixes
Emulators: Running the app in BlueStacks or Nox and using OBS VirtualCam to map a PC video feed as the "phone camera".
Automation: Using the Appium framework to script the entire KYC process, often utilizing plugins that instrument the app to inject images.
Because these tools require specific "illegal" environments to function, Talsec’s core features act as a multi-layered filter that stops the injection before the camera even opens.
Threat Vector
Talsec Relevant Feature
Why it Works
LSPosed with VCAM Module
Root & Hook Detection
VCAM requires a rooted device (Magisk) and an active hooking framework (LSPosed/Frida) to function. Talsec can kill the session the moment it sees these artifacts.
Emulators (BlueStacks) (+ OBS)
Emulator Detection
*This information can be securely evaluated on the customer backend endpoint if Talsec AppiCrypt is used as well for enhanced security
Mobile applications are under constant attack. From runtime hooking and reverse engineering to bypassing security controls, attackers continue to evolve their techniques faster than many development teams can react. One of the most powerful tools in this landscape is Frida - a dynamic instrumentation toolkit widely used by both security researchers and malicious actors.
In this deep-dive session, Akshit Singh explores how FRIDA works in practice, how attackers use it to manipulate mobile applications at runtime, and what developers and security engineers can do to defend against these techniques.
If you are an Android developer, mobile security engineer, penetration tester, reverse engineer, or simply curious about modern application security, this session delivers practical insights that go far beyond theory.
Why Frida Matters in Mobile Security
Frida has become one of the most important tools in the mobile hacking ecosystem. It allows attackers and researchers to dynamically inspect, modify, and hook into application behavior without recompiling the app.
That means attackers can:
Bypass root and jailbreak detection
Disable SSL pinning
Hook sensitive methods at runtime
Intercept API calls and secrets
For mobile developers, understanding Frida is no longer optional.
The presentation focuses on the intersection of offensive and defensive mobile security.
Viewers can expect practical demonstrations, technical explanations, and security insights covering topics such as:
Learn how runtime instrumentation works and why it is so effective against mobile applications. The session breaks down the fundamentals behind dynamic analysis and demonstrates how attackers can alter application behavior while the app is running.
The session explores common attack paths used by reverse engineers and mobile hackers, including:
Function hooking
Runtime method replacement
Data interception
Certificate pinning bypasses
These examples help developers understand how seemingly secure implementations can still be vulnerable during runtime.
Security is not just about preventing static reverse engineering. Modern mobile defense requires runtime protection.
The session discusses techniques for:
Detecting hooking frameworks
Recognizing tampered environments
Protecting sensitive runtime logic
Hardening Android applications
One of the strongest aspects of this session is its practical mindset. Instead of focusing purely on exploitation, it encourages developers to think like attackers in order to build more resilient applications.
Understanding offensive tooling is one of the fastest ways to improve defensive architecture.
Mobile applications increasingly handle:
Banking operations
Authentication flows
Cryptographic operations
Identity verification
At the same time, attackers are becoming more sophisticated.
Static obfuscation alone is no longer enough. Runtime attacks using tools like allow attackers to inspect and manipulate applications while they are executing.
Understanding the mechanics of runtime instrumentation helps teams move beyond checkbox security and toward real mobile resilience.
TechTalk: Predictive Apps Protection with Sergiy Yakymchuk (Talsec)
The Talsec Mobile App Security Conference in Prague was a two-day, invite-only event on fraud, malware, and API abuse in modern mobile apps, held at Chateau St. Havel on November 3–4, 2025, and hosted by Talsec, freeRASP, and partners. It brought together leading experts and practitioners to strengthen the mobile AppSec community, connect engineers with attackers and defenders, and share practical techniques for high‑stakes sectors like banking, fintech, and e‑government.
In a recent presentation, Sergiy Yakymchuk, CEO of Talsec, discussed the evolution of mobile application security, moving beyond simple detection toward a framework of predictive safety. He outlined three essential pillars that form the foundation of a "safe choice" for vendors and end users alike: collective defense, predictability, and user awareness.
1. Collective Defense: The "Forest Metaphor"
Safety is fundamentally intuitive; humans feel more secure when facing a common enemy together. Effective digital defense is like a forest where trees communicate threats via a fungal network. When one part of the forest is attacked by pests or disease, other trees receive messages and generate protective chemicals.
Talsec applies this principle through a community-driven model:
Vulnerability Sharing: Feedback from one user regarding a system vulnerability helps improve the platform for all.
Data-Driven Improvements: Using data from community versions of tools, such as free RASP (Runtime Application Self-Protection), the system can identify false positives and conflicts with new OS updates across various devices.
Structured Responsibility: Despite being a collective effort, there must be clear boundaries and mechanisms to define who is responsible for data and specific actions in various scenarios.
The ability to predict potential threats is a precondition for safety. In the context of business applications, this means delivering features that can anticipate anomalies and calculate risk scores before a transaction is completed.
Technological solutions supporting this include:
AppCrypt: An SDK-based technology that creates a "cryptographical snapshot" of a device's security state. This cryptogram is verified on the backend in real-time to detect threats like debuggers or simulators.
Device State API: A newer API-driven approach that allows businesses to check a device's security state at any time, independent of whether the user is currently using the app.
Contextual Risk Scoring: Moving beyond simple integrity checks, Talsec is developing systems that consider contextual data, such as transaction amounts, recipient information, and location history to identify anomalies.
The final pillar is awareness, ensuring that users and organizations have the information they need to defend themselves.
Global Benchmarking: Talsec provides global statistics on threats, such as the prevalence of rooted devices, cloned apps, and integrity problems across different countries, allowing CTOs and CISOs to make informed decisions.
AI-Enhanced Communication: Talsec is utilizing AI to translate technical signals (e.g., "device is in developer mode") into human-understandable language. This allows the platform to explain why a specific device state is risky and provide tailored advice based on the user's profile or culture.
An example use case involves blocking sensitive entry fields, such as credit card numbers, until a device security check is passed. If a high risk is detected—such as an SMS forwarder app that could steal an OTP—the user is informed through an AI-generated summary of exactly what they need to do to secure their device and proceed safely.
By combining these three pillars, organizations can move toward a more resilient and transparent security model that protects both the business and the end user.
Sideloading
The Talsec SDK evaluates an application's source to verify whether it was delivered through a trusted, official channel or sideloaded. Because Android and iOS handle app distribution fundamentally differently, the SDK utilizes platform-specific detection mechanisms.
What is Sideloading
In the context of Talsec threat evaluation, sideloading refers to any application installation that bypasses a trusted, official store.
Android: Encompasses APKs launched manually via file managers, browsers, or chat applications; installations pushed via ADB commands (adb install); emulator drag-and-drop; and third-party unofficial repositories.
iOS: Encompasses applications installed via Xcode, AltStore, Enterprise MDM distribution, or any external tool that modifies the binary or its provisioning profile outside of the official Apple ecosystem.
The Talsec SDK encounters four distinct categories when evaluating installation sources, each with different trust implications.
Apps bundled with the Android OS image itself and installed by the OS vendor. They are present before first boot, cannot be uninstalled without root access, and typically report no installer.
Applications bundled by the device manufacturer on top of the base OS—the OEM's extras (sometimes referred to as "bloatware")—are similar to system apps. They arrive out of the box and typically have no installer attribution. The distinction matters because a single OEM preload can serve multiple roles: the Samsung Galaxy Store and Xiaomi GetApps are both OEM preloads and official stores simultaneously.
These are applications delivered through a dedicated store client running on the device. The store client is the initiating package, and the Talsec SDK identifies it as the installer.
This domain is evaluated from two distinct perspectives:
RASP: Validates the store origin of your ownprotectedapp.
Malware Detection: Evaluates the store origin of every other app residing on the user's device.
The core classification logic is identical; only the subject differs. In both modules, whether an application is considered officially delivered or triggers a detection is entirely dictated by your trusted source configuration.
These are applications installed outside the official store flow. In these cases, the OS attributes the installation to the installer package — the app that performed the install, typically a browser, messenger, file manager, or migration tool (e.g., Chrome, Telegram, Smart Switch).
Talsec's Commitment to Comprehensive Security
While Talsec doesn't directly provide control-flow obfuscation for the main application code due to the aforementioned complexities, we are committed to offering our partners a holistic security solution.
We can recommend and facilitate integration with reliable third-party tools that specialize in obfuscation enabling you to effectively protect your most critical algorithms without compromising the stability and maintainability of your primary application code.
Talsec Obfuscation Solutions
Obfuscation Method & Protection
Advantages
Examples of Protected Assets
Platform-Specific Keywords or Settings (Android, iOS, Flutter)
Talsec Solution
Keynote: Communty-Driven Security as Collective Defense with Tomáš Soukal (Talsec)
The Talsec Mobile App Security Conference in Prague was a two-day, invite-only event on fraud, malware, and API abuse in modern mobile apps, held at Chateau St. Havel on November 3–4, 2025, and hosted by Talsec, freeRASP, and partners. It brought together leading experts and practitioners to strengthen the mobile AppSec community, connect engineers with attackers and defenders, and share practical techniques for high‑stakes sectors like banking, fintech, and e‑government.
Tomáš Soukal (Talsec) delivered a keynote addressing how Talsec operates as a "community-based company" where security is "community-driven". Talsec currently protects thousands of applications running on almost two billion devices. The core of this approach is recognizing that the company's community includes both adopters (developers and users) and adversaries (attackers and penetration testers)
The Value of the Two Communities
Both communities, the adopters and the adversaries, play critical roles in improving the Talsec SDK.
Adopters
Developers and users who adopt the SDK provide essential feedback by asking questions, opening GitHub issues, submitting tickets, and testing the software. This community effectively acts as a global QA team, running the SDK on unusual devices and under extreme scenarios. Their input generates hundreds of issues and discussions across platforms, offering a scale of testing impossible to achieve internally.
Adversaries
Attackers contribute by performing penetration tests, identifying vulnerabilities in the free RASP product, breaking into the SDK, and publishing write-ups on platforms like Frida CodeShare. These public exploits serve as a valuable learning resource, enabling Talsec to rapidly develop fixes and strengthen the product. For example, the RASP 17 release incorporated dozens of updates addressing community-reported bugs, requested enhancements, and bypasses discovered by adversaries.
Talsec faces significant security challenges due to device diversity and platform fragmentation.
Fragmentation
Numerous Android and iOS versions complicate efforts to keep up with evolving threats, hacking methods, and new tools.
Compatibility
The SDK must remain compatible with modern build tools across native Android, iOS, Flutter, React Native, Capacitor, Cordova, and gaming platforms such as Unity and Unreal Engine.
Edge Cases
The SDK must handle uncommon scenarios, including pre-rooted devices, TV boxes, payment kiosks, and Raspberry Pi devices running Android. Budget devices often exhibit non-standard behavior, resulting in issues such as key store race conditions or media DRM differences.
Community contributions are essential for broad coverage and actionable feedback. Fixes and enhancements applied for one developer benefit all users, creating a “one-to-many-to-one” feedback loop that supports the development of one of the most widely used RASP solutions.
Talsec uses a feature testing system within the free RASP product, operating in ignore mode so that application verdicts remain unaffected. This system allows testing of new ideas in the field, including free malware detection intelligence, with public participation.
The company also contributes back to the community through:
Knowledge Sharing: Publishing articles and sharing mobile security expertise through an authorship program.
Structured Contributions: Supporting projects such as the OWASP Mobile Application Standard, including a recent article on rooting.
Talsec Portal: Providing a platform where users can view data, statistics, trends, and the global state of mobile security, enabling the community to benefit from accumulated knowledge.
Key technical aspects of RASP include:
Attackers and Privileges: RASP operates at runtime, monitoring the application while it runs. On devices with elevated privileges, such as rooted devices, RASP detects remnants of rooting frameworks, leftover files, and other artifacts.
App Review Process: While Google Play’s review process is partially automated, RASP checks for emulators without affecting the SDK’s high success rate (99.999…%). The SDK does not require or store dangerous permissions.
Free vs. Commercial RASP: Free RASP is designed to provide maximum security within technological limitations. RASP Plus offers enhanced protection, including high-level bypass mitigation for UI callbacks, which require additional build process modifications.
Talsec primarily serves clients in fintech, banking, and health tech, with additional clients in e-government, gaming, and industrial sectors.
How Hook Detection Works
Hook detection mechanisms can differ between Android and iOS due to the differences in their operating systems. Below, we break down how hook detection typically works on each platform.
For Android
On Android, hooking often relies on tools that inject code into apps or modify the Android runtime (often requiring root access). Thus, Android apps employ a variety of methods to detect such interference:
Checking for Hooking Frameworks: The app can programmatically look for signs of popular hooking frameworks like Frida or Xposed. For instance, it might scan running processes and loaded libraries for names associated with Frida (such as a process listening on Frida’s default port, or the presence of libfrida libraries in memory). Similarly, it might try to detect Xposed by searching for known Xposed classes (like de.robv.android.xposed.XposedBridge) or files that the Xposed framework leaves on the system. If any of these indicators are found, the app concludes a hook might be present.
Runtime Integrity Checks: The app can perform self-checks on its code at runtime. This could involve verifying checksums or hashes of critical code segments to ensure they haven’t been modified in memory. If a hooking tool has patched or overwritten some instructions (as hooks often do), these integrity checks might catch the unexpected changes
Anti-Debugging Measures: Many hooking tools use debugging techniques under the hood (they attach to the app process similarly to how a debugger would). To counter this, apps implement anti-debugging. Techniques include detecting if the process is being debugged (using system calls like ptrace on Android), or if suspicious system flags are set that indicate an attachment. If the app notices it’s under a debugger or instrumentation when it shouldn’t be, it can assume a hooking attempt (since Frida often uses a JDWP debugger or ptrace mechanism). Some apps even deliberately perform slight “delays” or check execution timing, since a hooked environment may respond slightly slower due to the instrumentation.
Environment and Device Checks: A lot of hooking on Android requires root access. So apps often integrate root detection as part of hook detection. They check for root indicators (presence of su binary, known root app packages, modified system paths). Additionally, they check if the app is running in unusual environments: for example, inside an emulator or a virtual space (there are tools that allow hooking without root by running the app in a modified virtual environment). If the app detects it’s in an emulator or sees signs of frameworks like VirtualXposed (which allows Xposed modules without root), it can raise a red flag. Google’s SafetyNet/Play Integrity API results can also inform this – if the device fails integrity checks, the app may suspect that hooking tools could be active and be extra vigilant.
Monitoring System Calls and APIs: Advanced implementations may monitor certain sensitive API calls that hooking tools use. For example, on Android, a hooking tool might use the ptrace system call to attach to the app, or it may call functions to load custom libraries. An app can attempt to detect if those actions occur during its runtime. While an app can’t easily block these low-level calls (without OS support), noticing them can be a sign of intrusion.
Once any of these methods detects something fishy, the app can take action. Common responses on Android include: immediately closing the app (to prevent further tampering), logging the event (for analytics or forensic purposes), or disabling sensitive features (e.g. not allowing login or transactions if hooking is detected). Some security-conscious apps display a warning like “Untrusted environment detected” and exit, which is a direct result of these checks.
On iOS, hooking is less common in non-jailbroken devices due to Apple’s strict app sandbox and code signing requirements. However, in jailbroken devices (where a user has removed iOS restrictions), hooking becomes possible using tools like Cydia Substrate or Frida. Therefore, iOS hook detection often starts with jailbreak detection and then goes into deeper checks:
Jailbreak Detection: Since an iOS app normally shouldn’t be able to have new code injected at runtime (unless the device is jailbroken), the first step is checking if the device is compromised. The app checks for signs like the existence of Cydia (the jailbreak app store), the ability to write to areas of the filesystem that should be protected, or the presence of known jailbreak files and processes. If the device is jailbroken, the app assumes the security model is broken and hooking is possible, and may choose to not run or run in a restricted mode.
Detecting Injected Libraries: iOS hooking frameworks (like Substrate or Frida’s Gadget) work by injecting dynamic libraries (dylibs) into apps. An app can programmatically list the dynamic libraries loaded in its process (using APIs like dyld functions). If it finds a library that is not part of iOS or the app itself, that’s a big warning sign. For example, if something like FridaGadget.dylib or any library residing in ‘ /Library/MobileSubstrate/ ‘ is loaded, the app is likely hooked. Apps can maintain a list of expected module names and paths, and flag any anomalies.
In practice, iOS relies heavily on the assumption that if the device isn’t jailbroken, hooking is nearly impossible. So many iOS apps simply don’t worry about hooking beyond jailbreak detection. But for high-security apps that must even consider malicious insiders with jailbroken devices, the above measures add extra layers of defense. If a hook is detected, iOS apps often react similarly to Android ones: shut down or disable functionality. For instance, some banking apps on iOS will instantly close if they sense any jailbreak/hook to protect the user’s account.
Challenges in Root Detection - Magisk Hide, Zygisk, Shamiko, Play Integrity Fix
Detecting root access in Android is notoriously difficult due to evolving root hiders.
Magisk Hide, MagiskHidePropsConf, Zygisk, Shamiko
The evolution of anti-root-detection tools on Android has been marked by continuous innovation to evade increasingly sophisticated detection mechanisms. Early efforts like Magisk introduced systemless root access and Magisk Hide + Zygisk, which allowed selective hiding of root from specific apps. MagiskHidePropsConf further enhanced evasion by modifying device properties such as build fingerprints to mimic unrooted devices, with its changelog on GitHub showing iterative updates improving compatibility and stealth. The LSPosed framework and its Shamiko module represent a newer generation of root hiding, leveraging advanced hooking techniques to mask root indicators more effectively on modern Android versions, as reflected in LSPosed’s GitHub release history.
The Age of PlayIntegrityFix Bypass
With the deprecation of Google’s SafetyNet Attestation API and the introduction of the Play Integrity API, root hiding tools faced new challenges. The Play Integrity API enforces hardware-backed device verification, making bypassing root detection more difficult without compromising the device’s Trusted Execution Environment (TEE). To address this, the Play Integrity Fix module, released in October 2023, emerged as a specialized solution to pass Play Integrity and SafetyNet verdicts by ensuring valid attestation without directly hiding root. It requires root and Zygisk-enabled environments (such as Magisk with Zygisk) and helps certify the device for Play Integrity tests, although it does not aim to hide root from other apps. This module is frequently updated to maintain compatibility with evolving Google attestation methods and device blacklists.
Together, these tools illustrate the ongoing cat-and-mouse dynamic in Android root detection and evasion. While MagiskHide and Shamiko focus on concealing root status from apps, Play Integrity Fix targets the newer Play Integrity API attestation to maintain device certification. Complementary modules like PlayIntegrityNEXT automate fingerprint updates to sustain passing attestation over time. This layered approach reflects the complexity of modern root hiding, where developers continuously adapt to Google's evolving security frameworks to preserve rooted device usability without detection.
Advanced Root Cloaking: some tools can mask the presence of common rooting artifacts (e.g., the su binary, superuser APKs). This enables a device to appear “unrooted” even when it isn’t.
Dynamic Hooking: Attackers may modify the runtime behavior of root detection methods using tools like Frida, effectively intercepting or falsifying the output of these checks.
Ambiguous Indicators: Many detection methods rely on indicators like “test-keys” in the build properties or the presence of files such as Superuser.apk. However, these indicators can sometimes be present on non-rooted or development devices, leading to false positives.
Inconsistent Results: Due to the variability of rooting methods and custom ROMs, the same detection method may work on one device but fail on another.
OS and Vendor Modifications: Some manufacturers or custom ROM developers change system configurations or file structures, which can interfere with root detection heuristics
Restricted System Access: Applications operate in a sandbox, limiting their access to system-level information. This restriction is designed to protect privacy and security but also makes it harder to collect comprehensive data needed to confirm root status.
Continuous evolve race: As security measures improve, rooting tools evolve simultaneously to bypass these measures. This dynamic environment forces developers to continuously update their detection libraries to cover new bypass techniques.
User Impact: Some users intentionally root their devices for legitimate reasons (customization, performance tweaking, etc.). Overly aggressive detection may block these users or degrade their experience, while too lenient a policy might let malicious apps bypass security checks.
App Size: Integrating and updating multiple root detection methods (or libraries) to keep up with the latest evasion tactics can increase the APK size and maintenance complexity.
Talsec RASP+ and AppiCrypt for Apple TV Apps
Talsec SDK brings advanced protection already available on iOS or Android to Apple TV apps, helping streaming providers and TV app makers keep premium content, user accounts, and revenues safe across the entire Apple TV experience.
Talsec is bringing its premium Runtime Application Self-Protection (RASP) SDK to Apple TV, enabling developers to secure apps running in the Apple TV app ecosystem where users access Apple Originals, live sports, premium channels, and thousands of transactional titles in one place. Talsec ensures that your app stays protected from emerging big‑screen threats. The SDK covers key threat vectors such as debugging and runtime tampering, jailbroken or simulated environments, app integrity and distribution abuse.
Why Apple TV apps need protection
Apple TV apps operate in a high-value environment that concentrates premium content, subscription entitlements, and transactional workflows into a single execution surface. This makes them a prime target for attacks such as debugging, runtime manipulation, and signature bypassing aimed at disabling in-app controls, extracting credentials, or unlocking paid content.
In addition to runtime attacks, Apple TV apps are frequently targeted by geo-evasion techniques. VPNs, Smart DNS services, and location spoofing are commonly used to bypass territorial content licensing restrictions, access unavailable regional catalogs, or exploit regional pricing differences. For streaming providers operating under strict country-based licensing agreements, this creates direct compliance risks, revenue leakage, and potential contractual violations.
Jailbroken or simulated devices, unofficial distribution channels, altered device identities, and anonymized network environments further enable large-scale piracy, account sharing abuse, and entitlement fraud.
By employing Talsec’s security, you can safely monetize:
Subscription and channel access, including add-on services and family sharing
Transactional libraries for buy or rent content
Live sports packages, ad-funded experiences, and hybrid business models across devices and living-room screens
Talsec’s RASP for Apple TV delivers proven benefits for media creators, including content protection against piracy, user and account security to prevent takeovers, revenue protection for subscriptions and ad impressions, licensing compliance, and brand reputation.
Talsec embeds self-defense directly into the app, enabling real-time detection and reaction to attacks on tvOS devices. Device integrity checks identify compromised or simulated environments, while runtime protections prevent debugging, tampering, and unauthorized modification.
Talsec also detects VPN usage, anonymization services, and network manipulation techniques at runtime, allowing Apple TV apps to enforce territorial licensing rules before entitlement validation or playback begins.
API integrity via AppiCrypt secures communication between Apple TV apps and backend services, ensuring that only genuine, untampered clients operating in compliant environments can access APIs and request sensitive operations.
Managing a multi-DRM strategy with Apple FairPlay Streaming often creates a significant OPEX burden. The requirement to maintain a rigid Key Security Module (KSM) and pay recurring license delivery fees to third-party DRM vendors drains engineering and operational resources.
Traditional Digital Rights Management has critical blind spots. While it ensures HDCP compliance for video output, it remains blind to the device’s runtime health, network context, and location integrity. It often fails to prevent stream ripping on jailbroken Apple TVs or misuse via VPN-enabled cross-border access. Encryption protects the data pipe but does not validate the secure playback environment, leaving premium content vulnerable.
Talsec Runtime Application Self-Protection (RASP) improves OTT security by blocking insecure or non-compliant devices before they trigger costly DRM license issuance. By preventing playback on jailbroken devices, compromised runtimes, or unauthorized geographic locations, Talsec reduces DRM license waste and strengthens anti-piracy enforcement without the heavy integration overhead of standalone FairPlay deployments.
For streaming services, sports leagues, broadcasters, and aggregators building for Apple TV, Talsec helps protect high-margin content, enforce licensing compliance, and control operational costs by preventing incidents rather than reacting to them.
TechTalk: Threshold Cryptography with Jan Kvapil (MUNI)
The Mobile App Security Conference in Prague was a two-day, invite-only event on fraud, malware, and API abuse in modern mobile apps, held at Chateau St. Havel on November 3–4, 2025, and hosted by Talsec, freeRASP, and partners. It brought together leading experts and practitioners to strengthen the mobile AppSec community, connect engineers with attackers and defenders, and share practical techniques for high‑stakes sectors like banking, fintech, and e‑government.
Jan Kvapil delivered a keynote on threshold cryptography, presenting it as an orthogonal defense mechanism against single-point-of-failure attacks, particularly in high-security applications like mobile banking.
Many mobile banking applications rely on a single private key stored on a user’s device to represent digital identity and authorize transactions. The backend verifies each transaction by validating a digital signature generated using this key.
This model fails when an attacker compromises the device. If advanced malware or a zero-day exploit bypasses all defenses—including RASP, anti-malware protections, and even hardware-backed key storage—the attacker gains access to the private key. With that key, fraudulent transactions can be digitally signed in a way that appears fully legitimate to the backend. The risk escalates further if the attacker exfiltrates the key, enabling continued abuse even after the device is secured or replaced.
Achieving Cloudflare Outage Resilience using AppiCryptWeb
Cryptographic Runtime Attestation for Web Applications.
When the November 18, 2025, Cloudflare outage took down parts of the internet, many teams realized that a single vendor controlled both their content delivery and critical API security. If you are looking for a Cloudflare alternative or a way to harden your stack after “Cloudflare down” incident, the strategic move is to decouple your CDN from API and bot protection, rather than simply swapping one edge provider for another.
shows the outage was triggered by a bot-management configuration file that suddenly doubled in size, exceeded limits, and caused core proxy software to fail for traffic that depended on that module. Because this bot-management logic is embedded in the same global proxy that delivers websites and APIs, a single latent bug propagated to edge servers worldwide and resulted in HTTP 5xx errors for many customers at once.
High-profile services like X, ChatGPT, Shopify, and several transit and financial platforms were reported as partially or fully unavailable during the incident, even though many of their origin servers were fine. For anyone running revenue-critical APIs, this is a painful reminder that and being tightly coupled with effectively turns one vendor into a systemic single point of failure.
How to Detect a Weak Wi-Fi: Guide to In-App Network Security Checks
In today's interconnected world, the security of user data is paramount. For mobile applications, this responsibility extends beyond the app itself to the environment it operates in—including the Wi-Fi network the device is connected to. A connection to an access point (AP) employing outdated or compromised security protocols can expose users to significant risks, such as data interception and man-in-the-middle attacks.
This article details a pragmatic, "one-size-fits-all" approach for Android developers to identify weakly secured Wi-Fi connections. We aim to balance robust detection with a user experience that avoids unnecessary alarm for networks that, while perhaps not bleeding-edge, are still adequately secure for general use.
The core challenge lies in creating a consistent definition of a "weak" Wi-Fi network that can be applied across different Android versions, which offer varying APIs for network inspection. Our "one-size-fits-all" rule focuses on flagging protocols that are unambiguously compromised or offer no real protection.
To implement this, we establish a blacklist of security configurations that should trigger a warning:
Deconstructing Obfuscation: Three Key Types
The concept of obfuscation can be broadly categorized into three distinct types, each targeting different aspects of the application's code:
This type of obfuscation focuses on renaming the classes, interfaces, methods, and fields within the application's code to meaningless and often short identifiers. Instead of descriptive names like UserManager, authenticateUser, or userPassword, these elements might be renamed to something like a, b, or c.
Future-Proofing for the Data-Driven Ecosystem: Securing Your Application and Data APIs
Focus on businesses leveraging ad-supported and affiliate business models.
If your business runs on data and advertising, an invisible enemy is draining your profits right now. Without advanced API and app protection, you are paying to support bots that plunder your cloud resources while app clonesandscrapers devalue the data you sell to advertisers. Every fake click and fraudulent request cuts directly into your margins, distorting your metrics and undermining the platform integrity required for scaling your business.
Here is a clear look at how a comprehensive security service, like , can directly benefit your app and data APIs, ensuring a fair, secure, and profitable ecosystem. Talsec offers more than just "app shielding." We provide the commercial-grade security infrastructure needed to clean up your advertising ecosystem, enable advanced fintech integrations, and ensure your data remains the gold standard for partners worldwide.
Security is more than just a defense—it's a key enabler for financial and data strategies.
Obfuscation
Explore what obfuscation is, how different obfuscation methods protect mobile apps, and how Talsec’s pragmatic approach balances security, performance, and developer experience.
This article will delve into the concept of obfuscation, explore its different types, and articulate 's philosophy on its application. We believe in a balanced and pragmatic approach, prioritizing the most developer experience, app performance, exploitability of attack techniques while minimizing potential drawbacks and considering cost efficiency, to ensure both security and the smooth business operation of your mobile applications.
freeRASP for Unreal Engine: Secure Your Revenue
Shield your Unreal Engine mobile game with freeRASP, a free and developer-friendly runtime application self-protection solution for Android and iOS.
In today’s competitive mobile market, creating a stunning game with Unreal Engine is only half the battle. Protecting your creation is just as critical - it’s about safeguarding your revenue, preserving player trust, and ensuring a fair and competitive environment. For every developer, from solo indie to established AAA studio, runtime threats like app tampering, emulators, debuggers, and modified clients are significant dangers that can compromise your game’s integrity and impact your revenue:
Revenue Threats
Piracy: unauthorized distribution of paid apps for free
freeRASP for Kotlin Multiplaform Guide
A Kotlin Multiplatform (KMP) variant that lets you add runtime app protection to your shared Kotlin code.
Today, freeRASP is getting a new family member: a Kotlin Multiplatform (KMP) variant that lets you add runtime app protection to your shared Kotlin code and ship secure apps to both Android and iOS from a single codebase. Teams using KMP can now reuse the same security logic alongside business logic, without duplicating integrations or maintaining separate SDK wiring per platform.
freeRASP itself is a lightweight mobile security library designed to detect common runtime threats such as rooting, jailbreaking, repackaging, reverse engineering, and emulator abuse. It connects to the Talsec Portal, providing real-time analytics and detailed security reports on detected risks. With the freeRASP for KMP variant, these protections are seamlessly integrated directly into the shared Kotlin module via a unified common API. This API intelligently abstracts over native Talsec components to execute platform-appropriate, low-level security checks.
The KMP variant is specifically designed for typical mobile KMP setups that target both Android and iOS. It utilizes the standard hierarchical source set structure (commonMain, androidMain, iosMain). This approach ensures that security logic is co-located efficiently with shared business logic while still allowing for necessary platform-specific configuration and customization when required.
The KMP variant brings the same core detection categories that developers know from existing freeRASP integrations:
Keynote: 20 Minutes to Banking-Grade Security with Mateusz Wojtczak (LeanCode)
The Mobile App Security Conference in Prague was a two-day, invite-only event on fraud, malware, and API abuse in modern mobile apps, held at Chateau St. Havel on November 3–4, 2025, and hosted by Talsec, freeRASP, and partners. It brought together leading experts and practitioners to strengthen the mobile AppSec community, connect engineers with attackers and defenders, and share practical techniques for high‑stakes sectors like banking, fintech, and e‑government.
Mateusz Wojtczak, Head of the Flutter department at , delivered a keynote sharing the company's experience and developer-centric perspective on using Flutter in highly regulated and secure environments, such as banking and fintech. LeanCode is a leading software house in the "Flutter bubble" and a member of the Polish Banking Association, involved in building large-scale Flutter apps, including banking and fintech applications.
There is prevailing skepticism that cross-platform technology is "implicitly much less trusted" compared to native development. When working with clients, consultants, or performing code audits, LeanCode frequently encounters objections such as, "Flutter is not native, so Flutter is not secure."
This misconception stems from misunderstanding what Flutter actually is. Flutter is an open-source framework for building "beautiful natively compiled multiplatform apps from a single codebase." A Flutter app is not a "glorified web view" or interpreted JavaScript code. Instead, it compiles Dart code into machine code, producing an Android app in Kotlin or an iOS app in Swift.
Keynote: Raising the Bar with Software Protection with Béatrice Creusillet (Quarkslab)
The Mobile App Security Conference in Prague was a two-day, invite-only event on fraud, malware, and API abuse in modern mobile apps, held at Chateau St. Havel on November 3–4, 2025, and hosted by Talsec, freeRASP, and partners. It brought together leading experts and practitioners to strengthen the mobile AppSec community, connect engineers with attackers and defenders, and share practical techniques for high‑stakes sectors like banking, fintech, and e‑government.
Béatrice Creusillet, the R&D lead for the product division at Quarkslab, delivered a keynote on the critical need for software protection, illustrating her points with a real-world hacking story involving an electric vehicle (EV) charger. While absolute protection is impossible, layering defense mechanisms like obfuscation and integrity checks drastically raises the cost and expertise required for successful attacks.
The presentation began with a story of three Quarkslab engineers participating in the Pwn2Own bug bounty competition. Target was a "Hotel Maxi Charger AC wallbox," an electric vehicle supply equipment (EVSE) or charger used for residential and commercial purposes.
The device is highly connected and supports USB, Ethernet, Bluetooth, Wi-Fi, and NFC communication. It is managed through a companion Android application that interfaces with both the charger and the vendor’s cloud infrastructure. The presentation examines how limited software protections significantly reduced the cost and complexity of the attack.
Keynote: Discovering the Power of AI Pentesting with Pedro Conde (Ethiack)
The Mobile App Security Conference in Prague was a two-day, invite-only event on fraud, malware, and API abuse in modern mobile apps, held at Chateau St. Havel on November 3–4, 2025, and hosted by Talsec, freeRASP, and partners. It brought together leading experts and practitioners to strengthen the mobile AppSec community, connect engineers with attackers and defenders, and share practical techniques for high‑stakes sectors like banking, fintech, and e‑government.
Pedro Conde, an AI Scientist at Ethiack specializing in autonomous ethical hacking, delivered a compelling presentation on the power of AI pentesting, outlining three key objectives: to demystify AI pentesting, to demonstrate the current capabilities of these systems, and to emphasize that AI systems are already very capable and "different from human beings".
Conde provided a historical context for the rise of AI pentesting, noting the progression from classical machine learning to deep learning, then to Large Language Models (LLMs), and finally to Agentic AI, which is the category AI pentesting systems fall into. Agentic AI systems often utilize LLMs as a base but possess the ability to interact with the environment, extending beyond simple reasoning, predictions, and generation. These fully autonomous ethical hacking systems, which Ethiack calls "hackbots," can perform a complete pen-testing session, including finding vulnerabilities, without human intervention.
This autonomy offers advantages such as continuous 24/7 testing, high scalability through parallelization, and the ability to dynamically adapt to targets.
How to Detect Hooking (Frida) on Flutter
Protect your Flutter app from runtime attacks like Frida and Xposed with smart detection.
Imagine your app's security is a locked vault. What if an attacker could pick the lock and alter its contents while it's actively being used? That, in essence, is what a hooking attack does. This runtime threat is particularly dangerous for Flutter apps, but you can defend against it effectively.
Hooking is a technique where attackers use tools like “intercept” and modify your app's normal operations as they happen. Think of it like a spy intercepting a mail carrier, reading a sensitive message, and even changing it before it's delivered.
This gives attackers the power to:
Disable security measures, such as license checks or in-app purchase validations.
Root Detection Best Practices for Developers
For a developer, to effectively implement root detection in your applications, consider the following best practices:
Multi-layered detection: Use several detection techniques together to reduce false positives. Combine file system checks, binary analysis, and behavioral monitoring.
Keep Detection Methods Current: The rooting landscape continually evolves — new rooting methods and hiding techniques emerge (e.g., the shift from SuperSU to Magisk, Magisk’s DenyList replacing MagiskHide, etc.), so, Design your security process to accommodate updates to your root detection. This means periodically reviewing and updating the root indicators you check for, adding checks for novel root tools, and removing checks that are no longer relevant.
Keynote: Red Teaming in Practice with Adam Žilla (Haxoris)
The Mobile App Security Conference in Prague was a two-day, invite-only event on fraud, malware, and API abuse in modern mobile apps, held at Chateau St. Havel on November 3–4, 2025, and hosted by Talsec, freeRASP, and partners. It brought together leading experts and practitioners to strengthen the mobile AppSec community, connect engineers with attackers and defenders, and share practical techniques for high‑stakes sectors like banking, fintech, and e‑government.
Adam Žila, an ethical hacker, red teamer, and cybersecurity enthusiast, shared a true story of a red team operation targeting a large organization with thousands of employees that invested heavily in security, processes, and its people. The organization wanted to know how far a motivated and well-organized group of attackers could get if they were specifically targeted. The operation was a real-world attack simulation without limitations or restricted scenarios, designed to uncover technical weaknesses, test the human factor, and examine the physical perimeter.
The red team conducts the operation in a series of structured phases. While the specific techniques vary depending on the environment, the overall methodology reflects common real-world attack progression.
The engagement begins with open-source intelligence collection. The team gathers publicly available information related to the organization, including IP address ranges, domains and subdomains, employee locations, and the internal email address format. This information supports later technical and social engineering activities.
Panel: Engineers vs. Reverse Engineers
The Mobile App Security Conference in Prague was a two-day, invite-only event on fraud, malware, and API abuse in modern mobile apps, held at Chateau St. Havel on November 3–4, 2025, and hosted by Talsec, freeRASP, and partners. It brought together leading experts and practitioners to strengthen the mobile AppSec community, connect engineers with attackers and defenders, and share practical techniques for high‑stakes sectors like banking, fintech, and e‑government.
The battle between those who build software and those who deconstruct it is not a traditional conflict but an ongoing, innovative cycle that drives the entire technology industry forward. This dynamic is less about finding a definitive winner and more about the collective advancement of digital security. This article summarizes a panel discussion exploring these themes.
At first glance, it may seem that reverse engineers always hold the upper hand. Once an application is released, skilled individuals with the right tools can eventually uncover its secrets. However, this "rhetorical" win is part of a necessary balance.
Keynote: Cloudflare for AppSec with Anatol Nikiforov (Cloudflare)
The Mobile App Security Conference in Prague was a two-day, invite-only event on fraud, malware, and API abuse in modern mobile apps, held at Chateau St. Havel on November 3–4, 2025, and hosted by Talsec, freeRASP, and partners. It brought together leading experts and practitioners to strengthen the mobile AppSec community, connect engineers with attackers and defenders, and share practical techniques for high‑stakes sectors like banking, fintech, and e‑government.
Anatol Nikiforov of presented a keynote on the rapidly evolving landscape of Application Security (AppSec), focusing on how AI and the rise of residential proxies are creating sophisticated new challenges for cybersecurity providers.
Technological adoption is accelerating at an unprecedented pace. While mobile phones took 15 years to reach 100 million users and Facebook three and a half years, ChatGPT achieved the same user base in just two months. This rapid adoption is transforming cybersecurity, particularly in the domain of automated traffic and bots.
Identifying bots has become increasingly complex. Modern bots are far more sophisticated than earlier versions, which relied on IP addresses and contextual clues:
Case Study: How Rogue Malware Apps Attack Your Users (and What Our Data Shows)
This case study, courtesy of Talsec Labs, delves into Android malware campaigns and samples. The culmination of this research materializes in the state-of-the-art Malware Detection SDK.
In the Android ecosystem, cyber attackers frequently distribute apps with strong permissions (like Accessibility, SMS reading, or screen capturing) to execute attack vectors against legitimate apps. They don't need to break your app's encryption if they can simply read the user's screen or intercept their 2FA SMS.
To better understand this landscape, we ran a one-month case study analyzing real-world device environments across over 56,000 app hashes. What we found highlights exactly why traditional antivirus-like point-in-time signature checks fail.
Over the course of roughly a month, our scans identified 1,215 actively malicious or highly suspicious applications coexisting on user devices right alongside legitimate apps.The breakdown:
Keynote: Fingerprinting, Device Intel & Context with Martin Makarský (Fingerprint)
The Mobile App Security Conference in Prague was a two-day, invite-only event on fraud, malware, and API abuse in modern mobile apps, held at Chateau St. Havel on November 3–4, 2025, and hosted by Talsec, freeRASP, and partners. It brought together leading experts and practitioners to strengthen the mobile AppSec community, connect engineers with attackers and defenders, and share practical techniques for high‑stakes sectors like banking, fintech, and e‑government.
Martin Makarský, Director of Engineering at , delivered a keynote shifting the focus from simply collecting data to the critical challenge of interpreting that data in the context of anti-fraud efforts. He emphasized that the real difficulty in anti-fraud is "deciding what it means". The core message is that sophisticated device identification and intelligence must be coupled with human-defined business logic to effectively fight fraud without driving away legitimate users.
Effective anti-fraud systems depend not only on collecting data but on interpreting that data correctly. The central challenge lies in deciding what collected signals actually mean. Advanced device identification and intelligence must work alongside clearly defined business logic to combat fraud effectively without alienating legitimate users.
Several foundational technologies shape modern anti-fraud strategies:
TT: The AI Impersonator: Runtime Defense Against Machine-Generated Deception with Dmitri Bogatenkov
The Mobile App Security Conference in Prague was a two-day, invite-only event on fraud, malware, and API abuse in modern mobile apps, held at Chateau St. Havel on November 3–4, 2025, and hosted by Talsec, freeRASP, and partners. It brought together leading experts and practitioners to strengthen the mobile AppSec community, connect engineers with attackers and defenders, and share practical techniques for high‑stakes sectors like banking, fintech, and e‑government.
While AI offers incredible advancements, it has also become a powerful weapon for bad actors. Traditional security advice, such as looking for typos in scams, is now outdated as generative AI can create perfectly polished deceptions. Today’s apps require a "sixth sense" to combat a new adversary: the AI impersonator.
The AI impersonator is a suite of technologies working together to hack human belief rather than just code. This toolkit includes:
How to Detect App Tampering & Repackaging using Kotlin
Don’t let attackers clone and modify your Android app and fight back with runtime protection.
App tampering and repacking are silent killers of mobile apps. Attackers can modify your APK, inject malicious code, and redistribute it as if it were yours. Luckily, there are solutions which make detecting tampering in Kotlin-based apps simple and reliable.
App tampering occurs when attackers alter your APK’s code, assets, or configuration without authorization. Once modified, they “repack” the app into a new APK and distribute it. Often spreading malware or tricking users into installing a counterfeit version.
Real-world examples include:
Fake banking apps stealing credentials.
How To Detect Video Injection for KYC
For many KYC (Know Your Customer) vendors, video stream injection is the "final boss" of fraud. It’s the process of bypassing a smartphone’s physical camera sensor to feed pre-recorded or AI-generated deepfakes directly into the application's media pipeline.
If successful, an attacker can register thousands of fraudulent accounts using stolen identities without ever showing their real face.
The good news? Most common injection tools rely on a compromised system state that Talsec RASP for Android and iOS already detects.
Attackers typically use three main vectors:
Hooking: Using
Remote Access Tools
Remote Access Tools (RATs) are software that gives one person full input control over someone else's device — the same category as AnyDesk, TeamViewer, or RustDesk. Built for legitimate IT support, the exact same Android capabilities are what a support-scam or account-takeover operation needs: a screen it can see and hands it can drive, without the victim ever handing over a password. OWASP's requirement (Mobile Security Standard) calls this out directly: penetration testers routinely use these same tools to demonstrate data leakage, which is exactly why blocking them is a testable security requirement.
Unlike malware written to attack a specific app, these are often real, signed, widely-used tools. The attacker doesn't need to build anything — they need the victim to install one and grant it two or three permissions.
RATs are one category in a wider family of "someone else can see or drive this screen" threats:
Category
How to Detect Hooking (Frida) using Kotlin
Stop runtime attacks before they hijack your Android app.
Hooking frameworks like Frida and Xposed are increasingly popular among attackers trying to manipulate Android apps. From bypassing in-app purchases to stealing sensitive data, hooking is a serious risk.
Hooking is the process of intercepting and modifying function calls at runtime. Attackers use frameworks such as Frida, Xposed, or LSPosed to inject custom code into your app. Popular attacker toolkits include:
– runs on the device and enables full dynamic instrumentation
Year in Talsec RASP SDK: Highlights from 2025
This year, we confirmed our position as #1 RASP with top root detection. We embraced Kotlin Multiplatform and gaming engines like Unity and Unreal Engine, while finally delivering the long-awaited check completion API. Security was bolstered with new spoofing detections (WiFi, time, location) and highly requested screen leakage protection.
These rooting tools gave us a hard time, but overcoming them moved us to the first league of RASP root detectors. More in progress.
Improved Magisk, Shamiko, HideMyAppList, KernelSU root detection capabilities (some of top capabilities reserved for premium RASP+ 😉)
How Our Partnership With Gen Digital Enabled Malware Detection v2 Powered by Avast and Norton DBs
Talsec partners with Gen Digital (Avast, Norton) to integrate their global threat intelligence into Malware Detection v2, enabling a live, high-confidence malware detection.
The Talsec SDK just received the Malware Detection v2 update that allows you to move from "This app looks suspicious" to "This app is malicious," enabling app developers to block access on truly infected devices. Our community has been requesting the ability to automate security enforcement without the fear of blocking legitimate customers for a long time and there’s a story behind it.
Beyond our core mobile security RASP territory (root detection, Frida detection, app integrity checks, etc.) we’ve always wanted to master malware detection field to match our deepest understanding of Android risks. Our Malware Detection (v1) engine has been in the field since that early era, utilizing heuristics to flag suspicious properties like dangerous permissions or untrusted sources. It has been highly effective at uncovering zero-day threats, but it was essentially the 'Chapter One' that we’ve finally been able to complete with v2.
See the v2 product page to learn features and use-cases:
How to Detect Screen Capture & Recording using Kotlin
Stop data leaks before they happen. Protect your Android app from unwanted screenshots and recordings.
Screenshots and screen recordings may seem harmless, but in sensitive apps (banking, fintech, healthcare, messaging), they can expose confidential user data. Luckily, modern tools make it possible to detect and respond to these risks effectively.
Screen capture/recording refers to when users take screenshots or record your app’s screen. While capturing itself doesn’t impose threat, malicious actors can exploit it to steal sensitive information.
Attackers often use:
Built-in Android screenshots/recording tools
How to Detect Emulator in Kotlin
Fake users, fraudsters, and reverse engineers love emulators. Here’s how to stop them.
Emulators are powerful tools for developers, but in the wrong hands they become a major security risk. Fraudsters use them to automate fake traffic, bypass device checks, and even reverse-engineer apps. Luckily, you can detect emulator environments in Kotlin and block them before damage is done.
An emulator is a software-based environment that mimics a real Android device. While legitimate for app testing, attackers exploit emulators for:
Click fraud – simulating thousands of devices to inflate ad revenue.
Credential stuffing
How to Detect Developer Mode on Android using Kotlin
Struggling to protect your app from Developer Mode risks? Here’s how to fight back.
Developer Mode (or Developer Options) on Android is a handy tool for testing apps—but in the wrong hands, it’s a gateway for reverse engineering, debugging, and tampering. If attackers run your app in Developer Mode, they can more easily analyze or modify its behavior. Luckily, SDKs can detect and block this threat for you.
Developer Mode is a built-in Android setting that unlocks advanced debugging features. While useful for legitimate testing, it also lowers the security barrier for attackers. With Developer Options enabled, attackers can:
Attach a debugger and inspect runtime data.
EUDI Guide: Build a Secure EUDI Wallet Relying Party
Are you a EUDI Relying Party? eIDAS 2.0 brings statutory security obligations. Learn to protect your RP app from cloning, malware, and mobile fraud.
The digital identity landscape in Europe is undergoing its most significant shift in a decade. With the entry into force of Regulation (EU) 2024/1183 (eIDAS 2.0), every EU Member State is now mandated to offer at least one European Digital Identity Wallet (EUDIW) to its citizens. From the moment those wallets go live, any app or website that wants to accept identity attributes from them automatically becomes a Relying Party (RP) under the EUDI Architecture Reference Framework (ARF).
This article serves as the essential starting point for a comprehensive, multi-part series designed specifically to help CTOs, architects, and mobile developers secure the entire EUDI Relying Party infrastructure.
Here, in Article 1, we will break down the regulatory changes and expose the mobile threat surface nobody warned you about—the blind spot the specifications don't cover, making runtime device security entirely your problem to solve.
Regulation (EU) 2024/1183,
Injections via OBS happen at the virtualization layer. Talsec detects common emulators and can block the app entirely.
Appium Framework
Automation Detection
Appium leaves traces in the uiautomator service and often requires ADB/Developer Options to be enabled, both of which Talsec detects.
Repackaged Testing Builds
App Integrity Checks
Attackers sometimes re-sign the APK to disable security for automation. Talsec’s signature and binary integrity checks prevent these modified builds from running.
The Trusted Baseline: Google Play, Huawei AppGallery, Apple App Store, TestFlight
Talsec natively recognizes Google Play and Huawei AppGallery as the default trusted sources for Android (with support for custom configurations), while the Apple App Store and TestFlight serve as the strict, non-configurable trusted baseline for iOS.
Application Distribution Domains
System Apps
System apps are inherently trustworthy as part of the device's security baseline.
OEM Preloaded Apps
Preinstalled stores (e.g., Samsung Galaxy Store, Xiaomi GetApps) can act as installers. When such a store is in your trusted sources, Talsec SDK treats apps it delivered as officially distributed.
Other OEM preloads are ordinary preinstalled apps. They are not installers and play no role in installation source evaluation.
Store-Distributed Apps
Sideloaded Apps
By default, Talsec flags these as unofficial. If you add a sideload installer to your trusted sources, the SDK will accept every app installed through that channel.
Function Pointer Verification: iOS developers can perform checks on critical functions to see if they’ve been tampered with. For example, iOS apps might verify that certain Security or Crypto functions are still pointing to Apple’s original implementations. If a hook (via Substrate or the fishhook technique) has rerouted those functions to attacker code, the addresses or hashes won’t match the known good values. This is a more technical method, but it can catch cases where an attacker patches functions in memory. Essentially, the app knows what the start of a function is supposed to look like; if it’s been overwritten with a jump to elsewhere, that indicates a hook.
Anti-Debug and Anti-Attach: Just as on Android, on iOS an app can detect debugging attempts. iOS provides APIs to check if the process is being debugged (like checking the AMFID and other process flags). Also, iOS apps can use the ptrace call with the PT_DENY_ATTACH option to proactively prevent debuggers (which also blocks some hooking techniques that rely on debugger attachment). If an attacker cannot attach a debugger or instrument easily, it thwarts many hooking attempts. Some apps repeatedly check for any new process that tries to attach and immediately kill the app if detected.
Timing and Behavior Checks: This is less common on iOS due to the performance overhead, but conceptually an app could perform operations that should be quick and see if there’s an unusual delay or behavior (which might happen if a hook is intercepting calls). Also, the app might check if certain system calls return expected values; if a hook is faking responses (like returning false for “Is this device jailbroken?” when it actually is), a clever app might cross-verify via multiple methods to catch the lie.
For IOS
1) Evasion and Hiding Techniques
2) False Positives and False Negatives
3) Diverse Android Ecosystem
4) Limited Visibility and Sandbox Restrictions
5) Rapidly Evolving Techniques
6) Trade-offs Between Security and User Experience
Strategic Initiatives: Launch campaigns or programs that address emerging mobile security issues, setting the stage for long-term impact in the industry.
Flutter Plugin Attack: Mechanics and Prevention - Jaroslav Novotný — Senior Flutter Developer
Flutter Security 101: Restricting Installs to Protect Your App from Unofficial Sources — Marco Galetta,Senior Software Engineer
How to Block Screenshots, Screen Recording, and Remote Access Tools in Android and iOS Apps — Tomáš Soukal, Senior Mobile Security Developer
How to implement Secure Storage in Flutter? — Lucas Oliveira,Apple technologies, Flutter, Developer Mentorship
User Authentication Risks Coverage in Flutter Mobile Apps — Himesh Panchal, Web and Tech enthusiast, working with Flutter since its 1.0, mobile app CI/CD workflows, sharing knowledge with the developer community
dash_crypt: encryption and decryption package for Flutter and Dart — Ahmed Ayman, Senior Flutter Mobile Developer
Published Articles
Open Content Topics
Simple Root Detection: Implementation and verification
Hook, Hack, Defend: Frida’s Impact on Mobile Security & How to Fight Back
Country-based content licensing enforcement through detection of VPNs, Smart DNS services, and location spoofing
Use-Cases
How Talsec protects Apple TV apps
Optimize DRM Costs
Business impact and next steps
To learn more about securing your Apple TV apps with Talsec, reach out to our experts.
Open (Traditional, Unencrypted): Networks with no password and no encryption. On Android S (API 31) and above, this corresponds to WifiInfo.SECURITY_TYPE_OPEN. For older versions, this is inferred by the absence of WPA/WPA2/WPA3/OWE markers in the AP's advertised capabilities.
WEP (Wired Equivalent Privacy): A notoriously broken and deprecated protocol. Represented by WifiInfo.SECURITY_TYPE_WEP on Android S+ and the presence of "WEP" in the capabilities string on older versions.
WPA1 (Wi-Fi Protected Access - PSK/TKIP/CCMP): While an improvement over WEP, WPA1 has known vulnerabilities (especially TKIP) and is significantly weaker than WPA2. This is primarily identified in the legacy path (pre-Android S) by finding "WPA" in the capabilities string without stronger WPA2 or WPA3 indicators. The modern WifiInfo.SECURITY_TYPE_PSK often groups WPA1 and WPA2, making specific WPA1 flagging on S+ tricky without more granular (and often unavailable) system information. For a "not too alarming" approach, if SECURITY_TYPE_PSK is encountered, we generally don't flag it as weak to avoid flagging robust WPA2-PSK networks.
Unknown Security: If the Android system cannot determine the security type of the connected network (WifiInfo.SECURITY_TYPE_UNKNOWN on S+), it's prudent to consider this a potential risk. In the legacy path, this is approximated by encountering very minimal or unparseable capability strings that don't indicate any known security protocol.
OWE (Opportunistic Wireless Encryption / Wi-Fi Enhanced Open): While it doesn't use a pre-shared key, OWE does provide encryption for open networks, significantly improving privacy over traditional open Wi-Fi. Flagging this could cause undue concern. Identified as WifiInfo.SECURITY_TYPE_OWE on S+ and by an "OWE" marker (or absence of "OPEN" markers if "OWE" is present) in legacy capabilities.
WPA2-PSK (with AES/CCMP): The long-standing secure standard for personal networks. Covered by WifiInfo.SECURITY_TYPE_PSK on S+ and various "WPA2" or "RSN" markers in legacy capabilities.
WPA3 (SAE/Enterprise): The current leading security standard. Represented by WifiInfo.SECURITY_TYPE_SAE (and enterprise variants) on S+ and "WPA3" or "SAE" markers in legacy capabilities.
A robust check involves these key steps:
Permissions: Ensure your app has ACCESS_WIFI_STATE and ACCESS_FINE_LOCATION permissions. Location is crucial for accessing Wi-Fi scan results (pre-S) and detailed connection information (SSID on Q+).
Connectivity Check: First, verify the device is actively connected to a Wi-Fi network. Use ConnectivityManager to check for an active network and ensure its transport type is NetworkCapabilities.TRANSPORT_WIFI. Also, verify WifiInfo provides valid details (e.g., networkId != -1, non-null BSSID/SSID). If not connected to Wi-Fi, the security check is moot.
API Version Branching (SDK_INT):
Android S (API 31) and above: Utilize WifiInfo.currentSecurityType. Compare this integer value against our defined blacklist constants (SECURITY_TYPE_OPEN, SECURITY_TYPE_WEP, SECURITY_TYPE_UNKNOWN).
Pre-Android S: This path is more heuristic.
Retrieve the WifiInfo for the connected network to get its SSID.
Perform a Wi-Fi scan using WifiManager.scanResults.
Find the ScanResult that matches the connected SSID.
Parse the capabilities string of this ScanResult. Look for the presence of "WEP", or the absence of "WPA"/"RSN"/"OWE" (indicating traditional Open), or the presence of "WPA" without stronger WPA2/WPA3 indicators (indicating WPA1).
Incident Reporting/User Notification: If a blacklisted protocol is detected, inform the user or log the incident appropriately.
By implementing such a Wi-Fi security check, developers can empower their applications to identify potentially hazardous network environments. This "one-size-fits-all" approach, focusing on unambiguously weak protocols, provides a valuable layer of situational awareness for the user without causing unnecessary alarm. It’s a pragmatic step towards fostering a more secure mobile experience, acknowledging the diverse capabilities of the Android ecosystem. Remember that while this check identifies AP capabilities, the actual security also depends on factors like strong passwords and AP firmware integrity, which are beyond an app's direct control but contribute to the overall risk assessment this feature helps initiate.
The "One-Size-Fits-All" Philosophy: Defining "Weak"
The Blacklist: Clearly Insecure Protocols
What We Don't Blacklist (To Avoid Over-Alarming):
Practical Implementation for Developers
Conclusion
Manipulate authentication flows
Reverse engineer business logic
Observe encrypted data before encryption or after decryption
Security control evasion
Sensitive information extraction
Reducing attack surfaces
Improving resilience against dynamic instrumentation
Sensitive enterprise data
API secrets and tokens
What You Will Learn in This Session
Runtime Hooking and Instrumentation
How Attackers Use FRIDA Against Android Apps
Mobile Application Hardening
Defensive Thinking for Developers
The Growing Threat of Runtime Attacks
Handle App Security with a Single Solution! Check Out Talsec's Premium Offer & Plan Comparison!
- An advanced security SDK that actively shields your app from reverse engineering, tampering, rooting/jailbreaking, and runtime attacks like hooking or debugging.
(Android & iOS) & - A backend defense system that verifies the integrity of the calling app and device to block bots, scripts, and unauthorized clients from accessing your API.
- Scans the user's device for known malicious packages, suspicious "clones," and risky permissions to prevent fraud and data theft.
Appicrypt: Appicrypt ensures that the Talsec SDK initializes and runs fully. Running in the same process as the application, the SDK generates an encrypted payload with device and run state information. Clients attach this payload to HTTP headers, and the backend verifies integrity using a lightweight script. Clients retain full control of their encryption keys.
Key Security Challenges and the Community Solution
Feature Testing and Giving Back
Technical Insights on RASP Functionality
- An advanced security SDK that actively shields your app from reverse engineering, tampering, rooting/jailbreaking, and runtime attacks like hooking or debugging.
AppiCrypt (Android & iOS) & - A backend defense system that verifies the integrity of the calling app and device to block bots, scripts, and unauthorized clients from accessing your API.
Malware Detection - Scans the user's device for known malicious packages, suspicious "clones," and risky permissions to prevent fraud and data theft.
- Prevents Man-in-the-Middle (MitM) attacks by validating server certificates that can be updated remotely without needing to publish a new app version.
- A secure storage solution that encrypts and obfuscates sensitive data (like API keys or tokens) to prevent them from being extracted during reverse engineering.
Threshold cryptography (TC) mitigates single-device compromise by splitting a private key into multiple cryptographic shares. These shares are distributed across multiple devices, such as a user’s phone, laptop, a trusted partner’s device, or a backend service. The full private key never exists in one place.
When a transaction requires authorization, participating devices perform a coordinated cryptographic protocol to jointly produce a digital signature. The resulting signature remains fully backward-compatible: the backend verifies it exactly as it would a signature generated by a single private key, requiring no changes to existing verification logic.
Threshold cryptography prevents attackers from forging valid signatures when only one device is compromised. Possession of a single key share provides no ability to sign transactions independently, and any attempt to do so fails backend verification.
In multi-party configurations, signing also requires active participation from other trusted devices or parties. This design introduces an additional layer of protection, as suspicious signing requests can be detected and blocked by other participants. A successful attack requires compromising enough devices to meet the configured threshold, such as both devices in a two-out-of-two setup.
Threshold cryptography commonly relies on Shamir Secret Sharing. This method splits a secret into n shares such that only a minimum threshold t can reconstruct or use the secret, while any group smaller than t gains no information. The concept is often illustrated geometrically: just as two points are required to define a line and determine its intercept, multiple shares are required to recover or act on the secret value.
Threshold cryptography has existed since the 1980s and 1990s and reflects long-standing real-world security practices, such as requiring multiple keys to access sensitive assets. Adoption is accelerating due to several factors:
Cryptocurrency: Threshold cryptography protects against irreversible loss of funds caused by lost private keys.
National Authentication Systems: Estonia uses a two-out-of-two RSA signing scheme split between a national authority and the user.
Standardization: NIST is actively soliciting proposals for multi-party threshold cryptography, driving interoperability and broader adoption.
The MeeSign platform demonstrates threshold cryptography in practice. It is a fully open-source, proof-of-concept implementation available on GitHub and intended for developers and security teams rather than production use.
Key capabilities include:
Cross-Platform Support: Built with Flutter and running on Android, Windows, macOS, and Linux.
Integration Demonstrations: Compatibility with standard interfaces such as PKCS#11 enables use cases like SSH login signing.
Flexible Group Configuration: Users can define participant groups, set signing thresholds (e.g., two out of three), and select cryptographic protocols.
Threshold cryptography provides an effective defense against single-key compromise by requiring multiple devices or parties to participate in cryptographic decisions. When strong private key protection is essential, distributing trust across devices significantly raises the bar for attackers and reduces the impact of individual device compromise.
Thank Jan you for showcasing how threshold cryptography can protect digital identities by eliminating single-key failure points. Your work demonstrates how multi-device signing and shared trust significantly raise the bar for attackers and highlights why modern security architectures must move beyond device-centric key protection models as well!
Key Protection in a Compromised World: An Introduction to Threshold Cryptography
Handle App Security with a Single Solution! Check Out Talsec's Premium Offer & Plan Comparison!
Instead of asking only “What is the best Cloudflare alternative?”, a better question after this outage is “How do we make API security and bot mitigation portable across CDNs and gateways?” The idea is to treat the CDN purely as a transport and caching layer, while API security and fraud prevention are enforced by your own logic and keys, which you can run on any edge platform.
This is where AppiCryptWeb comes in.
AppiCryptWeb provides a cryptographic, request-level trust signal that is independent of any particular CDN’s internal bot rules, and can be evaluated the same way on NGINX, Cloudflare Workers, AWS API Gateway, or other gateways. That means you can build a multi-CDN or multi-WAF architecture without losing a consistent security posture when traffic fails over away from Cloudflare during an outage.
AppiCryptWeb is a WebAssembly-based, in-browser security agent that attaches a signed, encrypted cryptogram to every protected API request. Each cryptogram encodes:
The integrity of the browser runtime
A privacy-preserving device identity
A caller-provided nonce
A timestamp
Threat flags like tampering, bot automation, or suspicious execution state.
Architectural Overview of AppiCryptWeb
On the backend or at the edge, a lightweight validator decrypts the cryptogram using your keys, checks signatures and freshness, verifies the nonce binding, and returns a detailed risk assessment that your gateway or application can use to allow, challenge, or block the request. Because this verification logic lives in your infrastructure and uses your cryptographic material, it is not subject to Cloudflare’s internal bot-management pipelines or configuration rollouts
AppiCryptWeb does not try to replace Cloudflare’s global network or DDoS layer, but it does act as a strong Cloudflare alternative for API and bot protection by changing where trust decisions are made. Several aspects are particularly relevant:
Every API call carries its own cryptogram, providing request-level assurance about runtime integrity, device identity, and threat state, rather than relying only on IP reputation or heuristic scoring at the edge.
Each cryptogram is tied to a unique nonce and timestamp, providing API-level protection against replay and cross-request forgery attacks.
AppiCryptWeb provides a stable browser fingerprint that does not rely on cookies or invasive tracking, helping distinguish genuine users from scripted bots in a privacy-respecting way.
The cryptogram explicitly encodes signals relevant to fraud prevention and business logic abuse, giving your backend concrete data points to protect high-value flows.
Because the validation step is portable, you can run the same enforcement logic on Cloudflare Workers, NGINX, AWS API Gateway, or other providers without changing how cryptograms are generated.
Signatures are verified on your backend or edge using a key ID (KID) that you control, shifting the blast radius of configuration mistakes away from a global outage.
If the goal is “Cloudflare outage resilience” plus better API security, a practical pattern looks like this:
1
Users hit https://app.example.com behind Cloudflare, Akamai, or any other CDN.
2
The app includes the AppiCryptWeb agent and uses it to attach a cryptogram to all sensitive API calls, bound to a nonce derived from the request body.
3
The first edge hop (NGINX, API Gateway, or Cloudflare Worker) acts purely as an AppiCrypt authorizer: decrypt cryptogram, check policy, compare nonce, and if overallAssessment is OK, forward to the upstream, otherwise reply with 401/403.
4
Because the authorizer is your code and uses your keys, you can run the same logic in another region, another CDN, or even directly on a dedicated WAF if the current edge provider is having a bad day.
This decouples “who gives us packets” (CDN) from “who decides whether the browser is genuine and allowed to touch this API” (your cryptographic runtime-attestation layer).
AppiCrypt Checks Overview in our demo.
Integration is intentionally minimal:
Frontend
Load a small file, initialize the agent once per app load, and call a function to fetch a cryptogram before sending sensitive API requests.
Backend/Edge
Add a single validation step that decrypts the cryptogram, checks nonce and timestamps, interprets threat flags, and then either forwards the request or responds with 401/403.
This pattern maps cleanly onto familiar infrastructure like NGINX with an auth sub-request, a Cloudflare Worker, or an AWS Lambda authorizer for API Gateway.When this makes sense after the outage
AppiCryptWeb is designed for organizations that run high-value web APIs and care about protection against bots, scraping, fraud, and business-logic abuse, while also wanting to reduce concentration risk around a single edge vendor.
The key conceptual shift is to:
Keep using Cloudflare (or another CDN) for global anycast, caching, TLS termination, and network-layer DDoS.
Move API trust and authorization into a cryptographic runtime-attestation layer that you own and can run anywhere.
Written by Efim Goncharuk — Talsec AppiCryptWeb Architect
Many sites were unreachable even though the origin servers were up and running.
The Strategy: Decoupling API Security
The Solution: AppiCryptWeb
What AppiCryptWeb Actually Does
to see cryptograms in action.
Why this is a Cloudflare alternative at the API layer
Per-request cryptographic proof
Replay resistance via nonce binding
Privacy-preserving browser identity
Fraud-focused signals instead of generic heuristics
Works across multi-CDN and multi-WAF setups
Customer-owned keys and policy
Example architecture after the outage
How you would integrate AppiCryptWeb
Key Takeaway
The product page from Talsec goes deeper into the security model, deployment options, and comparison with API keys and CAPTCHAs
Renaming: The core mechanism involves replacing meaningful names with arbitrary strings.
Reduced Readability: This significantly hinders an attacker's ability to understand the purpose and functionality of different code components simply by examining their names. It breaks the semantic link between the code and its intended behavior.
Limited Complexity: Name obfuscation is generally the least complex type of obfuscation to implement and has minimal impact on the application's performance or stability.
Generic Applicability: This technique is indispensable and straightforward, as it is a complimentary compiler feature that yields a significant security advantage.
Consider a class responsible for handling user sessions:
After class name obfuscation, this might become:
While the underlying logic remains the same, the renamed elements provide no clues to an attacker about the class's purpose or the functionality of its methods and fields.
Talsec offers a feature to ensure that this basic obfuscation technique is applied and trigger the security threat control if this was skipped at build time.
String obfuscation focuses on concealing string literals embedded within the application's code. These strings can often reveal sensitive information, such as API keys, Certificates, URLs, error messages, or even business logic. By obfuscating these strings, you prevent attackers from easily extracting valuable insights or identifying critical parts of your application.
Encoding and Encryption: String obfuscation typically involves encoding or encrypting the string literals within the application.
Runtime Decoding/Decryption: The original strings are reconstructed at runtime, only when they are actually needed by the application.
Increased Analysis Difficulty: Attackers cannot simply search for specific keywords within the decompiled code to uncover sensitive information. They need to understand the obfuscation algorithm and potentially reverse-engineer the decoding/decryption process.
Consider the following code snippet containing an API key:
An attacker examining the decompiled code would see seemingly random strings, requiring them to identify and reverse the Base64 decoding to uncover the actual API key and URL. More sophisticated techniques involving encryption would further complicate this process. Talsec provides a feature to address this need with high level data protection.
Control-flow obfuscation aims to make the application's control flow – the order in which instructions are executed – more complex and difficult to follow. This is achieved by introducing artificial complexity, such as:
Opaque Predicates: Inserting conditional statements whose outcome is always known at runtime but is difficult for an attacker to determine statically. This creates "dead code" paths that complicate analysis.
Bogus Code Insertion: Injecting code that has no functional impact on the application's behavior but serves to confuse and mislead attackers.
Branching and Jumps: Replacing straightforward sequential execution with a web of conditional and unconditional jumps, making it harder to trace the logical flow.
Exception Handling Abuse: Using exception handling mechanisms in non-standard ways to alter the control flow.
State Machine Transformation: Converting linear code sections into complex state machines, obscuring the original logic.
Control-flow obfuscation might transform this into a more convoluted structure involving opaque predicates and unnecessary jumps, making it harder to understand the simple conditional logic.
A) Name Obfuscation for Classes, Methods, and Fields
Key Concepts
public class UserSessionManager {
private String loggedInUsername;
private boolean isLoggedIn;
public boolean authenticateUser(String username, String password) {
// Authentication logic
}
public String getLoggedInUsername() {
return loggedInUsername;
}
}
public class a {
private String b;
private boolean c;
public boolean d(String e, String f) {
// Authentication logic
}
public String g() {
return b;
}
}
String apiKey = "YOUR_SUPER_SECRET_API_KEY";
String apiUrl = "https://api.example.com/data";
After string obfuscation, this might look like:
Java
String apiKey = new String(Base64.getDecoder().decode("WU9VX1NVUEVSX1NFQ1JFVF9BUElfS0VZ"));
String apiUrl = new String(Base64.getDecoder().decode("aHR0cHM6Ly9hcGkuZXhhbXBsZS5jb20vZGF0YQ=="));
Example
B) String Obfuscation
Key Concepts
Example
C) Control-Flow Obfuscation
Key Concepts
Warning: Code Packing and Encryption are Unsuitable for Modern Apps
Code packing and app binary encryption were once popular for protecting app binaries from reverse engineering, typically compressing executables with a runtime unpacking routine.
Today, these techniques are no longer commonly used and may be restricted by app stores. Apple requires disclosures for encryption use, while Google Play flags suspicious packing via Play Protect.
Data-Driven Ecosystem Integrity: An advanced security solution ensures the integrity of the data collected for affiliate and advertising services. This means providing partners with high-quality, trustworthy data—data not coming from device farms or fraudulent sources—which builds confidence and maximizes ad revenue. We aren't just blocking hackers; we are cleaning up data so you can charge advertisers more and making your AWS bill lower.
Open Doors to New Services: Platforms with a large fanbase are perfectly set up to explore advanced services, such as fintech. Security can help future-proof thin app clients, opening a reliable path for new revenue drivers and features that allow you to monetize fan attention more easily and test new strategies globally.
Eliminate Predatory Activities: Security measures can cut off costly predatory activities. Stop resource-draining attacks where bots trigger expensive API calls (e.g., LLM tokens), ensuring your budget fuels real users, not scrapers.
The core of a complete security offering is comprehensive, real-time protection that covers every angle of your platform.
Strengthened DDoS Defense: By combining Web and Mobile coverage with Talsec (Android and iOS) and , you ensure protection across all user platforms. This comprehensive approach is essential for maintaining service availability and stability, and efficiently cuts off unnecessary requests before they reach your backend systems.
Control Your Data: Security helps you get your data under control by ensuring high-quality data collection. This includes the real-time detection of risky activities like VPN usage, device emulators (simulators), and unofficial store usage.
Prevent App Cloning and Copycats: Detect and block malware, fraud, and emerging threats in real time. Prevent fake app mods and copycats that could harm your brand's reputation.
Ensure Fair Game: Security helps maintain a fair game for every user and partner, minimizing Data Skew by preventing automatic click fraud and database attacks through client apps and dynamic request forgery that can distort performance data and compromise user information.
User Risk Profiling: Gain a deeper understanding of your user base with sophisticated user risk profiling.
Secure Secrets Management: Utilizing a allows you to securely ship sensitive secrets and configs.
Global Security Posture: Observe the security posture of devices in different regions of the world, giving you a global view of risk. Get premium access to global app security threat intelligence, shared across the community, allowing you to stay ahead of the curve.
Compliance Made Simple: Security partners can help you ensure compliance and align with strict regulations like OWASP MAS, GDPR, DORA, MDR, and NIS 2.
Talsec can reliably secure your app and data APIs, enabling your team to focus on innovation and growth without having security as an afterthought.
Ad stripping: removal of ads that generate developer revenue
That’s where freeRASP for Unreal Engine (Android + iOS) comes in.
Talsec’s freeRASP security solution now integrates directly with Unreal Engine through a dedicated plugin, empowering developers who target Android and iOS. This powerful, early-released plugin serves as the bridge to our robust, real-time threat detection technology, allowing you to connect it to your projects whether you work with C++ or exclusively in Blueprints.
The official Unreal Engine plugin is designed to fit your workflow:
Simple Setup: Get started quickly by adding the plugin to your project’s Plugins folder.
Centralized C++ Configuration: Set up all your security parameters for Android (package names, certificate hashes) and iOS (bundle IDs, team identifiers) directly in your game’s startup code for clean, version-controllable management.
React to Threats Your Way: Use Unreal’s native delegate system to trigger custom logic when a threat is found. Whether you need to flag a player, end a session, or simply log the event, you have complete control.
This makes it simple to react to critical threats such as:
Emulator usage
Rooted or jailbroken devices
Hooking frameworks and debugging attempts
Piracy: making paid apps downloadable for free
In-App payments theft
In-Game currency hacking
App tampering or repackaging
Ads stripping - removal of ad-supported revenue
This puts the power back in your hands, allowing you to safeguard your game’s integrity from the most common exploits.
Unreal Engine empowers you to build breathtaking, high-fidelity worlds. But that very complexity and quality make your game a prime target for malicious actors who use rooted devices, simulators, or modified game clients to gain an unfair advantage, exploit game logic, or steal in-game assets.
freeRASP gives you the armor your game deserves, acting as a silent guardian that protects the intricate systems you’ve worked so hard to build.
The first step to a more secure game is right here. Visit the official integration guide for Unreal Engine to get started with installation, configuration, and implementing your security logic. Don’t wait for a threat to strike - protect your players and your project today!
Next-Gen Security for Your Unreal Engine Game
// examples:
void AFreeRASPPlayerController::HandleSecurityThreat(ThreatType ThreatType)
{
UE_LOG(LogTemp, Warning, TEXT("Security threat detected: %d"), ThreatType);
switch (ThreatType) {
case ThreatType::OnPrivilegedAccess:
UE_LOG(LogTemp, Warning, TEXT("Privileged access threat detected"));
break;
case ThreatType::OnAppIntegrity:
UE_LOG(LogTemp, Warning, TEXT("App integrity threat detected"));
break;
case ThreatType::OnDebug:
UE_LOG(LogTemp, Warning, TEXT("Debug threat detected"));
break;
case ThreatType::OnSimulator:
UE_LOG(LogTemp, Warning, TEXT("Simulator threat detected"));
break;
case ThreatType::OnUnofficialStore:
UE_LOG(LogTemp, Warning, TEXT("Unofficial store threat detected"));
break;
case ThreatType::OnHookDetected:
UE_LOG(LogTemp, Warning, TEXT("Hook threat detected"));
break;
case ThreatType::OnObfuscationIssues:
UE_LOG(LogTemp, Warning, TEXT("Obfuscation issues threat detected"));
break;
case ThreatType::OnScreenshot:
UE_LOG(LogTemp, Warning, TEXT("Screenshot threat detected"));
break;
case ThreatType::OnScreenRecording:
UE_LOG(LogTemp, Warning, TEXT("Screen recording threat detected"));
break;
UE_LOG(LogTemp, Warning, TEXT("Dev mode threat detected"));
break;
case ThreatType::OnADBEnabled:
UE_LOG(LogTemp, Warning, TEXT("ADB enabled threat detected"));
break;
case ThreatType::OnSystemVPN:
UE_log(LogTemp, Warning, TEXT("System VPN threat detected"));
break;
...
Visit the to get started with installation.
The Missing Piece in Your Unreal Project
Why it Matters for Game Developers
What Are You Waiting For?
Rooted or jailbroken devices, including popular tools such as Magisk and Dopamine
Reverse engineering attempts and runtime hooking frameworks (for example, Frida or Xposed)
Tampering or repackaging and installation from untrusted sources
Emulators, app clones, multi‑instancing, screenshots, and screen recording attempts
You can react to these events through callbacks and monitor them later in the Talsec Portal. The solution is designed to have minimal impact on app performance and to support OWASP MASVS RESILIENCE requirements out of the box.
Add the freeRASP KMP dependency
Create configuration in shared code
Register callbacks for security events
Implement callback handlers to react to detection events, for example by logging, displaying warnings, or triggering additional server‑side checks, using the common API exposed by the KMP library. Because callbacks live in shared code, behavior stays consistent across platforms.
Initialize freeRASP on startup
From your platform‑specific entry points (for example, Android Application class and iOS App delegate or equivalent), call into shared code to initialize freeRASP with the configuration. This ensures the SDK starts early enough to observe the full app lifecycle.
The KMP variant fits several common scenarios especially well:
Greenfield KMP apps that want to ship secure Android and iOS builds from day one.
Existing Android apps adopting a shared KMP module and planning to add an iOS client later
Teams that already use freeRASP on one platform and want to consolidate security into shared Kotlin code
By keeping security logic close to shared domain logic, teams can better enforce consistent policies across platforms and simplify maintenance.
freeRASP has a long-standing track record of protecting production apps on both Android and iOS, including through many OS, device, and ecosystem changes. The new Kotlin Multiplatform variant builds on this foundation, so teams can expect the same stability and compatibility when sharing security logic across platforms.
The SDK evolves continuously to keep pace with fresh reverse-engineering tactics, new jailbreak and root approaches, and other emerging attack techniques, with updates captured in regular releases. The KMP library follows the same versioning and publishing conventions as the existing freeRASP SDKs, which keeps dependency management and CI/CD workflows predictable for engineering teams.
For a concrete view of how the product evolves over time, including new detections, improvements, and fixes, you can review the full history in the freeRASP “What’s New and Changelog” page at https://docs.talsec.app/freerasp/whats-new-and-changelog.
To start using freeRASP for Kotlin Multiplatform today:
Handle App Security with a Single Solution! Check Out Talsec's Premium Offer & Plan Comparison!
Key security-relevant features of the Dart language include:
Compilation: Dart compiles to native machine code, improving performance and making it harder to reverse engineer than bytecode or intermediate language.
Type Safety and Concurrency: Dart is type-safe, null-safe, and garbage-collected. Its simple concurrency model only allows passing messages across isolates without shared memory, helping developers avoid common vulnerabilities related to shared memory.
No Reflection: Dart lacks reflection, preventing access to runtime type information and reducing the risk of certain coding mistakes that could lead to vulnerabilities.
LeanCode began working with Flutter in 2021 on a project for the Polish branch of Crédit Agricole. The bank boldly chose to go "full Flutter" for their new mobile banking app, even though the platform was less mature at the time. The resulting application, now among the top-ranked mobile banking apps in Poland, had to meet strict non-functional requirements, particularly around security.
Experience from this and other banking projects, including one for Virgin Money in the UK, led to several key security observations:
Code and Runtime Integrity: Dart's Ahead-of-Time (AOT) compilation and obfuscation proved very effective. Penetration testing revealed no issues with code injection or Dart runtime vulnerabilities.
Networking Stack Security: Flutter uses a separate networking stack from Dart, which initially caused concern for penetration testers. However, teams successfully implemented SSL pinning (domain, root, and intermediate certificates) and public key pinning. The HTTP client API allows developers to easily switch to native HTTP stacks like OkHttp or iOS clients, or use existing core HTTP client libraries from the bank.
Leveraging Native APIs: Secure Flutter apps depend heavily on native functionality. Plugins such as flutter_secure_storage utilize native key stores, encrypted shared preferences on Android, and the iOS keychain. Biometrics, secure enclave encryption, and third-party SDKs for fraud detection or KYC all rely on the same native APIs as traditional apps. Developers must understand the native implementation behind each package.
RASP Integration: Multiple Runtime Application Self-Protection (RASP) providers integrated with Flutter. While most RASP features are native, some providers initially flagged false positives. Talsec, however, supports Flutter as a "first-class citizen," offering a RASP solution aligned with Flutter’s security considerations.
Code audits often reveal vulnerabilities unrelated to Flutter itself. Common issues include:
Insecure Data Storage: Storing sensitive data in public files or unencrypted shared preferences.
Misuse of Biometrics: Using biometrics only for local authentication without encrypting personal data. This can weaken security if apps store passwords to mimic protection.
Logging and Credentials: Logging sensitive information or storing passwords insecurely.
Ultimately, security depends on how code is written, not on the technology used. Applications can be secure with JavaScript or web views and insecure with native apps. Every line of code must be evaluated for security, as tests only reveal weaknesses—they do not create security.
Thank you Mateusz and LeanCode team for sharing your experience with Flutter in high-security environments. Your insights demonstrate that cross-platform development can achieve the same level of security as native apps when code is written thoughtfully.
The Core Insight: Security Depends on the Code, Not the Technology
Handle App Security with a Single Solution! Check Out Talsec's Premium Offer & Plan Comparison!
The attack is conducted in four distinct phases and requires approximately 33 person-days of effort. Both the Android application and the device firmware implement only minimal protection mechanisms, consisting primarily of application packing and light encryption.
The engineers could not extract the firmware directly from the charger, so they retrieved it via the Android companion application. The application was packed, requiring several days of dynamic analysis to unpack and retrieve the full application code. They then used static analysis to find the URL and tokens needed to download the encrypted firmware from the cloud.
The encrypted firmware was "lightly encrypted". It took a cryptanalyst three days to decrypt it, using expertise to make "some lucky guesses".
The engineers discovered the firmware was unprotected; it was not obfuscated and lacked common mitigations like ASLR and stack protection. Although the code was "strict" (no symbols), they identified the operating system as a freeRTOS and located the Bluetooth and USB stacks. This analysis led to the discovery of three vulnerabilities, which took 20 person-days.
Because there were "no protections," the team easily developed two exploitation chains leveraging Bluetooth and USB. They even made the chains persistent across future firmware updates by implanting them in the bootloader.
While the attack ultimately failed at Pwn2Own because they based their work on the European version of the firmware, not the US version used in the competition, the vulnerabilities were reported and fixed by the vendor.
The successful exploit could have allowed free charging, damaged the vehicle or battery, or provided access to the home/company network, nearby Bluetooth devices, or the cloud-based vendor backend.
The presentation uses the attack timeline to demonstrate how even basic software protection mechanisms significantly increase the time, cost, and expertise required to compromise a system. The absence of layered defenses allows attackers to progress rapidly from firmware acquisition to full exploitation.
Protection Level
Estimated Attack Time (Person-Days)
Resulting Difficulty
No Protection At All
27
Easy, fast success.
Light Protection (Actual Scenario)
33
The primary lesson from this case study is the critical importance of protecting IoT devices and their companion applications. Companion applications frequently represent the weakest link, as they expose device logic, credentials, and cloud interfaces, and often provide a direct path into private networks and backend systems.
The objective of application protection is to preserve application behavior, ensure operational safety, and protect company revenue. This requires safeguarding sensitive assets such as credentials, cryptographic keys, configuration parameters, and proprietary algorithms.
Software protection is built on two fundamental properties:
Integrity, which ensures that the application has not been modified or tampered with. Common techniques include code integrity checks and runtime application self-protection mechanisms.
Confidentiality, which aims to conceal application logic and sensitive data through methods such as code obfuscation and white-box cryptography.
Obfuscation increases the difficulty of reverse engineering by hiding program structure, transforming control flow, and concealing constants and strings. An additional benefit of obfuscation is diversification. By protecting different builds or instances differently, an exploit developed for one binary may not apply to another, buying valuable time for remediation.
No technique alone is enough. It is important to combine and layer both software and hardware protection mechanisms. Obfuscation, runtime protection, integrity verification, and encryption must be used together.
Thank you, Béatrice, Quarkslab, for showcasing how thoughtful research and practical insight can bridge the gap between theory and real-world security challenges. Your work highlights the importance of clear thinking, strong fundamentals, and curiosity-driven exploration in advancing modern cybersecurity.
Handle App Security with a Single Solution! Check Out Talsec's Premium Offer & Plan Comparison!
Conde detailed the four main building blocks of robust hackbot systems: the 'brains' (multiple interacting LLMs for central reasoning, planning, and decision-making), the 'structure' (providing the skeleton for agents, coordinating them, managing memory, and ensuring efficiency), the 'prompts' (translating human objectives into agent behavior and ensuring goal alignment), and 'tools' (extending the agents' capabilities to interact with the environment, perform actions like running scripts, and validate outputs).
A major limitation of AI systems, especially in pentesting, is 'AI hallucinations,' particularly false positives. Ethiack combats this by using deterministic tools and a specialized 'verifier' agent. The verifier takes a step back to reflect on the hackbot's reasoning, challenges and rechecks conclusions, and filters out weak or flawed inferences, which significantly decreases the false positive rate and increases precision.
Additionally, to prevent destructive behavior, a three-layered guardrail system is used: a prompt-level guardrail shaping model behavior with clear instructions, a deterministic filter for rule-based checks on environmental interactions, and a third-layer LLM agent for contextual judgment on complex cases.
The presentation featured a demonstration by Ethiack's hackbot, "Hackian," who shared how it "absolutely demolished" a genetics research platform called Genequest during a Defcon challenge. Hackian achieved a full system compromise in under four hours, finding two critical vulnerabilities, including one that neither human pentesters nor the challenge organizers were aware of.
Hackian first bypassed front-end registration restrictions by hitting the register endpoint directly, mapped the microservices ecosystem, and then exploited a debug endpoint in the DNA analysis service that was vulnerable to command execution.
The second critical bug allowed Hackian to read arbitrary files on the system (like /c/paswd) by sending file paths to the /analyze endpoint, which was using the Closure slurp function without validation. Conde concluded that the core message is not that AI systems are or will be better than humans, but that they are different and find different types of vulnerabilities, sometimes finding "quirks that humans may disregard". Therefore, organizations must test their assets with these systems to prevent "bad guys" from exploiting them.
Currently, Ethiack's hackbot is focused on web applications, though future development may include mobile applications.
Thank you Pedro, Ethiack, and Hackian for showcasing how agentic AI can transform penetration testing and uncover vulnerabilities that traditional approaches miss. Your work pushes the boundaries of what ethical hacking can achieve and highlights why defenders must start thinking in terms of AI-native offensive capabilities as well!
Handle App Security with a Single Solution! Check Out Talsec's Premium Offer & Plan Comparison!
Extract secrets like API keys directly from your app's memory.
Inject malicious code to commit fraud or steal user data.
Attackers often target the native Swift or Kotlin code within a Flutter application to manipulate its behavior.
About 0.05% of devices are hooked. That may sound small, but at global scale it still means millions of devices. If your app handles sensitive data, you can’t ignore this risk.
Number of Hooked Devices (source: Talsec)
You might be tempted to build your own defenses, like searching for frida-server processes or blocking suspicious network ports. Unfortunately, these simple checks rarely work for long. The developers of hooking frameworks are constantly updating their tools to be stealthier and evade these exact kinds of naive detections.
This creates a high-stakes cat-and-mouse game—one that requires constant vigilance and deep expertise. That's why relying on a specialized security SDK is the safer and more effective choice.
You can implement yourself simple Frida server detection. Frida often uses ports like 27042 and 27043.
With freeRASP, the hook detection utilizes hundreds of advanced checks, offering robust detection even with bypass scripts applied.
Process-name checks, suspicious open ports, injected or loaded Frida-related libraries, modified memory maps, abnormal function hooks and our secret sauce.
Very strong detections including root and jailbreak detections (Magisk, Dopamine)
Comes with like app integrity, root/jailbreak, emulators, debugging, screenshots, etc.
Trusted by
Add the in your project, focus on implementing the following callback:
When evaluating mobile app security and Runtime Application Self-Protection (RASP), developers often compare various Talsec alternatives to find the right fit for their architecture. The "right choice" depends on the specific problem you need to tackle and which vendor offers the best bang for your buck.
The market is diverse, offering different philosophical approaches to protection. Talsec prioritizes top-tier root detection and a balanced security SDK portfolio covering the most popular attack vectors. Meanwhile, some vendors specialize primarily in heavy code obfuscation and compiler-based hardening, while others focus on a drag-and-drop (no-code) integration experience for DevOps-oriented teams. There are also solutions dedicated specifically to API security, active cloud hardening, enterprise compliance, or gaming protection. The most prominent providers alongside Talsec include Guardsquare, Appdome, Promon, Build38, Approov, and AppSealing.
Hooking attacks using tools like Frida can intercept and modify app behavior in real time, exposing sensitive data and disabling protections. Detection doesn’t have to be DIY or error-prone—simple port checks are easily bypassed. Tools like freeRASP provide reliable, continuously updated detection with hundreds of advanced checks, letting you respond proactively to runtime threats.
👉 If you want hooking detection plus root, jailbreak, emulator, debugging, screenshot, and tampering protection in one free package, start with .
Handle App Security with a Single Solution! Check Out Talsec's Premium Offer & Plan Comparison!
Integration with app logic: For critical apps (like financial services), integrate root detection functionality to run continuously while the app is open to make sure that the user is not rooted all the time during his usage of the App.
Avoid Hardcoding and Obvious Logic: If your detection logic is too rigid or all in one place, attackers can figure it out by decompiling your APK. Don’t hardcode file names or root indicators in plaintext if you can avoid it — attackers might search the APK for strings like “/system/xbin/su” and simply modify your code to skip that check. Instead, consider computing values at runtime (e.g., assemble file paths or property names dynamically) so they’re not plainly visible in code. Leverage code obfuscation tools (like ProGuard/R8) to rename classes and methods related to security checks
Choose the root detection solution that aligns with your goals. Free tools like RootBeer, freeRASP, or Play Integrity provide basic protection — but premium offerings like Talsec RASP+ bring robust features and peace of mind.
Root Detection Solution
Pros
Cons
(free, open-source, in-app, used by 5000+ apps)
Open-source library with simple integration
Checks for common root indicators
Easily bypassed by tools like UnRootBeer or custom kernels
Relies on predefined threat lists, missing newer root methods
Prone to false positives
(free, reliable, in-app, used by 6000+ apps)
Actively maintained with frequent updates
Detects root/jailbreak indicators and common hiding tools (Magisk/Shamiko)
Lightweight integration
Less resilient to bypass compared to paid (binary not app-bound)
Adds 4 MB to app size
Sends threat data to Talsec-managed servers by default
Pro's and Con's of Popular Root Detector Solutions (free and paid)
The team assesses the organization’s external attack surface by scanning public-facing infrastructure, including exposed IP ranges, open ports, and running services. The assessment focuses on identifying known vulnerabilities, misconfigurations, exploitable CVEs, or outdated software.
The external perimeter proves to be well hardened. No publicly exploitable vulnerabilities are identified, and all attempts to compromise web applications and VPN gateways are unsuccessful. These findings indicate a high level of maturity in perimeter security management and patching practices.
The assessment continues on-site with an evaluation of the wireless network. The organization uses WPA2 Enterprise with client certificate authentication, which prevents handshake capture and offline password cracking. All access points are fully patched, effectively mitigating rogue access point and deauthentication attacks.
The team identifies no viable wireless attack paths.
After unsuccessful virtual and wireless attacks, the team shifts focus to physical security. Using previously collected OSINT, the team identifies a legitimate fire safety company under contract with the organization and constructs a credible false identity based on this relationship.
The team prepares branded work attire and supporting documentation to reinforce the pretext. Upon arrival, reception personnel verify the cover story and grant escorted access to the building. Once supervision lapses, the team remains unsupervised in a meeting room.
An active RJ45 network socket is discovered behind a television. The team deploys a rogue Raspberry Pi device equipped with LTE connectivity, establishing persistent remote access to the internal network. The deployment remains undetected by the organization.
To progress further, the team requires valid domain credentials. From the implanted device, the team launches an internal phishing campaign. A legitimate internal portal is cloned and hosted on a visually similar domain that uses a subtle typographical variation.
The campaign successfully captures valid domain credentials. After verifying the credentials, the team dismantles the phishing infrastructure to reduce the likelihood of detection.
With internal access and valid credentials, the team enumerates the Active Directory environment. Enumeration is performed manually using LDAP queries designed to resemble normal directory traffic, minimizing the risk of triggering alerts from firewalls or IDS and IPS systems.
The team identifies user and group structures and confirms the presence of an internal certificate authority.
Based on prior experience, the team recognizes the certificate authority as a high-value target. Using Certipy, the team enumerates the certificate authority and identifies vulnerability ESC8.
To exploit this weakness, the team configures NLM Relay X as a listener and uses NetExec with the Coerce module to trigger authentication from the domain controller. This process yields authentication material that allows the team to request a valid certificate issued in the name of the domain controller.
Possession of a valid domain controller certificate effectively grants full control over the Active Directory domain. With this level of access, the team can request ticket-granting tickets or perform DCSync operations to retrieve credential hashes for all domain accounts and computers.
This stage represents complete domain compromise.
Adam Žilla offered three main recommendations based on this red team operation:
1
Perimeter Security is Not Enough
Even the best perimeter security, like a firewall, is insufficient if an attacker can get inside the network. The speaker noted that all efforts to protect only the perimeter may be in vain. The success of an attacker is often a matter of motivation, and a well-organized group with no limitations in budget or time will eventually get inside, whether through phishing, social engineering, or a zero-day exploit in applications or a firewall.
2
Physical Security and Human Factors are Critical
Human factors and the human mind are as critical as technology and systems, as they can be exploited. For attackers, this is often the easiest route, as it requires no technological knowledge or firewall bypass; they simply use social engineering tactics like a phone call or a phishing email.
3
Companies should not only focus on the perimeter or endpoint detection and response (EDR) applications but also strengthen physical security and review visitor processes. The speaker suggests implementing processes, such as a centralized calendar, so someone knows if a specialist like a fire safety technician is scheduled to arrive, to prevent unexpected visits. Furthermore, regularly auditing all vectors (like firewalls, outdated Nginx servers, and source code), patching vulnerabilities, refactoring code, and raising cybersecurity awareness among employees is a good practice.
The operation serves as proof that real attacks do not follow the rules of a standard penetration test, and attackers will simply get in, regardless of legal compliance. The surprising lack of security awareness inside the network, illustrated by the flat network found after bypassing the hardened external perimeter, highlights a common problem: the old habit of believing a firewall alone provides complete safety.
Thank you Adam and Haxoris for insightful talk and valuable recommendations during the red team operation. Your expertise in cybersecurity and practical advice on enhancing defenses have been invaluable.
Physical Security Assessment and Rogue Device Deployment
Internal Phishing and Credential Acquisition
Active Directory Mapping and Domain Controller Takeover
Exploiting the Certificate Authority
Domain Compromise
Key Recommendations from the Operation
Handle App Security with a Single Solution! Check Out Talsec's Premium Offer & Plan Comparison!
Raising the Cost of Attack: The primary goal for engineers is not necessarily to create an "unhackable" system, but to make the process of attacking so difficult and expensive that it is no longer profitable for non-ethical hackers.
Offense Drives Defense: Without offensive pressure, defensive measures would stagnate. Innovative attacks force engineers to create more resistant hardware and software, leading to a safer global digital environment.
Much of the current security struggle stems from foundational computing architectures designed decades ago with performance, rather than security, as the priority. Historically, compilers were built to optimize for speed and memory, not to resist reverse engineering.
Modern shifts are beginning to address these roots:
Security-First Compilers: New development focuses on compilers that produce output that is inherently difficult to reverse.
Hardware Evolution: Innovations like built-in chips for data encryption and secure enclaves are now standard even in low-end devices, significantly raising the barrier for entry-level hacking.
The technological landscape is moving toward several parallel paths that could redefine security:
AI and Deep Fakes: While AI has increased the volume and sophistication of attacks—such as 2,000% increases in deep fake incidents—it also provides engineers with new tools to detect and mitigate these threats.
Quantum Computing: Though commercial quantum computing is still emerging, the development of quantum-resistant cryptography is already underway to stay ahead of future vulnerabilities.
The Return of Thin Clients: A potential shift back to centralized execution (where code runs on a secure mainframe rather than the local device) could make traditional local reverse engineering obsolete, though it would shift the focus toward cloud and transport security.
There is a general consensus that open-source projects contribute to global security by allowing for public auditing and learning. However, this openness comes with significant risk; a vulnerability in a single widely used open-source package can impact billions of systems simultaneously.
The most critical takeaway for CTOs and technical decision-makers is to move away from an "opposition mindset" between engineering and security.
Invest in Culture: Security should not be a final step or something done only because a security officer demands it. It must be a standard part of the engineering culture.
Shift Left: Cyber security professionals should be involved from the beginning of a project, rather than being called in only at the end.
Assume Vulnerability: Every employee should work with the baseline assumption that security is a continuous, background process in every line of code they write.
The Defensive Dilemma: Are We Fighting a Losing Battle?
Handle App Security with a Single Solution! Check Out Talsec's Premium Offer & Plan Comparison!
AI Amplification: Advanced bots leverage AI to learn and evade detection.
Evasion: Bots bypass visual challenges such as CAPTCHAs using computer vision and rapidly change IP addresses and behaviors.
Scale of Attack: Bot attacks are growing exponentially. The largest Distributed Denial-of-Service (DDoS) attack recorded last year reached 4 terabits per second; recently, a 29.7 terabit-per-second attack was mitigated, representing an eight-fold increase.
The 29.7 Tbps attack originated from a botnet called Isuru, which evolved from the Mirai botnet. Isuru has compromised over a million devices, primarily IoT devices such as routers and CCTV cameras.
Botnets have shifted their business model from offering "botnet as a service" to providing residential proxies.
Residential proxies infect devices, like user routers, and sell their network capacity on the darknet. This enables hackers to launch attacks using legitimate residential IP addresses that carry reputational trust online. Malicious activity typically uses a small fraction of the user’s bandwidth (e.g., 7–10%) to avoid detection.
Device infection often occurs through N-day attacks, exploiting known vulnerabilities for which patches exist but have not been applied.
Residential proxies are not exclusive to cybercriminals. Legitimate companies also operate residential proxy services, selling access to IP addresses for advertising or AI model training. Users often unknowingly permit up to 10% of their internet traffic to be used via agreements in app terms, such as free VPNs or ad blockers. Globally, approximately 250 million IP addresses participate in the residential proxy ecosystem.
Identifying residential proxies is challenging, even with advanced machine learning models, because malicious requests originate from legitimate IP addresses. Bots often rotate IPs per request, preventing detection based on repeated requests from a single IP.
Cloudflare developed ML version 8 (ML8) to differentiate residential proxies by analyzing individual requests rather than IP addresses alone. Key outcomes from ML8 implementation include:
Detection of 17 million new residential IP addresses per hour during the initial rollout.
Identification of 95% of evasive attacks previously difficult to detect.
A 20% increase in bot detections from cloud providers such as AWS and Digital Ocean, leveraging behavioral signals rather than IP alone.
Personalized security further enhances protection by tailoring machine learning models to specific enterprise traffic patterns. This approach addresses variations in what constitutes abuse for different organizations.
The personalized security process includes:
Dynamic Baseline: Establishing normal traffic patterns over time, accounting for seasonality or release spikes.
Identifying Anomalies: Detecting abnormal behavior specific to a website or application, such as methodical scraping of gaming data.
Automated Rules: Flagging anomalous bots and automatically generating rules to adjust bot scores for the specific customer.
Beta tests with five enterprise customers showed that personalized security detected 34% more abuses than traditional methods.
Legitimate AI agents, or "agentic bots," require secure authorization for actions such as making transactions on behalf of users. Visa and Mastercard implemented Web Bot Authentication to authorize these bots using cryptographic verification.
Requirements for agentic bots include:
Registration: Bots register on the platform and provide cryptographic keys.
Signature and Nonce: Each request contains a signature and a nonce to prevent replay attacks.
Key ID, Timeline, and Tag: Requests include a Key ID, transaction timeline, and an intent tag (e.g., purchase or browse).
This system operates without infrastructure changes for Visa or Mastercard. OpenAI has agreed to implement it, and Cloudflare provides an SDK for developers using Cloudflare Workers to build agentic AI applications compliant with these security protocols.
Thank you Anatol and Cloudflare team for sharing insights on combating modern AI-amplified bots and the evolving cybersecurity landscape. The detailed analysis of botnets, residential proxies, and the exponential scale of attacks provides valuable context for understanding today’s threats.
A deep dive into the specific malicious APKs revealed a heavy reliance on social engineering and counterfeit app clones. Attackers bypass official stores and trick users into side-loading apps by masquerading as:
Fake Media Files:Rasmlar_11_08_2022.jpg.apk, to'ydan video (2025).apk, Секс.apk
System Utilities:AppInstaller.apk, NetmirrorApk.apk
Game Mods & Cheats:PubgMobile.apk, com-mod-roblox-mod-apk-2-691-867-1888.apk
Users think they are downloading a picture, a video chat app, or a cheat for Roblox, but they are actually installing a Malware Dropper or a Trojan Banker that immediately requests dangerous permissions.
The Talsec Malware Detection SDK solves this by providing a powerful mixture of on-device heuristics and an online malware database. By evaluating the malware on-device with optional double check against online DB, the SDK provides actionable intelligence back to your app without sending the user's entire app inventory off-device.
1. On-Device Offline Scanning
The foundational layer runs entirely locally. Instead of just looking at hashes, Talsec evaluates the app's installation source and permissions together with it's behavior and environment: A brand-new, sideloaded app requests a suspicious combination of permissions (e.g., Accessibility access + SMS reading). Sounds suspicious, right?
2. The App Reputation API
For absolute certainty, the SDK seamlessly extends its offline capabilities with a live cloud malware database. This authoritative signal verifies the heuristic findings against known, live malware DB.
Because every app has a different risk appetite, we don't force a one-size-fits-all configuration. Dealing with malware means dealing with the reality of false positives. Here is how engineering teams implement the Malware Detection SDK based on recommended recipes:
Recipe A: "High-Confidence Online" (The Set-and-Forget Mode)
How it works: Leverages only the App Reputation API to check for definitively known malware.
False Positive Reality:0% False Positives. Because it relies strictly on confirmed malware DB hits, it never flags a benign app.
Implementation Flow: Ideal for busy teams. If the SDK flags an app in this mode, you can confidently hard-block the user from proceeding or shut down your app immediately. There is no need for complex UX flows—if a hit occurs, there is confirmed malware on the device.
Recipe B: "High-Security Online" (The Banking-Grade Mode)
How it works: Combines the live App Reputation API with our on-device permission heuristics.
False Positive Reality:Very Low, but present. If a sideloaded app is unknown to the DB but requires dangerous permissions, it will be flagged. This protects you from zero-day threats, but might occasionally flag a weird, benign indie app the user installed.
Implementation Flow: Because a flag might be a false positive, we don't recommend a hard block. Instead, developers use the SDK's detailed threat reasoning to trigger sophisticated countermeasures:
Warn the User: Show a bottom-sheet explaining that a highly suspicious app was found and ask them to uninstall it to continue using the banking/payment features safely.
Step-Up Authentication: Force the user to re-authenticate via biometrics or a hardware token before authorizing a transaction.
Process Evidence on the Backend: Send the Talsec risk score and threat details to your backend fraud engine. You can let the user continue browsing the app, but silently flag their account for manual review if they attempt a high-risk action (like a large funds transfer).
As our data shows, Android malware is not a theoretical threat; it’s an active, mutating ecosystem living on the same devices as your application. Building your own defense to catch repackaged clones, droppers, and permission-abusing trojans is a massive drain on your engineering resources. Check out Talsec's Premium Malware Detection to learn more about the configurations, or visit talsec.app to request a demo.
--written by Tomas Soukal
A 30-Day Malware Case Study
By teaming up with Gen, the parent company of Norton and Avast, we bring you an unparalleled malware database. Paired with our behavioral Malware Detection techniques it provides your mobile appa and security teams with top intelligence to detect ongoing threats. It continuously evolves, drawing top-tier threat intelligence from a massive network of 500 million global users.
How Attackers Trick Users
Talsec’s Hybrid Malware Detection Architecture
The Reality of False Positives & Practical Implementation Recipes
Handle App Security with a Single Solution! Check Out Talsec's Premium Offer & Plan Comparison!
Fingerprinting: Fingerprinting focuses on identifying environments rather than tracking individuals. It combines ordinary system signals that are insignificant on their own but together uniquely describe an environment and form a stable signature. This enables recognition of the same browser even after cookies are cleared. Modern fingerprinting systems apply machine learning to hundreds of signals, assigning higher weight to stable attributes such as GPU or installed fonts and lower weight to volatile signals like time zone, producing a confidence-based similarity score.
Device or Browser Identifier: Most anti-fraud systems rely on a stable identifier derived from fingerprinting. This identifier helps distinguish returning trusted users from first-time visitors or potentially risky anomalies, reducing unnecessary friction for known users.
Device Intelligence: Device intelligence does not identify who a user is, but rather what type of environment they are using. It transforms raw signals into actionable context, revealing intent-related indicators such as VPN usage inconsistent with local time zones or sessions running in incognito mode.
Fraud has reached a scale that makes advanced identification and intelligence unavoidable:
Online payment fraud is projected to cause approximately $350 billion in global losses between 2023 and 2027.
Card fraud alone accounts for roughly $50 billion in losses each year.
A single aggregated breach database contains 16 billion compromised login credentials—nearly twice the global population.
83% of organizations report experiencing at least one account takeover attack.
A common reaction to rising fraud is to increase friction through additional challenges such as two-factor authentication. However, excessive friction leads to user fatigue and abandonment. Device intelligence enables a more balanced approach by allowing systems to trust users with confidence.
This approach relies on adaptive security:
When device, environment, and behavior align with known trusted patterns—such as consistent device usage, location, and activity—no interruption is necessary.
When signals change unexpectedly, such as a new device, operating system, or identifier, systems can introduce proportional friction. This may include step-up authentication, temporary restrictions on high-risk actions, or escalation for manual review.
Balancing security and user experience raises a critical question: should algorithms make trust decisions automatically, or should humans define the rules?
Fully automated, out-of-the-box decisions (such as blocking all VPN traffic or rooted devices) fail because fraud is inherently contextual. A VPN may indicate abuse for one business and privacy-conscious behavior for another. A rooted device may represent a serious risk in mobile banking but a legitimate testing environment for quality assurance.
Universal models cannot account for a company’s specific users, business model, or risk tolerance. Effective systems should inform decisions rather than dictate them. Humans must define acceptable risk and friction, while algorithms enforce those decisions at scale.
Robust anti-fraud systems operate across multiple layers:
Device Layer: Ensures runtime integrity by verifying that the application or browser environment has not been tampered with.
Edge Layer: Enables rapid responses through CDNs or firewalls, allowing immediate blocking or challenging of suspicious activity without code changes, deployments, or infrastructure updates.
Back-End Layer: Applies contextual interpretation and enforces decisions based on business logic and risk models.
This layered approach enables rapid reaction to emerging fraud patterns. For example, a rule deployed at the edge can instantly block sign-up attempts originating from incognito sessions, reducing response time from hours to seconds.
While systems can score risk in real time, defining trust, acceptable risk, and user friction remains a human responsibility.
Thank you Martin and Fingerprint for sharing clear and practical insights into how fingerprinting, device intelligence, and contextual decision-making shape effective anti-fraud strategies.
Who Decides? Fingerprinting, Device Intelligence, and Context in Fighting Fraud
Handle App Security with a Single Solution! Check Out Talsec's Premium Offer & Plan Comparison!
Voice Synthesis: Replicating a specific voice from just a few seconds of audio.
Deepfakes: Generating realistic video.
This threat is fueled by the democratization of advanced AI models, the massive amount of personal data available on social media for tailored attacks, and the fact that mobile devices are now the epicenter of personal identity and finance.
A typical AI impersonator attack is hyper-personalized and bypasses traditional security.
Contextual Hook: Attackers use AI to scrape personal information, such as recent travel, to craft urgent and believable SMS alerts.
The Master Stroke: After a user clicks a malicious link, they receive a call from a fully synthetic AI voice.
Social Engineering: The AI, acting as a professional security agent, convinces the user to read back a legitimate one-time password (OTP).
Even if an app's encryption is unbroken, the human remains the entry point.
To counter these fakes, developers must build a "digital detective" inside their applications that follows three steps: gathering clues, connecting dots, and taking action.
The detective collects two types of data without compromising privacy:
Behavioral Clues: Analyzes unique user rhythms, such as typing patterns and swiping velocity, to detect if a user is acting under duress.
Contextual Clues: Checks the "scene of the crime" for runtime signals like rooted devices, screen overlays, SIM swaps, or geolocation anomalies.
A policy engine evaluates these clues together. For example, if a user adds a new payee while showing low behavioral trust and a geolocation mismatch, the system can trigger a precise, user-friendly intervention like a Biometric FaceID step-up instead of a blunt 24-hour block.
To protect users against the AI impersonator, organizations should:
Integrate Specialized SDKs: Use tools capable of gathering behavioral and contextual clues.
Audit Security Copy: Ensure microcopy is context-aware to prevent user confusion, such as warning a user that a bank will never ask for an OTP during an active call.
As AI continues to perfect the look of trust, developers must focus on perfecting the real-time "feel" of trust on the device.
Thank you, Dmitry Bogatenkov, for your insightful presentation on defending against machine-generated deception. Your discussion on shifting from simple code security to an intelligent runtime defense through a "digital detective" mindset was especially impactful. We appreciate you sharing your expertise and strategies for gathering behavioral and contextual clues to better protect users from the evolving threat of AI impersonators.
Handle App Security with a Single Solution! Check Out Talsec's Premium Offer & Plan Comparison!
Modified games with cheat engines or hidden malware.
Apps stripped of ads, in-app/subscription purchases, or security checks.
Think of it like someone copying your book, rewriting a few chapters, and publishing it under your name. Only this time, it’s malicious software.
Our data shows that around 0.08% of devices have breached app integrity.
Global Threat Rate for Tampering (source my.talsec.app)
Detecting tampering isn’t just about checking the APK’s checksum once — attackers can bypass simple checks. Detection must be ongoing, multi-layered, and resistant to bypasses.
Manual or DIY solutions (like hardcoding hash checks) quickly become outdated. Instead, developers rely on expert-maintained SDKs that:
Verify APK integrity at runtime.
Detect manifest modifications and signature mismatches.
Prevent repackaged versions from running.
You can implement yourself simple integrity detection check like this:
Talsec provides a universal solution that covers many of your app security needs:
Comes with 14 extra detections like root/jailbreak detection, Frida and hooking, emulators, debugging, screenshots, etc.
Used by 6000+ apps; #1 Mobile RASP SDK by popularity ()
Integration is straightforward and callback-based, allowing for simple and readable implementation of protection.
Integration Example:
When evaluating mobile app security and Runtime Application Self-Protection (RASP), developers often compare various Talsec alternatives to find the right fit for their architecture. The "right choice" depends on the specific problem you need to tackle and which vendor offers the best bang for your buck.
The market is diverse, offering different philosophical approaches to protection. Talsec prioritizes top-tier root detection and a balanced security SDK portfolio covering the most popular attack vectors. Meanwhile, some vendors specialize primarily in heavy code obfuscation and compiler-based hardening, while others focus on a drag-and-drop (no-code) integration experience for DevOps-oriented teams. There are also solutions dedicated specifically to API security, active cloud hardening, enterprise compliance, or gaming protection. The most prominent providers alongside Talsec include Guardsquare, Appdome, Promon, Build38, Approov, and AppSealing.
App tampering and repackaging let attackers modify your APK, strip protections, or spread counterfeit versions that steal data or revenue. Detection doesn’t have to be DIY or error-prone—simple checksum checks are easily bypassed. Tools like freeRASP provide reliable, continuously updated runtime protection with strong tamper detection and 14+ extra checks, letting you respond proactively to integrity breaches.
👉 If you want tampering detection plus root, jailbreak, Frida, emulator, debugging, screenshot, and malware protection in one free package, start with .
What is App Tampering & Repacking?
fun isAppTampered(context: Context): Boolean {
return try {
// Check if APK signature matches
val packageManager = context.packageManager
val packageName = context.packageName
val signatures = packageManager.getPackageInfo(
packageName,
android.content.pm.PackageManager.GET_SIGNATURES
).signatures
// Compare with expected signature hash (you need to hardcode your app's signature)
val expectedSignature = "YOUR_EXPECTED_SIGNATURE_HASH" // Replace with your app's actual signature
val actualSignature = android.util.Base64.encodeToString(
signatures[0].toByteArray(),
android.util.Base64.NO_WRAP
)
actualSignature != expectedSignature
} catch (e: Throwable) {
true // If we can't verify, assume tampered
}
}
Talsec.start(applicationContext)
override fun onTamperDetected() {
Log.w("freeRASP", "App tamper detected!")
// Optionally block sensitive actions or warn the user
}
Statistics
More actual global data can be found at .
How to Detect App Tampering?
DIY Coding Guide
Use freeRASP (free library by Talsec)
Commercial Alternatives
Key Takeaway
Handle App Security with a Single Solution! Check Out Talsec's Premium Offer & Plan Comparison!
LSPosed
or
VCAM
modules to intercept Camera API calls and swap the live feed for a file like virtual.mp4.
Emulators: Running the app in BlueStacks or Nox and using OBS VirtualCam to map a PC video feed as the "phone camera".
Automation: Using the Appium framework to script the entire KYC process, often utilizing plugins that instrument the app to inject images.
Because these tools require specific "illegal" environments to function, Talsec’s core features act as a multi-layered filter that stops the injection before the camera even opens.
Threat Vector
Talsec Relevant Feature
Why it Works
LSPosed with VCAM Module
Root & Hook Detection
VCAM requires a rooted device (Magisk) and an active hooking framework (LSPosed/Frida) to function. Talsec can kill the session the moment it sees these artifacts.
Emulators (BlueStacks) (+ OBS)
Emulator Detection
*This information can be securely evaluated on the customer backend endpoint if Talsec AppiCrypt is used as well for enhanced security
To maximize your KYC security, ensure you are utilizing Talsec’s full suite rather than just one module. By closing the door on Root, Hooks, Emulators, and Automation, you effectively neutralize majority of software-based video injection tools used in the wild today without needing complex video analysis processing pipelines.
How Is Video Injected
The Solution: Talsec's Defensive Mapping
Developer Pro-Tip
Handle App Security with a Single Solution! Check Out Talsec's Premium Offer & Plan Comparison!
Common Examples
Threat
Remote Desktop Control Apps
TeamViewer, AnyDesk
Social engineering, global data leakage
ADB Video Stream / Control
Vysor, scrcpy
Local data leakage
Screenshot & built-in recording
Default system apps
Global data leakage
Third-party screenshot/recording
RATs are the highest-severity row here — the only category where the attacker isn't just watching, they're operating the device.
Attackers typically rely on three things happening together, none of which is suspicious in isolation:
Accessibility takeover: The victim is walked into enabling Accessibility Service for the "support" app, which then dispatches gestures and reads screen content.
Overlay concealment: A floating control or "connected" indicator is drawn on top of the real UI using SYSTEM_ALERT_WINDOW.
Live screen access: The device's screen is captured, mirrored, or driven through Android's MediaProjection APIs, ADB (scrcpy/Vysor-style tools), or a dedicated virtual display.
Some tools also split these across two packages — a visible main app plus a companion "control plugin" installed separately to hold the Accessibility Service — so a check that only inspects the main package can miss the component that actually has control.
Most RATs abused this way are legitimate, signed applications rather than malware written from scratch, which makes them a good test of what a malware database can and can't do alone.
If the RAT is already known — a leaked build, a cracked APK, a fingerprinted clone — , backed by Gen's (Norton/Avira) live malware database, catches it as reliably as any other known malware: no permission heuristics needed, near-zero false positives.
If it's a zero-day RAT — a fresh clone, a rebrand, or a legitimate tool no database has flagged yet — there is no single check that catches this reliably, from us or anyone else. The approach has to be defense in depth: several signals that are each common on their own, but rare in combination.
Threat Vector
Talsec Relevant Feature
Stops seeing
Stops controlling
General Accessibility Services Misuse ( ⭐️The best Anti-RAT feature⭐️)
1) blockScreenControl()available since Q3 2026) + 2)Accessibility Services Misuse Detection Suite (RASP+)
✅ Android 14 / API 34 and above only: blocks both reading and remote control of the marked view
✅ Android 14 / API 34 and above only: bocks both reading and remote control of the marked view
Screen viewed via TeamViewer/AnyDesk-style tools, screenshots, recording, or casting
freeRASP + freeMalwareDetection cover the foundational layer — active screen blocking plus package/permission-based RAT hints, no config required. RASP+ adds built-in reactions, Overlay Detection, Accessibility Services Misuse Detection, and full incident logging for teams that need a configurable, auditable defense. See Malware Detection and RASP+ for how these combine.
Where Remote Access Tools Fit Among UI Screen-Capture Threats
objection – built on Frida, commonly used for bypassing SSL pinning and root detection
This allows attackers to:
Bypass license checks or payments
Steal API keys and user credentials
Alter logic to gain unfair advantages in apps (e.g., games, banking apps)
Detecting hooking is tricky because frameworks evolve fast and attackers hide their tracks. DIY detection (like searching for suspicious processes or libraries) often fails against advanced obfuscation. That’s why there are many solutions which already provides high level of detection:
(by Talsec) – battle-tested detection of Frida, Xposed, Magisk, and more
These solutions keep pace with new bypass techniques, saving you the burden of chasing attackers.
You can implement yourself simple Frida server detection. Frida often uses ports like 27042 and 27043.
With freeRASP, the hook detection utilizes hundreds of advanced checks, offering robust detection even with bypass scripts applied.
Robust Kotlin SDK that detects Frida, Xposed, Magisk, root, tampering, and more
Actively updated, trusted by 6000+ apps worldwide
Simple integration with callbacks for security events
Add the in your project, focus on implementing the following callback:
When evaluating mobile app security and Runtime Application Self-Protection (RASP), developers often compare various Talsec alternatives to find the right fit for their architecture. The "right choice" depends on the specific problem you need to tackle and which vendor offers the best bang for your buck.
The market is diverse, offering different philosophical approaches to protection. Talsec prioritizes top-tier root detection and a balanced security SDK portfolio covering the most popular attack vectors. Meanwhile, some vendors specialize primarily in heavy code obfuscation and compiler-based hardening, while others focus on a drag-and-drop (no-code) integration experience for DevOps-oriented teams. There are also solutions dedicated specifically to API security, active cloud hardening, enterprise compliance, or gaming protection. The most prominent providers alongside Talsec include Guardsquare, Appdome, Promon, Build38, Approov, and AppSealing.
Hooking is one of the most dangerous runtime threats to Android apps. Attackers armed with Frida, objection, or frida-trace can change your app’s behavior in seconds—but you can fight back. With freeRASP by Talsec, Kotlin developers get a reliable, lightweight, and continuously updated way to detect and stop hooking attacks before they cause damage.
import kotlinx.coroutines.Dispatchers
import kotlinx.coroutines.withContext
import java.net.InetSocketAddress
import java.net.Socket
suspend fun detectFridaPorts(): Boolean = withContext(Dispatchers.IO) {
val portsToCheck = listOf(27042, 27043)
for (port in portsToCheck) {
try {
Socket().use { socket ->
socket.connect(InetSocketAddress("127.0.0.1", port), 200)
// If we reach this line, the connection was successful
println("Frida-like service detected on port $port")
return@withContext true
}
} catch (e: Exception) {
// Port not open or connection timed out; ignore and continue
}
}
return@withContext false
}
This article delves into the concept of obfuscation, explore its different types, and articulate Talsec's philosophy on its application. We believe in a balanced and pragmatic approach, prioritizing security without compromising performance.
We introduced Talsec Portal, a comprehensive platform designed to provide interactive charts, readable security intelligence, and global benchmarking:
Centralized Hub: Transform raw security data into actionable intelligence.
Real-Time Monitoring: Track threats live.
Deep-Dive Analytics: Filter data by app versions, OS, devices, and more.
Global Benchmarking: Compare your security posture against global averages.
We have introduced new Starter plans that make it easier for teams to move from testing to commercial launch with predictable pricing and built‑in SLAs. The RASP+ Starter plan offers advanced in‑app protection with a Bronze SLA for apps up to 10K downloads, while the Full App Safety Suite Starter combines RASP+, Hardening, AppiCrypt, and Anti‑Malware into a single package for early‑stage production deployments.
Together with the existing freeRASP tier for exploration and low‑medium value apps, these new plans give companies a clear upgrade path from freeRASP to full‑scale protection.https://www.talsec.app/#plans
We want to extend our heartfelt thanks to the professional and freeRASP community for helping us make a difference in mobile security. To our fans, colleagues who work tirelessly to support everyone, and our adopters and supporter -your dedication inspires us every day. We don’t claim to have all the answers, but by partnering with industry experts and sharing knowledge, we continue to grow together. A strong, united community drives us forward and fuels our commitment to giving back to the broader mobile security ecosystem. Here’s to an even more secure and innovative 2026 - may it bring success, collaboration, and growth for us all!
🔐 Root Detection
🚀 New App Platforms
How to Achieve Root-Like Control Without Rooting: Shizuku's Perils & Talsec's Root Detection
How to Prevent Magisk Root Hiding and Security Bypass
🛠️ SDK API
🛡️ Spoofing Protection
📸 Screen Capture Protection
Read more in our article:
🕵️ Code Obfuscation for Mobile Apps
Read more in our article:
📊 Talsec Portal
Read more in our article:
🏁 New Starter Plans
Thank You for an Incredible 2025!
A few years ago, when we first started working on our Malware Detection extension, we realized we were at a crossroads. We could take the heuristic route (which we did)—identifying zero-day attacks by flagging apps requesting SMS permissions via ADB or holding REQUEST_INSTALL_PACKAGES. This remains vital for catching evolving malware that hasn't been indexed yet.
The alternative was a malware database (DB) approach. We tried to bridge this gap by engaging with the security community and major players, but at the time, access to the world’s leading threat intelligence providers was simply out of reach for a specialized team like ours.
I even found an artifact in my desk drawer the other day: a dusty 2TB HDD with a "Nuclear Danger" sticker, holding a static snapshot of a malware database from that era. The millions of hashes on that drive have almost zero value today, but it’s a reminder of what we wanted to build but couldn’t yet scale:
Note to future self: Don't leave malware hard drives lying around the office. 🙃
This year, as the demand for a real-time malware database became undeniable, everything fell into place. Through a mix of luck and persistence, our team connected with a true titan in threat intelligence: Gen Digital, the powerhouse behind Avast, Norton, and Avira. The Gen operates a global, cloud-based system that classifies files in real time. Behind it there’s an online database containing hundreds of millions of file metadata and a set of innovative algorithms that help decide if a file is potentially dangerous. Their API allows the Talsec SDK to verify app hashes and receive a classification in milliseconds.
The Gen, Norton and Avast logos are the property of Gen Digital Inc. and are used here solely for reference and identification purposes. src:
Suddenly, the state-of-the-art malware intelligence we had been striving for was accessible. With this level of intelligence finally at our fingertips, the team started coding immediately. We rewired the internals of our SDK Malware Detection engine to allow for live, online malware checks. After a total engine overhaul and rigorous testing, we introduced Malware Detection v2. It’s no longer a choice between heuristics and databases—it’s a hybrid framework that addresses both known and unknown threats.
You now have granular control:
Offline Mode: Stick to the classic heuristic scanning for privacy or offline-first needs.
High-Confidence Online Mode: Check against a live global database to identify known malware with near-zero false positives.
High-Security Online Model: The recommended setup for high-stakes environments like banking or payments. This combines API-verified detection with permission-based zero-day flagging.
Finally, the Talsec SDK is equipped well to identify all kinds of high-risk apps. RATs & banking trojans causing session hijacking or credential theft. Accessibility misuse malware performing unauthorized screen reading/clicks. Keyloggers & SMS Forwarders. Video injection tools utilized for KYC fraud. Or common tools like TeamViewer or AnyDesk that are often exploited for remote assistance fraud.
See the Talsec Malware Detection SDK in action. These demos that I recorded some time ago showcase how the SDK identifies specific threats in real-time on Android devices:
Some of you are already running this in your apps. If you are, I’d love to hear your thoughts in the comments. For everyone else: let us know if you want to see a demo.
Typical malware: Sideloaded, has suspicious permissions and is confirmed to be malicious by online DB
This problem is not as insignificant, as it looks like. Our data shows, that around 1.5% of devices on which screenshot was detected; and 0.1% where recording was detected.
Global Threat Rate for Screenshot (source my.talsec.app)
Global Threat Rate for Screen Recording (source my.talsec.app)
Detecting screen capture is tricky, since Android doesn’t offer a universal system-level API for all cases. DIY methods (like flagging windows with FLAG_SECURE) work only partially and can break user experience.
To provide reliable and strong detection, it's good idea to use specialised, continuously updated SDKs.
These can provide:
Newly updated detection techniques
Deeper check of device
Nice API for end developer to interact with, rather than reinventing a wheel
Comes with 14 extra detections like app integrity, Frida and hooking, emulators, debugging, screenshots, etc.
Used by 6000+ apps; #1 Mobile RASP SDK by popularity ()
Add the in your project, focus on implementing the following callback:
When evaluating mobile app security and Runtime Application Self-Protection (RASP), developers often compare various Talsec alternatives to find the right fit for their architecture. The "right choice" depends on the specific problem you need to tackle and which vendor offers the best bang for your buck.
The market is diverse, offering different philosophical approaches to protection. Talsec prioritizes top-tier root detection and a balanced security SDK portfolio covering the most popular attack vectors. Meanwhile, some vendors specialize primarily in heavy code obfuscation and compiler-based hardening, while others focus on a drag-and-drop (no-code) integration experience for DevOps-oriented teams. There are also solutions dedicated specifically to API security, active cloud hardening, enterprise compliance, or gaming protection. The most prominent providers alongside Talsec include Guardsquare, Appdome, Promon, Build38, Approov, and AppSealing.
What is Screen Capture & Recording?
Talsec.start(applicationContext)
override fun onScreenshotDetected() {
Log.w("freeRASP", "Screenshot detected!")
// Optionally block sensitive actions or warn the user
}
override fun onScreenRecordingDetected() {
Log.w("freeRASP", "Screenshot detected!")
// Optionally block sensitive actions or warn the user
}
Don't forget about possibility to take photo of a phone screen in real life.
Statistics
More actual global data can be found at .
How to Detect Screen Capture/Recording?
freeRASP (by Talsec)
Integration Example
Commercial Alternatives
Handle App Security with a Single Solution! Check Out Talsec's Premium Offer & Plan Comparison!
– running automated scripts against login systems.
App tampering – analyzing and modifying your app in a safe, sandboxed space.
Emulators pretends to be a real device, but it’s just software running on a PC. Detecting it crucial for protecting your app’s integrity.
More about emulators and their usage in gaming:
Detecting emulator environments is tricky because attackers constantly adapt.
Basic checks for emulators include looking at:
Device HW statistics: device model, CPU info, screen size/resolution
Suspicious system files
Suspicious processes
However, these are not enough thought, since they are easy to bypass. Instead, rely on specialised, continuously updated SDKs.
These can provide:
Newly updated detection techniques and emulator detectors
Deeper check of device
Nice API for end developer to interact with, rather than reinventing a wheel
You can implement yourself like this:
With freeRASP, the emulator detection utilizes hundreds of advanced checks, offering robust detection even with bypass scripts applied.
Comes with 14 extra detections like app integrity, Frida and hooking, root/jailbreak detection, debugging, screenshots, etc.
Used by 6000+ apps; #1 Mobile RASP SDK by popularity ()
Add the in your project, focus on implementing the following callback:
When evaluating mobile app security and Runtime Application Self-Protection (RASP), developers often compare various Talsec alternatives to find the right fit for their architecture. The "right choice" depends on the specific problem you need to tackle and which vendor offers the best bang for your buck.
The market is diverse, offering different philosophical approaches to protection. Talsec prioritizes top-tier root detection and a balanced security SDK portfolio covering the most popular attack vectors. Meanwhile, some vendors specialize primarily in heavy code obfuscation and compiler-based hardening, while others focus on a drag-and-drop (no-code) integration experience for DevOps-oriented teams. There are also solutions dedicated specifically to API security, active cloud hardening, enterprise compliance, or gaming protection. The most prominent providers alongside Talsec include Guardsquare, Appdome, Promon, Build38, Approov, and AppSealing.
Talsec.start(applicationContext)
override fun onEmulatorDetected() {
Log.w("freeRASP", "Emulator detected!")
// Optionally block sensitive actions or warn the user
}
How to Detect Emulator Usage?
DIY Coding Guide
Use freeRASP (free library by Talsec)
Integration Example
Commercial Alternatives
Handle App Security with a Single Solution! Check Out Talsec's Premium Offer & Plan Comparison!
Use USB debugging to inject commands or bypass protections.
Modify system behaviors that apps normally rely on for safety.
Our data shows that around 2% of devices have developer mode enabled.
Global Threat Rate for Developer Mode (source my.talsec.app)
You can implement yourself simple Developer Mode detection like this:
Comes with 14 extra detections like app integrity, Frida and hooking, emulators, debugging, screenshots, etc.
Used by 6000+ apps; #1 Mobile RASP SDK by popularity (link)
Add the in your project, focus on implementing the following callback:
When evaluating mobile app security and Runtime Application Self-Protection (RASP), developers often compare various Talsec alternatives to find the right fit for their architecture. The "right choice" depends on the specific problem you need to tackle and which vendor offers the best bang for your buck.
The market is diverse, offering different philosophical approaches to protection. Talsec prioritizes top-tier root detection and a balanced security SDK portfolio covering the most popular attack vectors. Meanwhile, some vendors specialize primarily in heavy code obfuscation and compiler-based hardening, while others focus on a drag-and-drop (no-code) integration experience for DevOps-oriented teams. There are also solutions dedicated specifically to API security, active cloud hardening, enterprise compliance, or gaming protection. The most prominent providers alongside Talsec include Guardsquare, Appdome, Promon, Build38, Approov, and AppSealing.
Developer Mode enables advanced debugging features that attackers can exploit to reverse engineer, tamper, or bypass app protections. Detection doesn’t have to be DIY or error-prone—simple flag checks are easily bypassed. Tools like freeRASP provide reliable, continuously updated detection with 14+ advanced checks, letting you respond proactively to threats like Developer Mode, root, Frida, emulators, and more.
👉 If you want Developer Mode detection plus root, jailbreak, emulator, debugging, screenshot, and tampering protection in one free package, start with .
What is Developer Mode?
fun isDeveloperModeEnabled(context: Context): Boolean {
// "development_settings_enabled" is available from API 17+
return try {
android.provider.Settings.Secure.getInt(
context.contentResolver,
android.provider.Settings.Global.DEVELOPMENT_SETTINGS_ENABLED
) == 1
} catch (e: Throwable) {
false
}
}
// Usage:
// val isDevMode = isDeveloperModeEnabled(context)
private val deviceStateListener = object : ThreatListener.DeviceState {
...
override fun onDeveloperModeDetected() {
TODO("Not yet implemented")
}
}
Statistics
More actual global data can be found at .
How to Detect Developer Mode?
DIY Coding Guide
Use freeRASP (free library by Talsec)
Integration Example
Commercial Alternatives
Key Takeaway
Handle App Security with a Single Solution! Check Out Talsec's Premium Offer & Plan Comparison!
the revised eIDAS (eIDAS 2.0), entered in force on
20 May 2024
. Every EU Member State must offer at least one
European Digital Identity Wallet (EUDIW)
to its citizens. From the moment a national wallet goes live,
any app or website that wants to accept identity attributes from it becomes a Relying Party (RP)
under the
EUDI Architecture Reference Framework (ARF)
.
If your app:
Onboards customers (KYC),
Gates content by age, residence, profession, or qualification,
Signs contracts or accepts qualified electronic signatures,
Replaces username/password with wallet-based login,
…then you are a Relying Party. And RPs carry statutory security obligations.
EUDIW presentations happen on a smartphone. That smartphone is also where:
The user's wallet app lives (and can be cloned, repackaged, or shimmed).
Your RP app lives (and can be reverse-engineered, hooked with Frida, and run on an emulator).
Malware can read screens, intercept NFC signals, or screen-share to a remote operator.
Social engineering can drive a real user to present credentials to a fake RP.
The eIDAS 2.0 implementing acts and the ARF push hard on the wallet side assurance. But the RP side is just as exposed, and largely your problem to solve.
Prove your RP app is genuine and untampered before accepting a presentation
Detect known malware on the device interacting with your app
Detect screen overlays, accessibility abuse, and screen mirroring during a presentation
RASP+
Proceed to the next article in this series, "EUDI Wallet Integration: A CTO's Decision Guide," to establish your strategic roadmap and understand the critical architectural shifts needed to ship securely.
written by Majid Hajian
This multi-part series is built for CTOs, architects, and mobile developers. We break down the regulatory clock, the architectural shifts, and the hands-on implementation details required to close the mobile security gap.
Explore the complete series:
Part 1: Build a Secure EUDI Wallet Relying Party An overview of the new eIDAS 2.0 landscape, the mobile threat surface nobody warned you about, and how to map regulatory obligations to your security stack.
Part 2: A strategic roadmap covering implementation timelines, the shift from real-time IdP callbacks to offline verification, and the privacy requirements your DPO needs you to know.
Part 3: A hands-on implementation guide for securing the OpenID4VP flow, writing GDPR-compliant DCQL queries, and setting up robust backend verification gates.
Part 4: A deep dive into platform attestation: AppiCrypt, Google Play Integrity and Apple App Attest , and how to build a resilient, cross-platform attestation strategy.
Disclaimer for full transparency: This article utilizes Talsec technology. We know we aren't the only vendor in the mobile security space. But we are the one running on 2,000,000,000 devices. We’ve protected more apps than there are cars on Earth. It's safe to say we know what we're doing.
What's actually changing
The mobile threat surface nobody warned you about
What Talsec offers you
2. Predictability through Real-Time Risk Scoring
3. Awareness: Bridging the Gap with AI
Handle App Security with a Single Solution! Check Out Talsec's Premium Offer & Plan Comparison!
- An advanced security SDK that actively shields your app from reverse engineering, tampering, rooting/jailbreaking, and runtime attacks like hooking or debugging.
(Android & iOS) & - A backend defense system that verifies the integrity of the calling app and device to block bots, scripts, and unauthorized clients from accessing your API.
- Scans the user's device for known malicious packages, suspicious "clones," and risky permissions to prevent fraud and data theft.
Android Device State & Security Snippets
Below is a quick-reference guide for the most commonly requested Android device property and security checks.
Active USB Connection
If you want to know if a USB device (like a flash drive, keyboard) is plugged into the Android device (Android as Host), or if the Android device is plugged into a specific piece of hardware designed for it (Android as Accessory), you use the official UsbManager API.
val usbManager = context.getSystemService(Context.USB_SERVICE) as UsbManager
// 1. Android as Host: Checks if external USB devices are plugged INTO the phone
val isUsbDeviceConnected = usbManager.deviceList.isNotEmpty()
// 2. Android as Accessory: Checks if the phone is plugged into a USB accessory (like a car dock)
val isUsbAccessoryConnected = usbManager.accessoryList?.isNotEmpty() == true
Work Profile Detection
Checks if the application executing the code is running inside a managed Work Profile.
Note: Checking if the device has a work profile from a personal profile generally requires elevated permissions, so checking the current profile's state is the standard approach.
val userManager = context.getSystemService(Context.USER_SERVICE) as UserManager
// Returns true if the app is currently running inside a managed profile
val isRunningInWorkProfile = userManager.isManagedProfile
Device Encryption Status
Checks if the device storage is currently encrypted. Modern Android devices (Android 10+) are encrypted by default out-of-the-box.
val dpm = context.getSystemService(Context.DEVICE_POLICY_SERVICE) as DevicePolicyManager
val status = dpm.storageEncryptionStatus
val isEncrypted = status == DevicePolicyManager.ENCRYPTION_STATUS_ACTIVE ||
status == DevicePolicyManager.ENCRYPTION_STATUS_ACTIVE_PER_USER
Unknown Sources Enabled
Checks if the user has allowed the installation of apps from outside the Google Play Store. The method changed significantly in Android 8.0 (API 26) from a global setting to a per-app permission.
The simplest way to check this without setting up complex cryptographic attestation is by reading system properties via the command line.
Warning: This method is simple but can be spoofed by tools like Magisk on rooted devices. For strict enterprise security, you must use hardware-backed KeyStore Attestation (SafetyNet / Play Integrity API).
Retrieves the date of the last installed Android security patch. This is returned as a highly readable string in a YYYY-MM-DD format.
Leaving WebView.setWebContentsDebuggingEnabled(true) active in a release build makes any WebView content in the app inspectable over USB/ADB via Chrome DevTools — exposing JavaScript bridges, tokens sitting in local storage/cookies, and internal API traffic to anyone with physical access and a cable. This is a standard Android build/manifest setting, and it is the app's responsibility to control. The safe pattern is to gate the call behind the build's debug flag so the line compiles out of release artifacts entirely.
How to Stop Bots Without CAPTCHA
Bot traffic now accounts for nearly half of all internet requests. The default answer - CAPTCHAs - is failing. Here’s a fundamentally different approach.
Want to see it in action? Try the yourself. Open it in a normal browser, then try it with Playwright or Puppeteer and see what happens.
The CAPTCHA problem
CAPTCHAs were designed around a simple assumption: tasks that are easy for humans and hard for machines. That assumption no longer holds.
AI solves them. GPT-4V, Gemini, and purpose-built CAPTCHA-solving models break image and audio challenges with accuracy rates above 90%. Services like 2Captcha and Anti-Captcha offer API-based solving at fractions of a cent per challenge.
Click-farms bypass them. Cheap human labor in CAPTCHA farms solves challenges in bulk. The “human verification” literally uses humans — just not your users.
Users hate them. Every CAPTCHA is friction. Studies consistently show that CAPTCHAs reduce conversion rates, hurt accessibility, and frustrate legitimate users. You’re punishing real customers to slow down attackers who have already found workarounds.
The fundamental issue: CAPTCHAs challenge the user. But the user isn’t the problem - the runtime environment is.
Instead of asking “Are you human?” you can ask a better question:
“Did this request come from a real, untampered browser?”
This is the idea behind runtime attestation. Rather than interrupting the user with a puzzle, you silently inspect the environment where the request originates. A real browser running on a real device has properties that are structurally difficult to fake - especially when the inspection happens inside an isolated execution context that the attacker cannot easily observe or manipulate.
takes this approach. You add a lightweight SDK to your web app - a JavaScript + WebAssembly bundle that runs inside your page, invisible to the user. On every request, it evaluates two layers of signals:
Properties of the runtime that automation tools leave behind. Headless browsers, WebDriver-based frameworks, and scripted environments expose dozens of telltale signs: missing APIs, inconsistent browser objects, absent plugins, zero-size viewports. Individually, each signal is easy to spoof. Combined and evaluated inside an isolated WebAssembly context - where the attacker can’t observe or patch the checks - they become much harder to defeat.
How the user actually interacts with the page. Real humans produce messy, variable input: imprecise mouse paths, irregular typing rhythms, natural scroll patterns. Automation tools produce synthetic events with uniform timing and mechanical precision. The SDK analyzes mouse movement, keystrokes, scrolling, and clicks over time, building a behavioral profile that can’t be faked by dispatching a few synthetic events.
The result is a cryptographically signed, encrypted token - a cryptogram - attached to each API request. Your backend validates it. If the token is missing, invalid, or indicates a bot - the request is rejected. No puzzles, no friction, nothing visible to the user.
The typical arms race with bot detection goes like this: you add a check, the attacker patches it, you add another check, and so on. Runtime attestation changes the dynamic in a few ways:
Checks run inside WebAssembly. Unlike JavaScript-based detection, the logic runs in compiled WASM modules. An attacker can’t set breakpoints, can’t monkey-patch the functions, and can’t inspect what’s being evaluated. By the time any result touches JavaScript, it’s already encrypted.
Multiple signal layers. Even if a stealth plugin patches the obvious environment signals (like navigator.webdriver), behavioral analysis provides a second, independent layer. Fooling both simultaneously is a much harder problem than fooling either one alone.
Cryptographic binding. Each token is bound to a specific request body and timestamp. Tokens can’t be replayed, can’t be reused across requests, and can’t be forged without the signing key embedded in the WASM. An attacker who intercepts a valid token still can’t use it for a different request.
No cryptogram, no access. A curl request, a Python script, or any call that doesn’t come from a browser running the SDK simply won’t have a token. The request is rejected at the edge before it reaches your application.
A common objection:
“What about puppeteer-extra-plugin-stealth? It patches all the known bot signals.”
Stealth plugins are good at making headless browsers look like real browsers to JavaScript-based detection. They override navigator.webdriver, fake the plugin array, spoof window.chrome, and more. Against a checklist of environment signals evaluated in JavaScript, they work.
Against runtime attestation, they face two problems:
The checks they can’t see.
When the detection logic is inside Wasm and the results are encrypted, the stealth plugin doesn’t know which checks exist, what they evaluate, or what the results are. It’s patching a surface it can only guess at.
Behavior can’t be faked with property overrides.
Stealth plugins don’t generate realistic mouse movement, natural typing rhythms, or human-like scroll patterns. They make the environment look right while the behavior remains mechanical. Behavioral analysis catches what stealth plugins don’t address.
A newer challenge: AI agents that browse with real Chromium instances — tools like Anthropic’s Computer Use, browser-use, and OpenAI Operator. These aren’t headless scripts; they control actual browser windows.
They still have to produce input events, and those events still have automation characteristics. Whether AppiCryptWeb catches them consistently is an active area of testing. Early results are promising, but we won’t claim coverage we haven’t validated. If this is your concern, - we can run detection tests against your specific threat model.
Transparency matters:
Not a WAF. It doesn’t inspect request payloads for injection attacks. Use it alongside your existing security stack.
Not a rate limiter. It tells you whether a request came from a real browser, not how many requests to allow.
Not infallible. A sufficiently resourced attacker will always find new angles. The goal is to make automated abuse structurally expensive — not theoretically impossible.
Add the SDK to your frontend
It’s a lightweight JavaScript + WebAssembly bundle. Two function calls: one to initialize, one per request to get a token.
Validate on the backend
Use the provided validator library or a ready-made edge adapter for Nginx, Cloudflare Workers, AWS Lambda, Azure, or GCP.
Decide your policy
Reject bots outright, flag for review, or apply step-up verification. The cryptogram gives you the signal; what you do with it is up to you.
No UI changes. No user friction. No CAPTCHAs.
Here's the entire frontend integration:
That's it. No UI changes. No user friction. No CAPTCHAs.
AppiCryptWeb is built by . If you want to try it against your own automation tests, check out the .
How to Detect Jailbreak using Swift
Need to secure your app against jailbreaked devices? Start here.
Jailbreaking may open new doors for iPhone users. For app developers, it opens dangerous backdoors for attackers. A jailbroken device removes Apple’s security boundaries, leaving device and also your app vulnerable to data theft, tampering, and malicious hooks. Luckily, there are modern security solutions, you can reliably detect and respond jailbroken devices.
What is Jailbreak?
Jailbreaking is the process of removing iOS restrictions, granting users root access to the system (similar to rooting on Android). This lets them install unauthorized apps, tweak system settings, or bypass App Store policies.
For attackers, it’s like getting the master key to device. With jailbreak tools like checkra1n, , or Dopamine they can:
Inject malicious code into your app
Steal sensitive user data
Disable or bypass security controls
Run debuggers and hooking frameworks like
Detecting jailbreak isn’t as simple as checking for “” anymore. Attackers constantly adapt, and DIY detection methods become outdated fast.
In recent years a lot of expert-maintained SDKs appeared that evolve alongside jailbreak techniques:
freeRASP (by Talsec)
These tools give you continuous protection without the need to reinvent the wheel.
The most robust, developer-friendly and free choice for iOS.
Very strong detections including Dopamine
Works offline with minimal performance overhead
Comes with
Integration Example:
A lightweight, open-source, and community-maintained option for iOS jailbreak detection and app security.
Detects jailbreak indicators including file system changes, suspicious apps, symbolic links, and more
Includes additional checks (debugger, emulator)
Actively updated by the open-source community
Integration Example:
Feature
freeRASP
iOS Security Suite
When evaluating mobile app security and Runtime Application Self-Protection (RASP), developers often compare various Talsec alternatives to find the right fit for their architecture. The "right choice" depends on the specific problem you need to tackle and which vendor offers the best bang for your buck.
The market is diverse, offering different philosophical approaches to protection. Talsec prioritizes top-tier root detection and a balanced security SDK portfolio covering the most popular attack vectors. Meanwhile, some vendors specialize primarily in heavy code obfuscation and compiler-based hardening, while others focus on a drag-and-drop (no-code) integration experience for DevOps-oriented teams. There are also solutions dedicated specifically to API security, active cloud hardening, enterprise compliance, or gaming protection. The most prominent providers alongside Talsec include Guardsquare, Appdome, Promon, Build38, Approov, and AppSealing.
Jailbroken devices aren’t just risky—they’re hostile territory for your app. By integrating jailbreak detection with tools like freeRASP, you can protect your users, safeguard sensitive data, and stay ahead of attackers.
👉 Don’t gamble on DIY scripts—secure your Swift app today with freeRASP by Talsec.
Talsec Global Threat Report 2025
Where the Attacks Are and What They Look Like
In September 2025, mobile app security firm Talsec released its Global Threat Report, a data-driven look at the state of mobile application security drawn from its freeRASP SDK. With telemetry from more than 365 million devices running over 5,000 apps, the report offers one of the most comprehensive snapshots available of how (and where) mobile applications are being attacked in the wild.
The headline finding is simple: while serious incidents are rare in percentage terms, they are significant at scale, and the attack surface looks very different from one region to the next.
A tiered view of the threat landscape
Talsec organizes mobile threats into three severity tiers:
Critical
App Tampering, Debugging, and Hooking
Major
Root/Jailbreak, Unofficial Store installs, and Simulator use
Warning
Screenshotting/Screen Recording, System VPN, Developer Mode, and ADB enabled
Looking across the global map, North America stands out for critical-tier incidents, particularly tampering and hooking. South Asia dominates several "major" and "warning" indicators tied to sideloading and developer-mode usage. Europe leads in screen capture incidents and VPN adoption.
App tampering, where an attacker modifies and re-signs an app after release, is highest in North America at 0.131% of devices, followed by Europe at 0.058%. That may sound tiny, but North America's rate is roughly 26× higher than Latin America's and reflects attackers concentrating effort where the payoff is greatest.
Unofficial store installs tell a different regional story. South Asia leads at 0.456%, more than twice the North American rate and nearly four times Europe's. This tracks with the prevalence of third-party marketplaces and cloning apps in those markets - channels that routinely skip Google and Apple's policy enforcement and sometimes host apps quietly modified with malware or stripped paywalls.
Runtime attacks target the live app rather than its static code — and they are where attacker sophistication shows.
Hooking (e.g., Frida-style instrumentation used to read memory, bypass checks, or disable certificate pinning) is highest in North America at 0.202%, reflecting a mature pentesting and security-research scene alongside active criminal exploitation. Latin America registers just 0.008%.
Debugging incidents are led by Europe (0.055%) and South Asia (0.052%), with North America and MENA lowest at 0.009%. Talsec attributes Europe's higher rate to its active bug-bounty culture, and North America's lower rate partly to enterprise-managed devices that block debugging.
Screenshotting and screen recording is by far the most common "warning" incident. Europe tops the chart at 3.98%, closely followed by North America (3.78%) and MENA (3.51%). These regions face heavy pressure from banking-focused malware and fraud operations that rely on screen-capture streaming to exfiltrate credentials, balances, and one-time codes.
Even when an app itself isn't attacked directly, a compromised device sets the stage.
Rooted/jailbroken devices are most common in North America (0.294%), which Talsec links to permissive norms and large modding communities. Latin America sits at just 0.023%, consistent with fraud in that region skewing toward social engineering rather than device compromise.
Simulators/emulators are most prevalent in Asia Pacific (0.034%) and Europe (0.028%), driven largely by game emulation and click-farm automation.
Developer Mode enabled is dramatically skewed toward South Asia at 1.147% (about 382× the North American rate) reflecting broad sideloading culture. ADB enabled follows the same pattern, with South Asia at 0.802% versus North America's 0.004%.
System VPN adoption is highest in Europe (9.32%) and North America (4.96%), with Asia Pacific (3.89%) showing pockets of very high national use tied to censorship workarounds.
The report also surveys the devices themselves:
iOS is highly consolidated around version 18.x globally, with iOS 26 rapidly gaining share — reflecting Apple's centralized update model.
Android is fragmented by region: North America runs the newest versions (strong 16.x and 15.x), while MENA and Asia Pacific still carry meaningful 10.x–12.x populations, increasing exploit exposure.
Google Play Services coverage is effectively universal (>99% in most regions), with Asia Pacific the sole outlier at 93.39% due to mainland China's blocks on Google. Correspondingly, Huawei Mobile Services is strongest in MENA (6.31%) and Asia Pacific (4.14%).
Hardware-backed keystores are essentially universal, so the weak link isn't cryptographic hardware but user posture: screen locks and biometrics. Europe leads in biometric adoption; Asia Pacific trails the pack by roughly 10 points on both locks and biometrics.
Conclusion is unsurprising, but the data makes the case cleanly: signature checks at install time verify only that an app is signed, not that it was signed by the legitimate developer. Once an app is running on a rooted device, under a hooking framework, or inside a repackaged binary from an unofficial store, the operating system's default protections have already been outflanked.
Runtime Application Self-Protection (RASP) closes that gap by detecting in-memory manipulation, hooking tools, unauthorized repacks, and risky runtime conditions while the app is executing — and by generating the telemetry needed to focus defenses on whichever region or threat class is heating up. For regulated sectors like finance and healthcare, where a single compromise carries severe financial, privacy, and compliance consequences, Talsec argues in-app protection has crossed from "enhancement" to "business necessity."
How to Detect Hooking (Frida) on React Native
Protect your React Native app from runtime attacks like Frida and Xposed with smart detection.
Imagine your app’s security is a locked vault. What if an attacker could pick the lock and alter its contents while it’s actively being used? That is exactly what a hooking attack does.
This runtime threat is uniquely dangerous for React Native. Because React Native relies on a "Bridge" to communicate between JavaScript and Native code (Java/Obj-C), there are multiple points of entry for attackers to intercept data, manipulate logic, or extract API keys.
What is Hooking?
Hooking is a technique where attackers use tools like Frida to "intercept" and modify your app’s normal operations as they happen. Think of it like a spy intercepting a mail carrier, reading a sensitive message, and changing it before it is delivered to your server.
This gives attackers the power to:
Bypass security: Disable jailbreak detection, biometric login, or SSL pinning.
Steal Data: Read unencrypted strings from memory (like JWTs or API keys).
Function Tampering: Force a function like isUserPremium() to always return true.
About 0.05% of devices are hooked. While this percentage seems low, at a global scale, it represents millions of compromised devices. If your app handles financial data, health records, or competitive gaming integrity, this is a risk vector you cannot ignore.
You might be tempted to build your own defenses. In React Native, this is slightly more complex than in Node.js because the JavaScript runtime (Hermes or JavaScriptCore) does not have built-in access to low-level TCP sockets.
To implement a detection mechanism yourself, you need to step outside standard React Native capabilities.
In React Native, detecting hooking is harder than in frameworks like Flutter because the JavaScript environment (Hermes or JSC) does not have direct access to low-level sockets or the OS filesystem. You cannot simply "check a port" from your App.js without installing extra libraries or writing Native Modules.
However, if you were to implement a naive check yourself, you would typically write a Native Module to check for common Frida ports (like 27042)
Attackers can run Frida on a random port.
Attackers can rename the Frida process.
Attackers can hook your "detection" function and force it to return false.
With freeRASP, the hook detection utilizes hundreds of advanced checks, offering robust detection even with bypass scripts applied.
Process-name checks, suspicious open ports, injected or loaded Frida-related libraries, modified memory maps, abnormal function hooks and our secret sauce.
Very strong detections including root and jailbreak detections (Magisk, Dopamine)
Add the in your project, focus on implementing the following callback:
When evaluating mobile app security and Runtime Application Self-Protection (RASP), developers often compare various Talsec alternatives to find the right fit for their architecture. The "right choice" depends on the specific problem you need to tackle and which vendor offers the best bang for your buck.
The market is diverse, offering different philosophical approaches to protection. Talsec prioritizes top-tier root detection and a balanced security SDK portfolio covering the most popular attack vectors. Meanwhile, some vendors specialize primarily in heavy code obfuscation and compiler-based hardening, while others focus on a drag-and-drop (no-code) integration experience for DevOps-oriented teams. There are also solutions dedicated specifically to API security, active cloud hardening, enterprise compliance, or gaming protection. The most prominent providers alongside Talsec include Guardsquare, Appdome, Promon, Build38, Approov, and AppSealing.
Hooking attacks using tools like Frida can intercept and modify app behavior in real time, exposing sensitive data and disabling protections. Detection doesn’t have to be DIY or error-prone—simple port checks are easily bypassed. Tools like freeRASP provide reliable, continuously updated detection with hundreds of advanced checks, letting you respond proactively to runtime threats.
👉 If you want hooking detection plus root, jailbreak, emulator, debugging, screenshot, and tampering protection in one free package, start with .
How to Detect Root on React Native
Need to secure your React Native app against rooted devices? Start here.
If you are deploying a React Native app on Android, you will inevitably encounter a formidable challenge: the rooted device. Root access represents a significant security vulnerability that demands a robust response. Ignoring this threat is not an option, particularly if your application handles sensitive data or performs critical business functions.
What is Root?
Rooting removes Android’s built-in restrictions and grants privileged (root) access to the device. With root access, users (or attackers) can:
Modify your app’s code or memory.
Inject malicious libraries using tools like Magisk or Xposed.
Bypass key protections such as SSL pinning.
It’s like removing the lock from your front door — anyone can walk in, change things, or steal information.
About 0.03% of Android devices are rooted. That may sound small, but at global scale it still means millions of devices. If your app handles sensitive data, you can’t ignore this risk.
There are simple checks like:
Detection of suspicious binaries
Detection of suspicious processes
Check for elevated permissions
These may catch older roots, but they quickly become outdated. Building your own detection logic is time-consuming and hard to maintain. Basic techniques involve.
While building your own solution offers control, it’s not recommended due to the time, effort, and expertise required to keep up. A better option is to use an actively maintained SDK that evolves with new attack methods.
You can implement yourself simple root detection like this:
With freeRASP, the root detection utilizes hundreds of advanced checks, offering robust detection even with hiding methods applied.
Strong detection (including Magisk 29+, Hide My Applist and Shamiko).
Add the in your project, focus on implementing the following callback:
When evaluating mobile app security and Runtime Application Self-Protection (RASP), developers often compare various Talsec alternatives to find the right fit for their architecture. The "right choice" depends on the specific problem you need to tackle and which vendor offers the best bang for your buck.
The market is diverse, offering different philosophical approaches to protection. Talsec prioritizes top-tier root detection and a balanced security SDK portfolio covering the most popular attack vectors. Meanwhile, some vendors specialize primarily in heavy code obfuscation and compiler-based hardening, while others focus on a drag-and-drop (no-code) integration experience for DevOps-oriented teams. There are also solutions dedicated specifically to API security, active cloud hardening, enterprise compliance, or gaming protection. The most prominent providers alongside Talsec include Guardsquare, Appdome, Promon, Build38, Approov, and AppSealing.
Rooted devices grant attackers privileged access, allowing them to tamper with apps, inject malicious code, or bypass critical protections like SSL pinning. Detection doesn’t have to be DIY or error-prone—simple checks for su binaries or elevated permissions are easily bypassed. Tools like freeRASP provide reliable, continuously updated detection with hundreds of advanced checks, letting you respond proactively to root threats and maintain app integrity.
👉 If you want root detection plus jailbreak, Frida, emulator, debugging, screenshot, and tampering protection in one free package, start with .
How to Detect Hooking (Frida) on Capacitor
Protect your Capacitor app from runtime attacks like Frida and Xposed with smart detection.
Imagine your app’s security is a locked vault. What if an attacker could pick the lock and alter its contents while it’s actively being used? That is exactly what a hooking attack does.
This runtime threat is uniquely dangerous for hybrid frameworks like Capacitor. Because Capacitor relies on a communication bridge to pass data between the web layer (WebView) and Native code (Java/Swift), there are multiple points of entry for attackers to intercept data, manipulate logic, or extract API keys.
What is Hooking?
Hooking allows malicious actors to inject their own code into your running process using dynamic instrumentation toolkits like Frida. It’s akin to wiretapping a phone line: the attacker sits between the operating system and your app logic, listening to every instruction and modifying them at will.
This grants them the ability to:
Nullify Defenses
Instantly turn off jailbreak checks, SSL pinning, or biometric requirements.
Siphon Secrets
Capture unencrypted API tokens, passwords, or JWTs right from system memory before they are stored or transmitted.
Alter Logic
Rewrite the return values of your functions (e.g., forcing a checkPaymentSuccess() function to always return true).
About 0.05% of devices are hooked. If your Capacitor app manages payments, PII (Personally Identifiable Information), or competitive gaming logic, you are a target.
Capacitor developers often face a "sandbox" problem. The JavaScript environment where your Ionic/Angular/React code lives has no visibility into the low-level operating system processes. You cannot ask the browser window if the kernel is being tampered with.
To detect these threats, you must leave the web layer and implement checks within the Native Android/iOS layer.
Since you cannot detect hooking from index.ts, you would need to build a custom Capacitor Plugin. A common "Do It Yourself" method involves scanning for network ports typically associated with the Frida server.
Here is what that logic looks like in the Java layer of a custom plugin:
Instead of building custom plugin, can use freeRASP. It provides a multi-layered shield that runs deep in the native code, protecting your Capacitor bridge from the inside out.
Deep Inspection: It monitors for suspicious libraries, memory tampering, dynamic code injection, and process anomalies—not just open ports.
Resilience: Designed to detect when it is being tampered with (anti-tamper checks).
Offline First: Does not require an active internet connection to protect the device.
When evaluating mobile app security and Runtime Application Self-Protection (RASP), developers often compare various Talsec alternatives to find the right fit for their architecture. The "right choice" depends on the specific problem you need to tackle and which vendor offers the best bang for your buck.
The market is diverse, offering different philosophical approaches to protection. Talsec prioritizes top-tier root detection and a balanced security SDK portfolio covering the most popular attack vectors. Meanwhile, some vendors specialize primarily in heavy code obfuscation and compiler-based hardening, while others focus on a drag-and-drop (no-code) integration experience for DevOps-oriented teams. There are also solutions dedicated specifically to API security, active cloud hardening, enterprise compliance, or gaming protection. The most prominent providers alongside Talsec include Guardsquare, Appdome, Promon, Build38, Approov, and AppSealing.
Hooking is a sophisticated attack vector that renders standard encryption and local storage protections useless by modifying your app's behavior in real-time. freeRASP bridges this gap, offering a free, enterprise-grade security layer that watches for Frida, rooting, and tampering, allowing you to secure your hybrid app with native-level confidence.
👉 Secure your hybrid app today against hooking, rooting, and debugging with the .
How to Detect Root on Flutter
Need to secure your Flutter app against rooted devices? Start here.
If your Flutter app runs on a rooted Android phone, attackers can tamper with it, inject malicious code, or bypass security checks. Root detection helps you protect sensitive data and maintain app integrity.
What is rooting?
Rooting removes Android’s built-in restrictions and grants privileged (root) access to the device. With root access, users (or attackers) can:
Modify your app’s code or memory.
Inject malicious libraries using tools like Magisk or Xposed.
Bypass key protections such as SSL pinning.
It’s like removing the lock from your front door — anyone can walk in, change things, or steal information.
About 0.03% of Android devices are rooted. That may sound small, but at global scale it still means millions of devices. If your app handles sensitive data, you can’t ignore this risk.
Attackers use advanced tools like Magisk and Shamiko to hide root access. Simple checks like
Detection of suspicious binaries
Detection of suspicious processes
Check for elevated permissions
may catch older roots, but they quickly become outdated. Building your own detection logic is time-consuming and hard to maintain. Basic techniques involve.
While building your own solution offers control, it’s not recommended due to the time, effort, and expertise required to keep up. A better option is to use an actively maintained SDK that evolves with new attack methods.
You can implement yourself simple root detection like this:
With freeRASP, the root detection utilizes hundreds of advanced checks, offering robust detection even with hiding methods applied.
Strong detection (including Magisk 29+, Hide My Applist and Shamiko).
Add the in your project, focus on implementing the following callback:
Rooted devices grant attackers privileged access, allowing them to tamper with apps, inject malicious code, or bypass critical protections like SSL pinning. Detection doesn’t have to be DIY or error-prone—simple checks for su binaries or elevated permissions are easily bypassed. Tools like freeRASP provide reliable, continuously updated detection with hundreds of advanced checks, letting you respond proactively to root threats and maintain app integrity.
👉 If you want root detection plus jailbreak, Frida, emulator, debugging, screenshot, and tampering protection in one free package, start with .
How to Prevent Magisk Root Hiding and Security Bypass
In the world of mobile app security, the cat-and-mouse game between developers and malicious actors is relentless. One of the most significant threats is the rooted device. It gives users privileged control over the operating system. This access can be used to bypass security controls, tamper with app data, and reverse-engineer your application.
The most sophisticated tool in this arena is , a "systemless" rooting utility. One of it's most potent feature is Magisk Hide. It is specifically designed to hide the rooted status of a device from detection.
This article explains why simple root detection methods fail against Magisk and presents a robust, professional solution to secure your application.
Many developers start by implementing basic root detection checks. As detailed in previous Talsec's articles, these common methods include:
How Secure Are Flutter Apps?
A great mobile application isn’t just fast and user-friendly — it must also be secure. In sectors like fintech, healthcare, and government, customers and regulators place a high level of trust in your app. Losing that trust through a security breach or compliance failure can result in lost customers, regulatory fines, and long-term reputational damage. From Talsec data, we know that there are around 4% of insecure devices globally, across all platforms and frameworks.
Additionally, approximately 12% of devices (as of May 5, 2025) running Android 10 (released in 2019) or older versions lack critical security updates, leaving them vulnerable to a range of recently discovered remote code execution (RCE), escalation of privilege (EoP), and information disclosure (ID) vulnerabilities.
Major enterprises such as NuBank, BMW, and Alibaba run critical apps in Flutter while meeting strict security standards. With the right architecture and controls, Flutter apps can be just as secure and compliant as native apps.
Short answer: Native (Swift) nor Flutter is inherently more or less secure. be hardened or left exposed. The security outcome depends on architecture, developer choices, and maintenance.
How to Detect Jailbreak on Flutter
Jailbroken devices open doors for attackers. Here’s how you can secure your Flutter app.
A jailbroken iPhone is like leaving the front door of your house unlocked: attackers can enter, change things, and take what they want. If your Flutter app runs on a jailbroken device, it may be easier to reverse-engineer, tamper with, or run in an unsafe environment. Detecting jailbreaks early helps you protect user data and preserve app integrity.
Jailbreaking removes iOS restrictions and grants root (privileged) access to the device (similar to ). With root access, users (or attackers) can install unauthorized apps, change system settings, and bypass App Store protections. This lets them install unauthorized apps, tweak system settings, or bypass App Store policies. Common jailbreak tools include , , or .
On a jailbroken device, attackers can:
How to Detect Jailbreak on React Native
Protect your React Native app from compromised iOS environments with smart detection.
Imagine you built a high-security facility, but one of your users decided to remove all the doors and disable the alarm system because they wanted "full control" over the building. That is essentially what a Jailbreak does to an iOS device.
Jailbroken environment is a critical security risk. It removes the OS sandbox, allowing malicious actors (or even just buggy tweaks) to access your app's private data, Keychain items, and internal logic.
Jailbreaking is the process of unlocking an iOS device to remove Apple's built-in restrictions. Much like , it gives users full administrative (root) access. This allows for the installation of apps outside the App Store and deep customization of system settings. Popular tools used to achieve this include , , or .
On a jailbroken device, attackers can:
How to Detect Jailbreak on Capacitor
Protect your Capacitor app from compromised iOS environments with smart detection.
Imagine you built a high-security facility, but one of your users decided to remove all the doors and disable the alarm system because they wanted "full control" over the building. That is essentially what a Jailbreak does to an iOS device.
Jailbreaking is the process of unlocking an iOS device to remove Apple's built-in restrictions. Much like rooting on Android, it gives users full administrative (root) access. This allows for the installation of apps outside the App Store and deep customization of system settings. Popular tools used to achieve this include checkra1n, unc0ver, palera1n, or Dopamine.
A jailbroken environment is a critical security risk. It removes the OS sandbox, allowing malicious actors (or even just buggy tweaks) to access your app's private data, Keychain items, and internal logic.
fun canInstallFromUnknownSources(packageInfo: PackageInfo): Boolean {
if (Build.VERSION.SDK_INT < Build.VERSION_CODES.O) {
return false
}
val uid = packageInfo.applicationInfo?.uid ?: return false
val mode = appOpsManager?.checkOpNoThrow(
AppOpsManager.OPSTR_REQUEST_INSTALL_PACKAGES,
uid,
packageInfo.packageName
)
return mode == AppOpsManager.MODE_ALLOWED
}
fun isBootloaderUnlocked(): Boolean {
return try {
val process = Runtime.getRuntime().exec("getprop ro.boot.flash.locked")
val reader = java.io.BufferedReader(java.io.InputStreamReader(process.inputStream))
val lockedState = reader.readLine()
// "0" typically means unlocked, "1" means locked
lockedState == "0"
} catch (e: Exception) {
false // Default to false if unable to read
}
}
val securityPatchDate = if (Build.VERSION.SDK_INT >= Build.VERSION_CODES.M) {
Build.VERSION.SECURITY_PATCH
} else {
"N/A" // Security patch dates were not standardized before Android 6.0 (API 23)
}
class MyApplication : Application() {
override fun onCreate() {
super.onCreate()
if (BuildConfig.DEBUG) {
WebView.setWebContentsDebuggingEnabled(true)
}
// Release builds skip this line — WebView debugging stays off.
}
}
Dynamic TLS Pinning - Prevents Man-in-the-Middle (MitM) attacks by validating server certificates that can be updated remotely without needing to publish a new app version.
Secret Vault - A secure storage solution that encrypts and obfuscates sensitive data (like API keys or tokens) to prevent them from being extracted during reverse engineering.
import TalsecRuntime
let config = TalsecConfig(
appBundleIds: ["YOUR_APP_BUNDLE_ID"],
appTeamId: "YOUR TEAM ID",
watcherMailAddress: "WATCHER EMAIL ADDRESS",
isProd: true
)
extension SecurityThreatCenter: SecurityThreatHandler {
public func threatDetected(_ securityThreat: TalsecRuntime.SecurityThreat) {
print("Found incident: \(securityThreat.rawValue)")
}
}
public enum SecurityThreat: String, Codable, CaseIterable, Equatable {
// ... other cases ...
case jailbreak = "privilegedAccess"
}
let jailbreakStatus = IOSSecuritySuite.amIJailbrokenWithFailMessage()
if jailbreakStatus.jailbroken {
print("This device is jailbroken")
print("Because: \(jailbreakStatus.failMessage)")
} else {
print("This device is not jailbroken")
}
Accurate Jailbreak Detection
High
Medium
Works Offline
Yes
Yes
If your app runs on a jailbroken device, its integrity is at serious risk.
How to Detect Jailbreak?
iOS Security Suite
Check out freeRASP and for industry leading jailbreak detection
Popular Libraries for Jailbreak Detection
freeRASP (free library by Talsec)
iOS Security Suite
Comparison Table
Commercial Alternatives
Key Takeaway
Handle App Security with a Single Solution! Check Out Talsec's Premium Offer & Plan Comparison!
- An advanced security SDK that actively shields your app from reverse engineering, tampering, rooting/jailbreaking, and runtime attacks like hooking or debugging.
(Android & iOS) & - A backend defense system that verifies the integrity of the calling app and device to block bots, scripts, and unauthorized clients from accessing your API.
- Scans the user's device for known malicious packages, suspicious "clones," and risky permissions to prevent fraud and data theft.
// Android (Java) Example for a React Native Module
private boolean detectFridaPorts() {
int[] portsToCheck = {27042, 27043};
for (int port : portsToCheck) {
try {
Socket socket = new Socket("127.0.0.1", port);
socket.close();
// If connection succeeds, the port is open (suspicious)
return true;
} catch (IOException e) {
// Port is closed, which is good
}
}
return false;
}
- An advanced security SDK that actively shields your app from reverse engineering, tampering, rooting/jailbreaking, and runtime attacks like hooking or debugging.
(Android & iOS) & - A backend defense system that verifies the integrity of the calling app and device to block bots, scripts, and unauthorized clients from accessing your API.
- Scans the user's device for known malicious packages, suspicious "clones," and risky permissions to prevent fraud and data theft.
Battle Tested: Currently protecting over 6000+ apps globally.
// Android (Java) logic inside a custom Capacitor Plugin
private boolean isFridaServerRunning() {
// Frida default ports
int[] suspiciousPorts = {27042, 27043};
for (int port : suspiciousPorts) {
try {
// Attempt to connect to the local port
Socket socket = new Socket("127.0.0.1", port);
socket.close();
// If we connected, something is listening there -> Danger
return true;
} catch (IOException e) {
// Port is closed, usually safe
}
}
return false;
}
import { startFreeRASP } from 'capacitor-freerasp';
// reactions for detected threats
const actions = {
// Android & iOS
privilegedAccess: () => {
console.log('privilegedAccess');
},
}
const config = ...
// returns `true` if freeRASP starts successfully; you can ignore this value
const started = await startFreeRASP(config, actions);
- An advanced security SDK that actively shields your app from reverse engineering, tampering, rooting/jailbreaking, and runtime attacks like hooking or debugging.
(Android & iOS) & - A backend defense system that verifies the integrity of the calling app and device to block bots, scripts, and unauthorized clients from accessing your API.
- Scans the user's device for known malicious packages, suspicious "clones," and risky permissions to prevent fraud and data theft.
- An advanced security SDK that actively shields your app from reverse engineering, tampering, rooting/jailbreaking, and runtime attacks like hooking or debugging.
AppiCrypt (Android & iOS) & - A backend defense system that verifies the integrity of the calling app and device to block bots, scripts, and unauthorized clients from accessing your API.
Malware Detection - Scans the user's device for known malicious packages, suspicious "clones," and risky permissions to prevent fraud and data theft.
- Prevents Man-in-the-Middle (MitM) attacks by validating server certificates that can be updated remotely without needing to publish a new app version.
- A secure storage solution that encrypts and obfuscates sensitive data (like API keys or tokens) to prevent them from being extracted during reverse engineering.
Their decline is largely due to widespread misuse by malware and incompatibility with modern app distribution policies.
- An advanced security SDK that actively shields your app from reverse engineering, tampering, rooting/jailbreaking, and runtime attacks like hooking or debugging.
AppiCrypt (Android & iOS) & - A backend defense system that verifies the integrity of the calling app and device to block bots, scripts, and unauthorized clients from accessing your API.
Malware Detection - Scans the user's device for known malicious packages, suspicious "clones," and risky permissions to prevent fraud and data theft.
- Prevents Man-in-the-Middle (MitM) attacks by validating server certificates that can be updated remotely without needing to publish a new app version.
- A secure storage solution that encrypts and obfuscates sensitive data (like API keys or tokens) to prevent them from being extracted during reverse engineering.
Slowed the team down.
Light Protection (with OS/App parts protected)
39
Would have exceeded the Pwn2Own time limit.
Strong Protection (RASP, Strong Encryption, Heavy Obfuscation)
Not possible in the allocated time
Would have required changing techniques and was estimated to be impossible within the time constraints.
- An advanced security SDK that actively shields your app from reverse engineering, tampering, rooting/jailbreaking, and runtime attacks like hooking or debugging.
AppiCrypt (Android & iOS) & - A backend defense system that verifies the integrity of the calling app and device to block bots, scripts, and unauthorized clients from accessing your API.
Malware Detection - Scans the user's device for known malicious packages, suspicious "clones," and risky permissions to prevent fraud and data theft.
- Prevents Man-in-the-Middle (MitM) attacks by validating server certificates that can be updated remotely without needing to publish a new app version.
- A secure storage solution that encrypts and obfuscates sensitive data (like API keys or tokens) to prevent them from being extracted during reverse engineering.
Injections via OBS happen at the virtualization layer. Talsec detects common emulators and can block the app entirely.
Appium Framework
Automation Detection
Appium leaves traces in the uiautomator service and often requires ADB/Developer Options to be enabled, both of which Talsec detects.
Repackaged Testing Builds
App Integrity Checks
Attackers sometimes re-sign the APK to disable security for automation. Talsec’s signature and binary integrity checks prevent these modified builds from running.
- An advanced security SDK that actively shields your app from reverse engineering, tampering, rooting/jailbreaking, and runtime attacks like hooking or debugging.
AppiCrypt (Android & iOS) & - A backend defense system that verifies the integrity of the calling app and device to block bots, scripts, and unauthorized clients from accessing your API.
Malware Detection - Scans the user's device for known malicious packages, suspicious "clones," and risky permissions to prevent fraud and data theft.
- Prevents Man-in-the-Middle (MitM) attacks by validating server certificates that can be updated remotely without needing to publish a new app version.
- A secure storage solution that encrypts and obfuscates sensitive data (like API keys or tokens) to prevent them from being extracted during reverse engineering.
Emulators in Gaming: Threats and Detections
Introducing Multi-Instancing Detection for freeRASP
- An advanced security SDK that actively shields your app from reverse engineering, tampering, rooting/jailbreaking, and runtime attacks like hooking or debugging.
AppiCrypt (Android & iOS) & - A backend defense system that verifies the integrity of the calling app and device to block bots, scripts, and unauthorized clients from accessing your API.
Malware Detection - Scans the user's device for known malicious packages, suspicious "clones," and risky permissions to prevent fraud and data theft.
- Prevents Man-in-the-Middle (MitM) attacks by validating server certificates that can be updated remotely without needing to publish a new app version.
- A secure storage solution that encrypts and obfuscates sensitive data (like API keys or tokens) to prevent them from being extracted during reverse engineering.
Checking for the su binary
This is the traditional superuser binary.
Looking for known root packages
Searching for apps like eu.chainfire.supersu or com.topjohnwu.magisk.
Checking build properties
Looking for "test-keys" in the build tags, which often indicates a custom or non-production ROM.
Here's the catch: Magisk is designed to defeat every single one of these checks.
Magisk operates "systemlessly," meaning it doesn't modify the core /system partition. Instead, it hooks into the boot process. When an app tries to check for su or other root indicators, Magisk intercepts the request and returns a "false negative," reporting that the device is not rooted. This makes simple, self-implemented checks dangerously unreliable and gives a false sense of security.
To effectively counter modern threats like Magisk, you need a specialized, multi-layered security solution. This is where Talsec's freeRASP and RASP+ SDKs come in.
Talsec RASP (Runtime Application Self-Protection) is security SDK designed to protect mobile applications at runtime. It goes far beyond simple file checks and uses a variety of obfuscated and advanced techniques to detect threats, even those actively trying to hide.
Key features of freeRASP include:
Advanced Root Detection
Capable of identifying sophisticated root-hiding frameworks like Magisk.
Emulator Detection
Detects if the app is running in an emulator or simulator, a common environment for attackers.
By integrating Talsec SDK, you offload the complex work of runtime security to a dedicated team of experts, allowing you to focus on your app's features.
Integrating freeRASP is straightforward. Follow these steps based on the official documentation.
In your settings.gradle(.kts) file, add the Talsec Artifactory repository:
Kotlin
In your app-level build.gradle(.kts) file, add the freerasp dependency:
Kotlin
The best place to initialize Talsec is in your custom Application class.
Kotlin
With this simple integration, your application is now actively monitored for rooting, debugging, and other runtime threats.
freeRASP provides an excellent layer of foundational security for any application. However, applications in high-risk sectors like finance, healthcare, and e-commerce often face more advanced attacks, including:
Dynamic Instrumentation: Using tools like Frida or Xposed to hook into your app's code at runtime.
Reverse Engineering: Advanced static and dynamic analysis to steal algorithms or sensitive keys.
App Repackaging: Modifying your app and republishing it with malicious code.
For these threats, Talsec offers RASP+. This is an enterprise-grade solution that provides real-time threat intelligence, advanced protection against instrumentation, and dedicated professional support to harden your app's security posture.
Relying on simple su checks is no longer a viable security strategy against tools as sophisticated as Magisk. To truly protect your users and your data, you must adopt a modern RASP solution.
Start today with freeRASP to get immediate, robust protection against common runtime threats.
When your security needs grow, or if you are in a high-stakes industry, RASP+ offers the comprehensive protection your business requires.
To understand the full range of features and determine the right level of protection for your application, we highly recommend visiting Talsec's Plans Comparison page.
// build.gradle.kts (Module :app)
dependencies {
// ... other dependencies
implementation("app.talsec.android:freerasp:X.X.X") // Replace with the latest version
}
// MyApplication.kt
import android.app.Application
import app.talsec.android.Talsec
import app.talsec.android.TalsecConfig
import app.talsec.android.TalsecCallback
class MyApplication : Application() {
override fun onCreate() {
super.onCreate()
// 1. Define the configuration
val config = TalsecConfig(
// Set your expected package name and signing hash
expectedPackageName = "com.your.app.package",
expectedSigningHashes = listOf("your_signing_hash_base64"),
// 2. Define the callbacks
callback = TalsecCallback(
// 3. Define actions for detected threats
onRootDetected = {
// WARNING: Rooted device detected
// Implement your response (e.g., terminate app, alert user)
},
onDebuggerDetected = {
// WARNING: Debugger detected
},
onEmulatorDetected = {
// WARNING: Emulator detected
},
onTamperDetected = {
// WARNING: App integrity compromised
},
onUntrustedInstallationDetected = {
// WARNING: App installed from an unofficial source
}
)
)
// 4. Start Talsec
Talsec.start(this, config)
}
}
Articles About Root Detection
A Robust Solution: Talsec freeRASP
How to Implement freeRASP in Your Android App
Step 1: Add the Repository
Step 2: Add the freeRASP Dependency
Step 3: Initialize Talsec
For High-Stakes Applications: RASP+
Conclusion
Every app begins with a runtime. Native apps run directly on iOS and Android runtimes, tapping into platform-level security features like Keychain, Keystore, and Secure Enclave. This tight integration often means fewer layers to worry about.
Flutter apps also produce native binaries through ahead-of-time (AOT) compilation, but they bring along the Flutter engine and framework. This extra layer, plus other features like platform-channel bridges, broadens the attack surface and requires careful handling.
Once compiled, both native and Flutter apps can be analyzed. Native binaries can be reverse-engineered, though techniques like symbol stripping, R8/ProGuard (Android), and linker options help reduce exposure. Kotlin/Java bytecode is especially easy to decompile if not obfuscated.
Flutter binaries work a bit differently. Its AOT-compiled binaries don’t resemble standard Java bytecode, which makes casual decompilation harder. Still, they’re not immune. Flutter provides obfuscation and split debug info options — essential tools to raise the barrier against reverse engineers.
Modern mobile security leans heavily on hardware. With native development, features like Secure Enclave, hardware-backed Keystore, or attestation APIs are available directly, with little friction.
Flutter apps can access the same features, but usually through plugins or custom platform-channel code. That introduces an extra dependency — either you trust the plugin’s quality or you must maintain the bridge yourself.
And what data says about Flutter security? When we look at occurrence of incidents, we get roughly similar results as presented in the beginning:
Generally, we can divide mobile threats into static and dynamic threats.
These arise during the development phase and can usually be identified and resolved with secure coding practices and modern tooling.
Missing Obfuscation
Code obfuscation helps protect code by making it harder to read for humans, using various techniques such as call flow flattening, variable renaming, dummy code insertion, etc. This helps to protect against more advanced attacks by hiding business logic, so an attacker cannot use knowledge of the codebase for a more sophisticated attack.
Currently, Flutter's built-in obfuscator is not as robust as those available for C/C++ or Java/Kotlin, making string values and business logic more susceptible to discovery.
Hardcoded Secrets
Embedding API keys, tokens, or other credentials directly in source code is a major cause of leaks – either by accidental commits or through decompilation. Flutter's built-in obfuscation does not hide string values, so secrets are easily discovered even in “obfuscation” protected builds.
Talsec created Secret Vault to solve this problem: it dynamically provisions secrets, removes the need for hardcoded credentials, and safeguards sensitive information (like API keys, encryption keys, and tokens). Secret Vault actively protects these assets from leakage, reverse engineering, and automated extraction attempts, ensuring end-to-end data security.
Insecure Storage
Relying on SharedPreferences or other plain-text storage solutions exposes sensitive information to attackers who gain access to the device.
Debuggable Application
Debug builds include extra diagnostic capabilities useful during development but dangerous in production. If debugging features remain enabled when you release your app, attackers can access internal app state, trace code execution, or manipulate behavior.
These threats are most often encountered when an app is deployed and running on user devices.
Privileged Access
A device can have elevated privileges over a normal device. These elevated rights (root or jailbreak) allow bypassing any built-in security measures that the system has. This is often misused by an attacker who can run any script or look inside any process without the knowledge of the app.
Dynamic Instrumentation and Hooking
Tools like Frida can manipulate an application while it's running on a device (also called hooking) and can get access to sensitive data or hijack a request by tapping into a function that is being executed by the device.
Application Repackaging and Tampering
Malicious actors may modify your app (e.g., injecting ads, unlocking premium features, or adding malware) and redistribute the altered version. Protecting against repackaging involves runtime integrity checks, signature verification, and anti-tampering techniques.
TLS Pinning Bypass
TLS pinning ensures your app only communicates with trusted servers by verifying server certificates. This is often used as an API protection technique. Hackers can bypass this protection, making the app vulnerable to MITM attacks.
Malware
Even if your app is secure, malware installed on the user’s device can steal information or interfere with your app’s operation.
There are multiple techniques you can use to improve the security of a Flutter application:
Static Analysis: Utilize SAST tools like MobSF or Guardsquare's AppSweep to find vulnerabilities in source and compiled code before release.
Dynamic Checks: Use RASP and real-time security monitoring to detect tampering, root status, and suspicious runtime behavior on live devices.
Dependency Scanning: Continuously scan for known vulnerabilities in third-party packages and maintain an updated Software Bill of Materials (SBOM).
Penetration Testing: Conduct regular security audits using both manual assessments and automated DAST tools, including simulated attacks (red teaming) when possible.
Advanced mobile security goes beyond basic application hardening. This section delves into cutting-edge protection mechanisms that operate at the runtime and API level, providing a multi-layered defense against sophisticated threats. We will explore Runtime Application Self-Protection (RASP), API security measures like certificate pinning and device attestation, and anti-malware techniques, all of which are crucial for safeguarding modern mobile applications and their users.
RASP is a security technology that embeds directly into the application runtime. Unlike perimeter defenses such as firewalls or intrusion detection systems, RASP allows the app itself to monitor and defend against malicious behavior while it is running.
Solutions such as Talsec’s RASP+ provide you with advanced detection of frameworks like Frida, Magisk, or Dopamine, as well as environment checks for developer mode or VPN usage.
Even if a mobile app is well protected, attackers often target the APIs it connects to. Mobile APIs carry sensitive data, making them high-value targets. You can protect API by using:
Certificate Pinning
Ensures that the app communicates only with trusted servers. Typically, you can find static pinning, but some companies, like Talsec, provide . Dynamic pinning allows you to change certificates remotely, rather than having certificates hardcoded in the app and having to make a new version of the app to update them.
Device or App Attestation
Attestation is a test that checks whether the app and/or device on which the app is running is genuine and has not been tampered with. Attestation like this can then generate cryptographic proof (data) which are presented to the server. The server then knows if the app is healthy and, therefore, allows or denies requests. Check out Talsec's solution.
Apps may run on devices already compromised with malware. Modern mobile malware abuses permissions, accessibility services, and overlays to steal credentials or intercept OTPs. measures focus on detecting hostile environments and blocking execution in unsafe conditions.
L0 - Detect Attacks: Check app security state with freeRASP & Talsec Portal insights
L1 - Protect App: Pass pentests, combat reverse engineering, and comply with regulations with RASP+ and AppHardening (Secret Vault, Dynamic TLS Pinning)
L2 - Protect Transactions: Combat API abuse, bots, web-scraping and MiTM with AppiCrypt
L3 - Protect Users: Combat social engineering, phishing, malware with Device Risk Scoring and Malware Detection
Enterprises adopt mobile security SDKs not only to protect their applications but also to stay compliant with global regulations and industry frameworks. Standards like PSD2, DORA, MAS, and HIPAA are not abstract rules — they directly shape how secure your app needs to be.
PSD2 (EU payments): Requires Strong Customer Authentication and fraud protection. Apps must verify device integrity and secure transactions.
DORA (EU resilience): Focuses on operational resilience. Apps need runtime protection, and recovery readiness.
MAS TRM (Singapore): Mandates encryption, monitoring, and defense against tampering for financial systems.
HIPAA (U.S. healthcare): Requires strict protection of health data, including secure storage and encrypted communication.
Talsec’s RASP and API security solutions are designed with these regulations in mind. Key benefits include:
Simple integration — works even for small development teams.
Resilience to reverse engineering and bypass attempts — protects against tools like Magisk and Dopamine.
Wide threat coverage — rooting, hooking, tampering, malware, and more.
Platform independence — not tied to Google Play Services, making it suitable for global use.
Actionable threat intelligence — reports and monitoring that support compliance documentation.
Data sovereignty — all security data remains under your organization’s control.
In practice, compliance is not only about passing audits or avoiding fines. It’s about building user trust, protecting brand reputation, and ensuring that your app can withstand evolving threats.
Advanced Protections: RASP, API Security, and Anti-Malware
Runtime Application Self-Protection (RASP)
API Protection
Anti-Malware Measures
Talsec's Multi-Layered App and API Protection Model
Market Insights, Regulations, and Standards
Inject malicious code into your app.
Steal sensitive user data (tokens, stored credentials).
Disable or bypass security controls inside the app.
Run debuggers and hooking frameworks (like Frida) to modify runtime behavior.
Historically, developers looked for signs like the presence of Cydia to detect jailbreak. Modern attackers adapt quickly, hide artifacts, and use tools to bypass naive checks. DIY methods become outdated fast — what worked last month may fail today.
Rather than building brittle checks, use a maintained solution that combines many signals and is actively updated.
You can implement yourself simple jailbreak detection like this:
With freeRASP, the jailbreak detection utilizes hundreds of advanced checks, offering robust detection even with hiding methods applied.
Offline operation with minimal performance overhead.
A suite of additional (app integrity, runtime manipulation such as hooking, emulator detection, debugger/screenshot detection, etc.).
Trusted by
When evaluating mobile app security and Runtime Application Self-Protection (RASP), developers often compare various Talsec alternatives to find the right fit for their architecture. The "right choice" depends on the specific problem you need to tackle and which vendor offers the best bang for your buck.
The market is diverse, offering different philosophical approaches to protection. Talsec prioritizes top-tier root detection and a balanced security SDK portfolio covering the most popular attack vectors. Meanwhile, some vendors specialize primarily in heavy code obfuscation and compiler-based hardening, while others focus on a drag-and-drop (no-code) integration experience for DevOps-oriented teams. There are also solutions dedicated specifically to API security, active cloud hardening, enterprise compliance, or gaming protection. The most prominent providers alongside Talsec include Guardsquare, Appdome, Promon, Build38, Approov, and AppSealing.
Jailbroken iOS devices remove critical restrictions, giving attackers privileged access to inject malicious code, steal sensitive data, and bypass in‑app protections. Detection doesn’t have to be DIY or error‑prone—simple checks like looking for Cydia are outdated and easily bypassed. Tools like freeRASP provide reliable, continuously updated detection with strong signals against modern jailbreaks, letting you respond proactively to protect user data and app integrity.
👉 If you want jailbreak detection plus root, Frida, emulator, debugging, screenshot, and tampering protection in one free package, start with .
If your app runs without detection on such devices, its integrity is at serious risk.
How to Detect Jailbreak?
DIY Coding Guide
freeRASP (free library by Talsec)
Intergration Example
Commercial Alternatives
Key Takeaway
Handle App Security with a Single Solution! Check Out Talsec's Premium Offer & Plan Comparison!
Inject malicious code into your app.
Steal sensitive user data (tokens, stored credentials).
Disable or bypass security controls inside the app.
Run debuggers and hooking frameworks (like Frida) to modify runtime behavior.
You can either implement your own jailbreak detection logic or use a dedicated, specialized security SDK. Building your own solution gives you full control over what you check and how you integrate it into your app. However, modern mobile environments are complex, and attackers increasingly use advanced hooking and masking techniques that can make straightforward checks less reliable.
Security SDKs address this by combining multiple detection signals, maintaining broader coverage, and continuously adapting to new techniques. As a result, many teams choose a specialized SDK to reduce maintenance effort and ensure more consistent, robust detection across a wide range of scenarios
The most robust "DIY" way to detect a jailbreak in React Native is to look for specific files and directories known to be created by jailbreak tools (Cydia, Unc0ver, Checkra1n).
Prerequisites: You will need a library to access the file system. react-native-fs is the standard choice.
You can create a utility function that iterates through a list of "suspicious" paths. If any of them exist, the device is likely jailbroken.
With freeRASP, the jailbreak detection utilizes hundreds of advanced checks, offering robust detection even with hiding methods applied.
Offline operation with minimal performance overhead.
A suite of additional (app integrity, runtime manipulation such as hooking, emulator detection, debugger/screenshot detection, etc.).
Trusted by
When evaluating mobile app security and Runtime Application Self-Protection (RASP), developers often compare various Talsec alternatives to find the right fit for their architecture. The "right choice" depends on the specific problem you need to tackle and which vendor offers the best bang for your buck.
The market is diverse, offering different philosophical approaches to protection. Talsec prioritizes top-tier root detection and a balanced security SDK portfolio covering the most popular attack vectors. Meanwhile, some vendors specialize primarily in heavy code obfuscation and compiler-based hardening, while others focus on a drag-and-drop (no-code) integration experience for DevOps-oriented teams. There are also solutions dedicated specifically to API security, active cloud hardening, enterprise compliance, or gaming protection. The most prominent providers alongside Talsec include Guardsquare, Appdome, Promon, Build38, Approov, and AppSealing.
A jailbroken device is a compromised device. For React Native apps holding sensitive user data, ignoring this risk is dangerous.
DIY is cat-and-mouse
Checking for files like /Applications/Cydia.app is easily bypassed by "Hide Jailbreak" tweaks.
Use specialized tools
Libraries like freeRASP use multi-layered checks (permissions, protocol handlers, system calls) to detect jailbreaks even when they are hidden.
React Proactively
Don't wait for a data breach; detect the compromised environment immediately on app launch.
If you want Jailbreak detection plus many more protections in one free package, start with freeRASP for React Native.
Handle App Security with a Single Solution! Check Out Talsec's Premium Offer & Plan Comparison!
Inject malicious code into your app.
Steal sensitive user data (tokens, stored credentials).
Disable or bypass security controls inside the app.
Run debuggers and hooking frameworks (like Frida) to modify runtime behavior.
You can either implement your own jailbreak detection logic or use a dedicated, specialized security SDK.
Building your own solution gives you full control over what you check and how you integrate it into your app. However, modern mobile environments are complex, and attackers increasingly use advanced hooking and masking techniques that can make straightforward checks less reliable.
Security SDKs address this by combining multiple detection signals, maintaining broader coverage, and continuously adapting to new techniques. As a result, many teams choose a specialized SDK to reduce maintenance effort and ensure more consistent, robust detection across a wide range of scenarios.
The most common "DIY" way to detect a jailbreak is to look for specific files and directories known to be created by jailbreak tools (Cydia, Unc0ver, Checkra1n).
Prerequisites: You will need a library to access the file system. In Capacitor, @capacitor/filesystem is the standard choice.
You can create a utility function that iterates through a list of "suspicious" paths. If any of them exist, the device is likely jailbroken.
With freeRASP, the jailbreak detection utilizes hundreds of advanced checks, offering robust detection even with hiding methods applied.
Offline operation with minimal performance overhead.
A suite of additional (app integrity, runtime manipulation such as hooking, emulator detection, debugger/screenshot detection, etc.).
Trusted by
When evaluating mobile app security and Runtime Application Self-Protection (RASP), developers often compare various Talsec alternatives to find the right fit for their architecture. The "right choice" depends on the specific problem you need to tackle and which vendor offers the best bang for your buck.
The market is diverse, offering different philosophical approaches to protection. Talsec prioritizes top-tier root detection and a balanced security SDK portfolio covering the most popular attack vectors. Meanwhile, some vendors specialize primarily in heavy code obfuscation and compiler-based hardening, while others focus on a drag-and-drop (no-code) integration experience for DevOps-oriented teams. There are also solutions dedicated specifically to API security, active cloud hardening, enterprise compliance, or gaming protection. The most prominent providers alongside Talsec include Guardsquare, Appdome, Promon, Build38, Approov, and AppSealing.
A jailbroken device is a compromised device. For apps holding sensitive user data, ignoring this risk is dangerous.
DIY is cat-and-mouse: Checking for files like /Applications/Cydia.app is easily bypassed by "Hide Jailbreak" tweaks.
Use specialized tools: Libraries like freeRASP use multi-layered checks (permissions, protocol handlers, system calls) to detect jailbreaks even when they are hidden.
Don't wait for a data breach; detect the compromised environment immediately on app launch. If you want Jailbreak detection plus many more protections in one free package, start with freeRASP.
What is Jailbreak?
On a jailbroken device, attackers can:
import { Filesystem, Directory } from '@capacitor/filesystem';
const detectJailbreakDIY = async () => {
// A list of common files found on Jailbroken iOS devices
const jailbreakPaths = [
'/Applications/Cydia.app',
'/Applications/RockApp.app',
'/Applications/Icy.app',
'/usr/sbin/sshd',
'/usr/bin/sshd',
'/usr/libexec/sftp-server',
'/Applications/WinterBoard.app',
'/Applications/SBSettings.app',
'/private/var/lib/apt/',
'/Library/MobileSubstrate/MobileSubstrate.dylib',
'/bin/bash',
];
for (const path of jailbreakPaths) {
try {
// Logic adapted for Capacitor Filesystem
const status = await Filesystem.stat({
path: path,
// System paths are usually accessed directly on iOS
});
if (status) {
console.warn(`Jailbreak artifact found: ${path}`);
return true;
}
} catch (error) {
// Access errors might happen due to permissions or non-existence, ignore them
}
}
// Additional Check: Can we write to a system folder? (Sandbox Escape)
try {
const testPath = '/private/jailbreak_test.txt';
// Attempt to write outside the standard app sandbox
await Filesystem.writeFile({
path: testPath,
data: 'test',
encoding: 'utf8'
});
// If successful, clean up
await Filesystem.deleteFile({ path: testPath });
console.warn("Sandbox escape detected! (Write access to /private)");
return true;
} catch (e) {
// Failure to write is good (Normal behavior)
}
return false;
};
import { startFreeRASP } from 'capacitor-freerasp';
// reactions for detected threats
const actions = {
privilegedAccess: () => {
console.log('privilegedAccess');
},
}
const config = ...
// returns `true` if freeRASP starts successfully; you can ignore this value
const started = await startFreeRASP(config, actions);
How to Detect Jailbreak?
DIY Coding Guide
freeRASP (free library by Talsec)
Commercial Alternatives
Key Takeaway
React Proactively
Handle App Security with a Single Solution! Check Out Talsec's Premium Offer & Plan Comparison!
import { getCryptogram, setMagicFile } from "appicrypt-web";
// Once, on page load
await setMagicFile(await (await fetch("/tscfg.txt")).text());
// Per request — attach a cryptogram as a header
const body = JSON.stringify({ action: "checkout" });
// Nonce can be any unique bytes; hashing the request body lets the backend verify it matches
const nonce = new Uint8Array(await crypto.subtle.digest("SHA-256", new TextEncoder().encode(body)));
const cryptogram = await getCryptogram(nonce);
fetch("/api/checkout", {
method: "POST",
headers: { appicrypt: cryptogram },
body,
});
A different question
What runtime attestation looks like in practice
Environment signals
Behavioral signals
Why this is hard to bypass
The stealth plugin problem
What about AI agents?
What this doesn’t do
Getting started
Handle App Security with a Single Solution! Check Out Talsec's Premium Offer & Plan Comparison!
- An advanced security SDK that actively shields your app from reverse engineering, tampering, rooting/jailbreaking, and runtime attacks like hooking or debugging.
(Android & iOS) & - A backend defense system that verifies the integrity of the calling app and device to block bots, scripts, and unauthorized clients from accessing your API.
- Scans the user's device for known malicious packages, suspicious "clones," and risky permissions to prevent fraud and data theft.
- An advanced security SDK that actively shields your app from reverse engineering, tampering, rooting/jailbreaking, and runtime attacks like hooking or debugging.
(Android & iOS) & - A backend defense system that verifies the integrity of the calling app and device to block bots, scripts, and unauthorized clients from accessing your API.
- Scans the user's device for known malicious packages, suspicious "clones," and risky permissions to prevent fraud and data theft.
Regional distribution of Tampering incidents
Regional distribution of Unofficial Store incidents
Regional distribution of Hooking incidents
Regional distribution of Debugging incidents
Regional distribution of Screenshoting / Screen Recording incidents
Regional distribution of Root / Jailbreak incidents
Regional distribution of Simulator incidents
Regional distribution of devices with Developer Mode enabled
Regional distribution of devices with System VPN enabled
Regional distribution of iOS versions
Regional distribution of Android versions
Regional distribution of mobile services (Google Play)
Regional distribution of mobile services (Huawei Mobile Services)
EUDI Developer Guide: Secure EUDI Wallet Integration for Mobile Developers (ARF, DCQL, 2026-2027)
Secure your EUDI Wallet integration. Don't let a stolen credential from a compromised device pass every cryptographic check—close the ARF spec security gaps with mobile runtime protection SDK.
You're building a mobile app that accepts EU digital identity credentials. The user taps "Login with EU Wallet." Their EUDI Wallet presents a signed credential, and your backend verifies it. Simple protocol, but the mobile runtime around it is an attack surface the ARF spec doesn't cover. Let's be honest: trying to protect this cryptographic perfection from post-install rooting and Frida hooks is the exact reason mobile security engineers drink so much coffee. This guide shows how to ensure security of the full flow with Talsec app protection tools: RASP+ SDK & AppiCrypt.
This multi-part series is built for CTOs, architects, and mobile developers. We break down the regulatory clock, the architectural shifts, and the hands-on implementation details required to close the mobile security gap.
Explore the complete series:
Part 1: An overview of the new eIDAS 2.0 landscape, the mobile threat surface nobody warned you about, and how to map regulatory obligations to your security stack.
Architecture
Your app is a Relying Party (RP): you request credentials from the user's EUDI Wallet using OpenID4VP, receive signed SD-JWT presentations, and verify them offline against the EU Trusted Lists. The credential was signed by an EU Member State issuer; your backend never calls home to that issuer during verification.
That offline verification model is powerful, but it creates a gap: a stolen credential from a compromised device passes every cryptographic check. The defines the credential format and protocol, but won't resolve the runtime device security for you. That gap is yours to close.
The Talsec security layer closes it by adding runtime proofs to every presentation flow, app authenticity and runtime integrity, before you ever parse the credential.
Use (the current OpenID4VP 1.0 query format) to specify exactly what you need. Request minimum attributes; this is a GDPR requirement.
For age verification only, request just age_over_18, the wallet that proves the claim without revealing the birth date.
Before calling the EUDI Wallet, your app generates an token (cryptogram) and attaches it to the request. , the cryptogram is a "cryptographical snapshot" of the device's security state, verified on the backend in real time to detect threats such as debuggers or simulators, and it proves the app binary is genuine and not repackaged.
Let's see some sample codes to understand a bit better the pattern, start with Android (Kotlin):
Similarly we can repeat that for iOS (Swift):
What the cryptogram token gives your backend:
App authenticity: A repackaged or cloned APK/IPA cannot produce a valid cryptogram for your App ID ()
Runtime threat flags: root/jailbreak (su, Magisk, palera1n), hooking frameworks (Frida/Xposed), emulators, debuggers, all captured in the same cryptogram
Real-time risk score: the backend script verifies the cryptogram and returns an integrity status per request
For on-device runtime protection, use (open-source) or , which adds overlay detection, screen-mirroring defense, and accessibility-abuse monitoring.
When the mobile app sends a SecureRequest, your backend runs several checks before reading any credential claims.
The ordering matters: cheap checks first, expensive ones last. Here is how you can create your gates in each step in your framework of choice for the backend:
App authenticity (AppiCrypt® backend script) verification: Decrypt and verify the AppiCrypt cryptogram using the simple script Talsec provides. The cryptogram is bound to your App instance, and the request payload, a repackaged or cloned APK/IPA, cannot produce a valid one. REJECT 403 if invalid.
Runtime integrity (RASP flags inside the cryptogram): The AppiCrypt cryptogram also carries RASP threat flags captured on the device. Check: no root/jailbreak, no hooking framework (Frida/Xposed/Substrate), no debugger, no emulator. Tune the policy per your risk appetite. REJECT 403 if flags exceed policy threshold.
Credential verification (ARF-compliant, any OpenID4VP library)
Issuer key must chain to the EU Trusted List (offline, no issuer callback)
nonce must match what you sent (prevents presentation replay)
Here is what it looks like in a simplified image:
I find some gaps when working with EUDI wallets, and I thought to bring them here. Three rules that prevent production incidents and GDPR fines:
1. Check credential revocation (Token Status List): Every SD-JWT contains a status claim pointing to a . Fetch it, decode the bitstring, and confirm the credential index is still 0 (active). This is the most commonly skipped verification step; without it, you'll accept revoked credentials indefinitely.
2. Never log the raw vp_token: The verifiable presentation contains disclosed PII (name, birth date, nationality). Logging it raw = violation. Log only: issuer, vct, iat, exp, and your internal session ID. If you need the payload for debugging, store it encrypted with a short TTL in a separate audit store.
3. Use pairwise identifiers for user storage: Don't store the wallet's sub claim directly; it's the same across all RPs the user interacts with, enabling cross-service tracking. Instead, derive a per-RP identifier:
Use this as your PR/release todolist. Every item maps to a security control described above; skip one, and you have a gap.
Register as RP in the Member State trust ecosystem
Backend: verify AppiCrypt cryptogram on every sensitive request (covers app authenticity + RASP threat flags in one step)
The EUDI Wallet shifts identity verification from server-mediated flows to cryptographic offline verification. That's powerful, but it moves the trust boundary to the mobile device. If the device is compromised, the credential is compromised. Start with the checklist above. Ship iteratively: RASP+ first, then upgrade to AppiCrypt and Malware Detection as your threat exposure grows. Happy coding!
written by Majid Hajian
EUDI Wallet Integration: A CTO's Decision Guide
A CTO's guide to EUDI Wallet integration: navigate eIDAS 2.0 deadlines, adapt to offline verification, and close critical mobile security gaps.
Your engineering team is about to ask you whether EUDI Wallet is a 2026 problem or a 2027 problem. The honest answer is: it's a now problem. The Architecture and Reference Framework (ARF) is stable, wallets are in pilot, and teams that start integration in late 2026 will be late. This guide covers the decisions you need to make, not the implementation details your developers handle.
This multi-part series is built for CTOs, architects, and mobile developers. We break down the regulatory clock, the architectural shifts, and the hands-on implementation details required to close the mobile security gap.
Explore the complete series:
Part 1: An overview of the new eIDAS 2.0 landscape, the mobile threat surface nobody warned you about, and how to map regulatory obligations to your security stack.
ARF stable, pilots underway, reference wallets live
Who must act by 2027? Any of the following apply to your company, EUDI Wallet acceptance is a regulatory obligation:
Banking, payments, or any PSD2 Strong Customer Authentication (SCA) flow
Very Large Online Platform under the Digital Services Act (DSA)
Telco SIM registration or contract execution
Any service legally requiring strong user authentication for online
EUDI is not a new OAuth provider you add to your SSO. The trust model is fundamentally different.
Traditional identity (OAuth/OIDC): User logs in → your app redirects to Google/bank/IdP → IdP authenticates the user → IdP calls back to confirm.
EUDI identity: User presents a credential from their wallet → your backend verifies the cryptographic signature offline, against public keys in the → no callback to the issuer, ever.
The power of that model also lies in its architectural implication: you own verification entirely. The issuer (a Member State government) signed the credential. Your backend checks that signature. There is no third-party real-time validation call. No fallback if your trust list is stale.This shifts operational responsibility onto your team for:
Fetching and caching EU Trusted Lists (refresh daily)
Verifying credential signatures, disclosure hashes, and holder binding
Checking credential revocation on every presentation
Managing your RP registration certificate
Here is the part that the protocol specification does not resolve: a stolen credential from a compromised device passes every cryptographic check.The credential is real. The signature is valid. The issuer stands behind it. But if the device presenting it is rooted, the app has been repackaged, or malware overlays the consent screen, the protocol cannot tell you. You can.
The three attack vectors that live outside the protocol:
This gap is yours to close. The regulation requires RPs to "protect the rights and interests of natural persons"; the mechanism is yours to choose.
Three layers of protection, stacked. Pick based on your risk exposure:
is recommended as primary, cross-platform attestation gate. In contrast to the platform solutions like Play Integrity (Android) or App Attest (iOS), AppiCrypt operates with the same SDK and verification model on both Android and iOS and works independently of Google Play Services or Apple’s online services. By binding every API call to a cryptographic snapshot of the device security state and embedding RASP threat flags, AppiCrypt provides a much stronger, runtime-aware posture designed for per-request API gating—crucial for high-risk EUDI actions.
What this gives you: app genuineness, device hardware attestation, one-time challenge binding.
continuously monitors the app's runtime environment: rooting, hooking frameworks (Frida/Xposed), debugger attachment, emulators, and repackaging. For higher-risk flows, RASP adds overlay detection, screen-mirror defense, and accessibility abuse monitoring, the vectors directly relevant to wallet consent screen attacks.
What this doesn't give you: real-time detection of rooting, Frida hooks, overlay malware, or runtime compromise after attestation.
binds every API call from your app to your backend with a cryptographic token (a "cryptographical snapshot" of device security state). Your backend verifies this token in real time, blocking cloned APKs, repackaged apps, and requests from compromised environments before you touch the credential. RASP threat flags are embedded in the same cryptogram. See the for the full capability overview.
The principle: request only what you need for the specific use case. If you are verifying age, request age_over_18 (a boolean, the user's birth date never leaves the device). If you need an identity for KYC, request only the claims your regulatory obligation requires, not the full credential.
Three non-negotiable data handling rules for your team:
Never log the raw presentation token. It contains disclosed PII. One line in a log file is a GDPR Article 5 violation.
Never store the wallet's subject identifier as a user ID. It enables cross-service tracking. Use a pairwise-derived identifier keyed to your domain.
Discard claims you don't need to persist. Verify them, act on the outcome, and store only what your service function requires.
Your DPO should review the DCQL queries your team writes before they ship.
Banking and Fintech: eIDAS 2.0 and PSD2 converge in the 2027 window. Wallet-based SCA replaces SMS OTP and hardware tokens with a stronger cryptographic guarantee; the wallet signs a commitment to the exact transaction amount and merchant. KYC onboarding via EUDI PID presentation eliminates video-ID costs while delivering a cryptographically verified result. Start the SCA migration architecture in 2026.
Telecommunications: SIM registration currently often requires storing passport photocopies and ongoing GDPR liability. EUDI selective disclosure lets you request only the claims national law mandates (name, date of birth, nationality) without building a passport archive. Contract execution via Qualified Electronic Signature (QES) in the wallet replaces PDF/wet-signature workflows at scale.
E-Signatures / Trust Services: A successful wallet credential presentation is not a Qualified Electronic Signature. Identity verification and document signing are legally separate operations on separate APIs. Ensure your product architecture keeps them distinct, or you will fail both security review and legal audit.
Here is how you should think of thee phases of what to ship:
Are we verifying the Key Binding JWT (nonce, aud, iat, sd_hash) on every presentation, not just the issuer signature?
Are we checking credential revocation via Token Status List on every call?
EUDI Wallet is an infrastructure change with a regulatory deadline. The cryptographic model is more powerful than anything currently deployed at scale for identity, but it transfers verification responsibility entirely to you. The architecture is settled. The reference implementations exist. The tooling is available. The teams that plan now will ship on time.
written by Majid Hajian
EUDI App Attestation Choices: AppiCrypt vs. Google Play Integrity & Apple App Attest
The EUDI Wallet secures the user's identity, but AppiCrypt is what secures your Relying Party app against clones, mods, and malicious automation.
The eIDAS 2.0 Architecture Reference Framework treats the wallet as the security anchor on the user side. Your Relying Party app is not part of that anchor. Which means:
⚠️ Malicious clone of your RP app can issue OpenID4VP requests that look identical.
⚠️ Hooked (Frida) app can hook verifyPresentation() and lie to your backend.
⚠️ Scripted automation tool can hammer your enrollment endpoint with attested user wallets.
App attestation answers exactly one question: "Is the request really coming from a genuine, unmodified instance of my app?" If you cannot answer that question with cryptographic confidence, every other RP-side control is paper-thin.
No discussion of app attestation would be complete without mentioning Google's native attestation service. While the underlying concept of an OS-vendor signal is fundamentally sound, the real-world execution has historically fallen short. Plagued by frequent API downtimes and restrictive rate limiting, it is effectively ruled out as a primary security layer for most serious businesses.
The Play Integrity backend signs an integrity verdict that includes requestDetails, appIntegrity, deviceIntegrity (legacy: deviceRecognitionVerdict), and accountDetails.Your client requests a token from Play Integrity, sends it to your backend, your backend asks Google to decode the token (or you decrypt locally), and you read the verdict labels.Here are considerations:
Strengths. First-party signal from the OS vendor. Free at low volume.
Weaknesses for an EUDI RP.
Requires Google Play Services. Useless on Huawei devices, on AOSP, on
Apple's per-device, per-app attested key pair, anchored in the Secure Enclave.
How verification works.There is no live Apple verification API. Your app calls App Attest once to get an attestation object. Your backend validates the object locally against Apple's published roots, stores the resulting attested public key, and thereafter verifies signed assertions from that key on every sensitive request. That stored key is your proof of authenticity.
Here are the considerations:
Strengths. Hardware-anchored, low overhead per request after enrollment.
Weaknesses for an EUDI RP.
iOS only.
Talsec's cross-platform API protection and app and device-integrity verification layer. Each API call carries a unique cryptographic proof/signature, which is verified on the backend.Here are the considerations:
Strengths for an EUDI RP.
Same SDK and same verification model on Android and iOS (or website). One mental model, one backend code path.
No dependency on Google Play Services or Apple's online services. Works on any Android distribution, including EU-sovereign builds.
Use AppiCrypt as your primary gate. Optionally, layer Play Integrity / App Attest as a secondary signal when you want OS-vendor corroboration. The order matters: In practice, each mobile request should carry three security inputs:
an token as the cross-platform attestation
a on the app side
an optional Play Integrity or App Attest signal as secondary corroboration;
Your backend should verify all available inputs before forwarding the request to the wallet flow (OpenID4VP), then optionally enrich the decision with your selected risk/telemetry service.Why AppiCrypt first: it's the one that doesn't break the moment a user installs your app on a Huawei phone, an EU sovereign Android build, or an enterprise-managed iPad with strict network egress. We have also published another article if you want to learn details: "".
For EUDI relying parties, app attestation is a core trust gate for every sensitive flow. A practical setup is to enforce AppiCrypt on every request, optionally enrich decisions with Play Integrity or App Attest signals, and always combine attestation with runtime risk checks.
written by Majid Hajian
How to Detect Hooking (Frida) using Swift
Protect your iOS app from runtime manipulation with Frida detection.
iOS apps are prime targets for hooking frameworks like Frida. Attackers use them to bypass protections, steal data, or alter app logic. Fortunately, SDKs like freeRASP by Talsec give Swift developers a simple way to detect and stop these attacks.
What is Hooking?
Hooking is when attackers intercept and modify method calls at runtime. On iOS, this is often achieved through:
Frida-server – enabling dynamic instrumentation on jailbroken devices
Objection – built on Frida, frequently used to bypass SSL pinning or jailbreak detection
frida-trace – helps attackers log and manipulate API calls
With these tools, attackers can:
Bypass payment checks or subscriptions
Steal credentials, tokens, or API keys
Inject malicious logic into sensitive apps (banking, healthcare, messaging)
Imagine someone secretly attaching a device to your phone line—every call you make could be recorded, redirected, or modified in real time. That’s how hooking works in your app.
Detection on iOS is complex. Frida developers continuously update their frameworks to evade naive checks. Simple DIY solutions like searching for frida-server processes or suspicious ports often fail. That’s why expert SDKs are the safer choice:
These SDKs evolve alongside attacker techniques, giving you peace of mind.
freeRASP (by Talsec)
to detect jailbreak, debugger, tampering, and hook attempts
Comes with like root, debugger, hooking (Frida, Xposed), emulators, and more
Trusted by
Swift Example:
When evaluating mobile app security and Runtime Application Self-Protection (RASP), developers often compare various Talsec alternatives to find the right fit for their architecture. The "right choice" depends on the specific problem you need to tackle and which vendor offers the best bang for your buck.
The market is diverse, offering different philosophical approaches to protection. Talsec prioritizes top-tier root detection and a balanced security SDK portfolio covering the most popular attack vectors. Meanwhile, some vendors specialize primarily in heavy code obfuscation and compiler-based hardening, while others focus on a drag-and-drop (no-code) integration experience for DevOps-oriented teams. There are also solutions dedicated specifically to API security, active cloud hardening, enterprise compliance, or gaming protection. The most prominent providers alongside Talsec include Guardsquare, Appdome, Promon, Build38, Approov, and AppSealing.
On iOS, attackers equipped with Frida, objection, or frida-trace can hijack your app’s logic at runtime. DIY detection is fragile—serious apps need serious protection. With freeRASP by Talsec, Swift developers get a lightweight, continuously updated SDK to block hooking and keep users safe.
Introduction
Discover curated AppSec articles, guides, and research on mobile app and API security, covering rooting, hooking, Flutter security, RASP, AppiCrypt, and practical threat detection techniques.
Articles by our team members and guest experts () that explore practical mobile security and threat defense topics for the developer community.
Defending Mobile Banking Apps Against the Rokarolla Trojan
In June 2026, security researchers published research on a new Android banking trojan they named Rokarolla, after its command-and-control servers. Within days it was being tracked against 217 banking and cryptocurrency apps, driven by a toolkit of roughly 137 remote commands.
The malware takes over the device, silences main security countermeasures, intercepts the channels a bank would normally use to warn the user, and runs fraud while the victim sees nothing unusual.
This guide is for the people who have to react to that: Android engineers, security architects, and product owners at banks and fintechs. We will walk through how Rokarolla works, then map each behaviour to a concrete Talsec defence guiding you to understand where client-side security can stop the attack and where it can only flag it so your backend can respond.
Talsec makes your app aware that the device is compromised, early enough to change how the session behaves.
Android Malware Detection SDK for Your App: Detect Risky & Suspicious Apps and Known Malware
Talsec Malware Detection SDK scans Android devices for RATs, keyloggers & SMS forwarders without QUERY_ALL_PACKAGES. Play Store compliant, offline-capable.
If you're building a banking, fintech, or e-gov Android app, you likely need to scan the user's device for malware - and you're probably required to do so under regulations like , , or .
Historically scanning device apps meant using the QUERY_ALL_PACKAGES permission, which Google heavily restricts since Android 11 - apps using it for general security scanning are routinely rejected from the Play Store. Talsec's Malware Detection SDK solves this. It uses a targeted approach that stays fully compliant with Google Play policies.
The malware detection diagram below shows the multi-layered detection pipeline of the Talsec Malware Detection SDK that every app on the device goes through. The App Reputation API is the only online step; all other stages run entirely on-device. This means the detection can operate in a fully offline mode when that better suits the use-case or compliance requirements. Because there is no one-size-fits-all solution, Talsec Malware Detection is designed to be configurable so every team gets the best fit for their needs.
How to Detect VPN using Swift
Struggling to protect your app from hidden network traffic? Here’s how to fight back.
VPNs are widely used for privacy, but they can also be exploited to bypass geo-restrictions, manipulate in-app content, or hide fraudulent activity. Detecting VPN usage in your iOS app is challenging, but there are solution whichmake it practical and reliable.
A VPN (Virtual Private Network) encrypts traffic and routes it through remote servers. While this protects privacy, it can also help attackers:
Bypass geo-restrictions (e.g., accessing services from unsupported countries)
Secure Input Protection
A PIN entry screen is a high-value target: attackers try to read it via screen capture, steal it through tap-jacking overlays, scrape it with a malicious accessibility service, or capture keystrokes through a compromised third-party keyboard (IME). As a general prerequisite, RASP+ Overlay Detection, Accessibility Misuse Detection, and Malware Detection should be running app-wide — they catch the device- and app-level threats that no per-screen setting can see. Android itself does not ship a dedicated "secure keyboard" component, but you can build the equivalent for the screen itself using standard platform primitives.
There are two supported approaches, in order of strength:
Custom in-app PIN keypad (recommended for PINs). The app draws its own numeric buttons and writes straight into an in-memory buffer. Because no system IME is involved, a keylogging or replacement keyboard has nothing to intercept — the keystrokes never leave your process. This is the closest Android equivalent to a "secure keyboard" for short numeric secrets.
Simple Root Detection: Implementation and verification
How to Detect Root
aud must match your RP Client ID (prevents cross-RP reuse)
key-binding JWT must be valid (proves wallet holds the key) → REJECT 403 if any check fails
Revocation Check (Token Status List / OCSP): Fetch the Token Status List bitstring from the issuer CDN. Confirm the credential's index is 0 (active). REJECT 403 if revoked.
Build DCQL queries, minimum attributes per use case
Define risk policy: fail-closed on AppiCrypt violation, step-up on borderline scores
Per-request nonce bound to your RP client_id
Never log raw vp_token, log only metadata (issuer, vct, iat, session ID)
Store pairwise-derived user IDs, not raw wallet sub claims
Part 2: EUDI Wallet Integration: A CTO's Decision Guide A strategic roadmap covering implementation timelines, the shift from real-time IdP callbacks to offline verification, and the privacy requirements your DPO needs you to know.
Part 3: Secure EUDI Wallet Integration for Mobile Developers A hands-on implementation guide for securing the OpenID4VP flow, writing GDPR-compliant DCQL queries, and setting up robust backend verification gates.
Part 4: App Attestation for EUDI Relying Parties A deep dive into platform attestation: AppiCrypt, Google Play Integrity and Apple App Attest , and how to build a resilient, cross-platform attestation strategy.
Disclaimer for full transparency: This article utilizes Talsec technology. We know we aren't the only vendor in the mobile security space. But we are the one running on 2,000,000,000 devices. We’ve protected more apps than there are cars on Earth. It's safe to say we know what we're doing.
Step 1: Request Credentials (DCQL Query)
Step 2: Secure the Client Request
Device Risk State API: Talsec also offers a server-side Device Risk State API, a product that lets your backend check a device's security state on-demand, independent of the user's current app session. See plans comparison or contact Talsec directly for access and API details.
System keyboard, hardened. If you must use a normal text field, force the sensitive numberPassword input type (which suppresses personalized learning and suggestions), disable autofill and the clipboard, and — for the highest assurance — restrict input to the pre-installed system IME rather than any installed third-party keyboard.
Both approaches sit on top of the same screen-level hardening: FLAG_SECURE to block screenshots, screen recording, and the recents thumbnail, and obscured-touch filtering to defeat tap-jacking overlays.
In Compose, set importantForAutofill = View.IMPORTANT_FOR_AUTOFILL_NO on the host AndroidView/root, or disable autofill for the Activity, since the TextField itself does not expose an autofill flag.
Layout (res/layout/activity_pin.xml):
Activity:
filterTouchesWhenObscured and FLAG_SECURE defend the screen locally, but they cannot detect a malicious accessibility service or malware already resident on the device. Keep Talsec Accessibility Misuse Detection, Overlay Detection, and Malware Detection enabled app-wide so those threats are caught before the user ever reaches this screen.
data class SecureRequest(
val openid4vp: OpenID4VPRequest,
val cryptogram: String, // cryptographical snapshot of app + device security state
)
suspend fun buildSecureRequest(): SecureRequest {
val nonce = secureNonce()
val req = OpenID4VPRequest(
dcqlQuery = pidAgeVerification(),
nonce = nonce,
clientId = RP_CLIENT_ID,
responseUri = "$BACKEND_URL/presentation/callback",
)
return SecureRequest(
openid4vp = req,
cryptogram = Talsec.getCryptogram(req.canonicalBytes()),
)
}
struct SecureRequest: Encodable {
let openid4vp: OpenID4VPRequest
let cryptogram: String // cryptographical snapshot of app + device security state
}
func buildSecureRequest() async throws -> SecureRequest {
let nonce = secureNonce()
let req = OpenID4VPRequest(
dcqlQuery: pidAgeVerification(),
nonce: nonce,
clientId: RP_CLIENT_ID,
responseUri: "\(BACKEND_URL)/presentation/callback"
)
return SecureRequest(
openid4vp: req,
cryptogram: try Talsec.getCryptogram(req.canonicalBytes())
)
}
async function handleProtectedRequest(req: Request) {
const cryptogram = req.headers["appicrypt"];
if (!cryptogram) return unauthorized(401);
appicryptEvaluate(cryptogram)
// 🪄Checks performed by AppiCrypt automatically🪄:
// - compute threat checks and evaluate RASP flags
// - verify signature
// - validate app/policy info against backend config
// - compare nonce
// ...
if (overallAssessment !== "OK") return forbidden(403);
if (riskScore > securityThreshold) return forbidden(403);
return forwardToBusinessLogic(req);
}
val pairwiseId = hmacSha256(key = RP_DOMAIN_SECRET, data = presentation.sub)
// Store pairwiseId as your user reference, can't be correlated across RPs
@Composable
fun SecurePinKeypad(onPinComplete: (String) -> Unit) {
val view = LocalView.current
DisposableEffect(Unit) {
val window = (view.context as Activity).window
window.setFlags(FLAG_SECURE, FLAG_SECURE)
onDispose { window.clearFlags(FLAG_SECURE) }
}
// PIN lives only in memory — never touches an IME, autofill, or the clipboard.
var pin by remember { mutableStateOf("") }
Column(horizontalAlignment = Alignment.CenterHorizontally) {
// Masked dots reflecting the current length.
Row(Modifier.padding(24.dp)) {
repeat(4) { i ->
Box(
Modifier.size(16.dp).padding(4.dp)
.background(
if (i < pin.length) Color.Black else Color.LightGray,
CircleShape
)
)
}
}
val keys = listOf("1","2","3","4","5","6","7","8","9","","0","⌫")
keys.chunked(3).forEach { row ->
Row {
row.forEach { key ->
Button(
onClick = {
when (key) {
"" -> {}
"⌫" -> pin = pin.dropLast(1)
else -> if (pin.length < 4) {
pin += key
if (pin.length == 4) onPinComplete(pin)
}
}
},
enabled = key.isNotEmpty(),
modifier = Modifier.size(72.dp).padding(4.dp)
) { Text(key, fontSize = 20.sp) }
}
}
}
}
}
@Composable
fun SecurePinEntry() {
val view = LocalView.current
// FLAG_SECURE: no screenshots, no screen recording, blanked in recents.
DisposableEffect(Unit) {
val window = (view.context as Activity).window
window.setFlags(
WindowManager.LayoutParams.FLAG_SECURE,
WindowManager.LayoutParams.FLAG_SECURE
)
onDispose { window.clearFlags(WindowManager.LayoutParams.FLAG_SECURE) }
}
var pin by remember { mutableStateOf("") }
OutlinedTextField(
value = pin,
onValueChange = { if (it.length <= 6 && it.all(Char::isDigit)) pin = it },
label = { Text("PIN") },
singleLine = true,
visualTransformation = PasswordVisualTransformation(),
keyboardOptions = KeyboardOptions(
// Password keyboard type is treated as sensitive: the IME keeps
// entered digits out of personalized-learning/suggestions.
keyboardType = KeyboardType.NumberPassword,
imeAction = ImeAction.Done
),
// pointerInteropFilter requires @OptIn(ExperimentalComposeUiApi::class).
// Reject taps that arrive while another window sits on top (tap-jacking).
modifier = Modifier.pointerInteropFilter { event ->
val obscured = event.flags and
(MotionEvent.FLAG_WINDOW_IS_OBSCURED or
MotionEvent.FLAG_WINDOW_IS_PARTIALLY_OBSCURED)
obscured != 0 // true = consume & ignore the event
}
)
}
class PinActivity : AppCompatActivity() {
override fun onCreate(savedInstanceState: Bundle?) {
super.onCreate(savedInstanceState)
// FLAG_SECURE must be set before setContentView to also cover the recents thumbnail.
window.setFlags(
WindowManager.LayoutParams.FLAG_SECURE,
WindowManager.LayoutParams.FLAG_SECURE
)
setContentView(R.layout.activity_pin)
val pinField = findViewById<EditText>(R.id.pinField)
// Disable copy/paste/selection so the PIN can't reach the clipboard.
pinField.customSelectionActionModeCallback = object : ActionMode.Callback {
override fun onCreateActionMode(mode: ActionMode?, menu: Menu?) = false
override fun onPrepareActionMode(mode: ActionMode?, menu: Menu?) = false
override fun onActionItemClicked(mode: ActionMode?, item: MenuItem?) = false
override fun onDestroyActionMode(mode: ActionMode?) {}
}
pinField.isLongClickable = false
// Belt-and-braces: also enforce obscured-touch rejection in code.
pinField.filterTouchesWhenObscured = true
}
}
Dynamic TLS Pinning - Prevents Man-in-the-Middle (MitM) attacks by validating server certificates that can be updated remotely without needing to publish a new app version.
Secret Vault - A secure storage solution that encrypts and obfuscates sensitive data (like API keys or tokens) to prevent them from being extracted during reverse engineering.
Are we refreshing the EU Trusted List cache daily?
Have we run the eight negative-cryptography tests (tampered disclosure, reused nonce, wrong audience, revoked credential, etc.)?
Is the raw vp_token excluded from all logging pipelines?
Have we registered as a Relying Party in the relevant Member State trust ecosystem?
Have we tested against the official EUDI reference wallet and the EUDI Launchpad interoperability program?
Part 2: EUDI Wallet Integration: A CTO's Decision Guide A strategic roadmap covering implementation timelines, the shift from real-time IdP callbacks to offline verification, and the privacy requirements your DPO needs you to know.
Part 3: Secure EUDI Wallet Integration for Mobile Developers A hands-on implementation guide for securing the OpenID4VP flow, writing GDPR-compliant DCQL queries, and setting up robust backend verification gates.
Part 4: App Attestation for EUDI Relying Parties A deep dive into platform attestation: AppiCrypt, Google Play Integrity and Apple App Attest , and how to build a resilient, cross-platform attestation strategy.
Disclaimer for full transparency: This article utilizes Talsec technology. We know we aren't the only vendor in the mobile security space. But we are the one running on 2,000,000,000 devices. We’ve protected more apps than there are cars on Earth. It's safe to say we know what we're doing.
Architecture decisions, RP registration plan
2026
Certified wallets available in Member States
Integration in dev/staging, pen testing
End 2026
Public services accept wallets
Production readiness for regulated RPs
End 2027
Regulated private-sector RPs expected to accept
Delivery deadline for banking, telco, VLOPs
Rooted / jailbroken device
Attacker extracts credentials or intercepts the presentation flow
❌ No
Overlay attack
Malware covers the wallet consent screen; user approves the wrong thing
❌ No
Repackaged RP app
Modified app routes credentials to attacker's server
1: Protocol
OpenID4VP request/response, SD-JWT verification, Trust List integration, revocation
Start now
2: Hardening
AppiCrypt, RASP+ runtime protection
Before pilot
3: Production
RP registration, pen testing, EUDI Launchpad interop validation, GDPR audit
enterprise builds, and on parts of the EU long-term sovereignty roadmap.
Verdict labels are coarse.MEETS_DEVICE_INTEGRITY hides a lot. You
cannot, for example, distinguish clean stock from clean
rooted-but-Magisk-hidden.
Quota and latency are real production concerns.
No cross-platform symmetry. Different model on iOS.
Operationally heavier than it looks: you must persist and rotate attested keys, handle device migration, and reason about App Attest "fraud" assertions.
No detection of jailbreak, hooking, or malware: App Attest tells you the key is genuine, not that the runtime is clean.
Can be combined with RASP signals for a stronger runtime-aware policy decisions.
Designed for per-request API gating, which maps well to high-risk RP actions (presentation, issuance, signature authorization).
—
✅
✅
Works without Google Play Services
❌
n/a
✅
Per-request gating model
Token-per-request (with quotas)
Stored key + signed assertions
Token-per-request (no third-party online dependency)
Tied to RASP runtime view
❌
❌
✅
EU sovereignty story
Weak
Weak
Strong
Free tier
Yes (rate-limits)
Yes
Starter plan available
Concern
Play Integrity
App Attest
AppiCrypt
Android
✅
—
✅
This multi-part series is built for CTOs, architects, and mobile developers. We break down the regulatory clock, the architectural shifts, and the hands-on implementation details required to close the mobile security gap.
Explore the complete series:
Part 1: Build a Secure EUDI Wallet Relying Party An overview of the new eIDAS 2.0 landscape, the mobile threat surface nobody warned you about, and how to map regulatory obligations to your security stack.
Part 2: A strategic roadmap covering implementation timelines, the shift from real-time IdP callbacks to offline verification, and the privacy requirements your DPO needs you to know.
Part 3: A hands-on implementation guide for securing the OpenID4VP flow, writing GDPR-compliant DCQL queries, and setting up robust backend verification gates.
Part 4: A deep dive into platform attestation: AppiCrypt, Google Play Integrity and Apple App Attest , and how to build a resilient, cross-platform attestation strategy.
Disclaimer for full transparency: This article utilizes Talsec technology. We know we aren't the only vendor in the mobile security space. But we are the one running on 2,000,000,000 devices. We’ve protected more apps than there are cars on Earth. It's safe to say we know what we're doing.
Google Play Integrity API
Google Play Integrity API frequent service downtimes and rate limiting can break your verification flows. It is prone to unpredictable failures, so integrate it only as an optional, secondary security check.
- An advanced security SDK that actively shields your app from reverse engineering, tampering, rooting/jailbreaking, and runtime attacks like hooking or debugging.
AppiCrypt (Android & iOS) & - A backend defense system that verifies the integrity of the calling app and device to block bots, scripts, and unauthorized clients from accessing your API.
Malware Detection - Scans the user's device for known malicious packages, suspicious "clones," and risky permissions to prevent fraud and data theft.
- Prevents Man-in-the-Middle (MitM) attacks by validating server certificates that can be updated remotely without needing to publish a new app version.
- A secure storage solution that encrypts and obfuscates sensitive data (like API keys or tokens) to prevent them from being extracted during reverse engineering.
Mobile and API Threat Detection & Defense (Rooting, Hooking, Reverse Engineering)
Technical articles focused on advanced strategies to detect and defend against mobile threats, including rooting, hooking, reverse engineering, and API abuse.
Talsec RASP+, AppiCrypt and freeRASP Guides and Features
This collection highlights cutting-edge tools and resources from Talsec designed to secure mobile apps through runtime application self-protection (RASP), API integrity checks, and anti-abuse measures.
At Talsec, we’re proud to lead the way as the #1 Flutter Security SDK, and our commitment to this growing framework runs deep. This curated collection showcases our ongoing efforts to protect Flutter apps.
Breaking the Android Sandbox and How to Defend Against It
Case Study: How Rogue Malware Apps Attack Your Users (and What Our Data Shows)
EUDI - App Attestation Choices: AppiCrypt vs. Google Play Integrity & Apple App Attest
EUDI Developer Guide: Secure EUDI Wallet Integration for Mobile Developers (ARF, DCQL, 2026-2027)
EUDI Wallet Integration: A CTO's Decision Guide
Build a Secure EUDI Wallet Relying Party
Frida: Hacking and protecting mobile apps
New features in Talsec Portal
How Our Partnership With Gen Digital Enabled Malware Detection v2 Powered by Avast and Norton DBs
Talsec Global Threat Report 2025
Panel: Engineers vs. Reverse Engineers
The AI Impersonator: Runtime Defense Against Machine-Generated Deception with Dmitri Bogatenkov
How to Stop Bots Without CAPTCHA
Opening Keynote: Safety/Security Equilibrium with Sergiy Yakymchuk (Talsec)
TechTalk: Predictive Apps Protection with Sergiy Yakymchuk (Talsec)
TechTalk: Best Practices for Keeping Your App Safe with Majid Hajian (Microsoft)
OWASP Top 10 For Flutter – M10: Insufficient Cryptography in Flutter & Dart
Android Malware Detection SDK for Your App: Detect Risky & Suspicious Apps and Known Malware
OWASP Top 10 For Flutter – M9: Insecure Data Storage in Flutter & Dart
OWASP Top 10 For Flutter – M8: Security Misconfiguration in Flutter & Dart
Mapping against these four Talsec SDK products:
(free) and (premium)
(free) and (premium)
Rokarolla behaviour
What it does
Talsec protection
Sideloaded dropper (fake Chrome/TikTok, poses as Play Protect)
Gets installed from a browser/website instead of a store
Scan for sideloaded apps
available both in freeMalwareDetection,
Malware Detection
Second-stage payload on the device with Accessibility + SMS + Call-handler + overlay permissions
The actual malware sitting alongside your app
The kill chain is straightforward, which is part of why it works.
Distribution. Rokarolla never touches the Play Store. It spreads through rogue sites advertising popular apps. The user is pushed to download an APK directly — sideloading — and the first thing they install is a dropper dressed up as Google Play Protect.
Privilege escalation. Once running, the dropper fetches the payload and asks for the permissions that make everything else possible: Accessibility Services, notification access, and the default SMS and call handler roles. One of its early commands disables Play Protect so it can stay hidden.
Execution and isolation. When the victim opens a targeted app, Rokarolla draws a pixel-matched fake login page over the real one and records everything typed. It keylogs (<start_keylogger>), scrapes on-screen text, and — instead of the noisy live screen-casting older families used — quietly takes screenshots through Accessibility and exfiltrates them frame by frame. To finish a fraudulent transfer it suppresses audio and vibration, hides its icon, blocks incoming calls, and consumes the bank's OTP SMS directly. The user holds a phone they think they control while someone else drives it.
That last part is the real innovation, and it is why detection has to happen client-side and early. By the time your backend sees an anomaly, the OTP has already been intercepted.
Obfuscation (R8/ProGuard) protects your code from reverse engineering. It does nothing against an overlay drawn on top of your running app.
Certificate pinning guarantees a secure channel to your backend. It cannot help when Accessibility scrapes the data off the screen before it is ever encrypted.
The gap is the device environment itself. A banking app needs to answer a different question: is this device safe to transact on right now? Three properties matter for a real-world deployment:
No performance friction. Banking users abandon apps that stutter or drain the battery. Scanning has to run in the background, off the UI thread.
Zero-day reach. A brand-new Rokarolla build won't be in any signature database yet. The defence has to recognise the risk profile — sideloaded source plus dangerous permission combinations — not just known hashes.
Low false positives. Block a legitimate user because they have a harmless accessibility tool installed, and your support desk drowns. The response has to be proportionate.
This is exactly the shape of Talsec's layered model.
Talsec doesn't sit between the malware and the OS. It runs inside your app, watches the environment, and fires callbacks you decide how to handle. Against Rokarolla, four layers do the work.
1. Malware scanning.freeMalwareDetection (the free community variant) and the premium Malware Detection product scan installed apps in the background. Locally, they use package-name and hash blocklists plus permission-based risk scoring: the combination of sideloaded source + Accessibility + overlay capability is a high-confidence indicator of an app like Rokarolla's payload. The premium tier adds an online App Reputation API to confirm known strains.
2. Untrusted installation source. Rokarolla's dropper arrives from a browser, not a store. onUntrustedInstallationSourceDetected flags your own app's install origin, and the malware scanner's source filtering does the same for other apps on the device.
3. Overlay and Accessibility-misuse protection. This is where RASP+ earns its place. Rokarolla's entire credential-theft mechanism is built on overlays and Accessibility-service abuse. RASP+ is designed specifically to detect overlay attacks, screen readers, and Accessibility misuse — the techniques at the centre of this trojan.
4. Screen-capture blocking. Rokarolla exfiltrates screenshots through Accessibility. freeRASP can detect screenshots and recordings, and — more usefully here — actively block capture with Talsec.blockScreenCapture(activity, true), which renders sensitive screens as black to a screen logger.
A note on what is not in this list: SMS and call interception. Once an app holds the default SMS/call-handler role, no in-app SDK can stop it reading messages. Talsec's contribution is upstream of that — it tells your app the device is compromised, so your backend can stop trusting SMS OTP on that session entirely and fall back to phishing-resistant authentication.
Malware detection ships as part of freeRASP, so a single integration gives you the malware callback plus the rest of the RASP checks. The steps below follow the official Android integration guide; see it for the full configuration reference.
Register Talsec's artifact repository in your project's settings.gradle (keep it last):
Start Talsec in onCreate so protection is live before any screen loads. Run it in TalsecMode.BACKGROUND to keep it off the UI thread.
You only override the callbacks your policy cares about. For this threat model, these are the ones that matter — kept high-level here; in practice each one feeds a risk engine rather than acting directly:
}
Hook this into ActivityLifecycleCallbacks so it covers the whole app, and switch it on for screens showing balances, OTPs, or transfer confirmations:
Detection is only useful if it changes what your app does. A practical pattern is a small risk engine that collects Talsec signals and applies different policies to different user actions.
Login. If Talsec reports an untrusted source plus an installed app abusing Accessibility, don't pre-fill the password field and don't fall back to SMS OTP — that's exactly the channel Rokarolla owns. Use in-app biometric or key-pair validation instead, so a screen capture or intercepted SMS yields nothing useful. On a confirmed malware match, end the session and show a full-screen block explaining the device needs cleaning.
High-value transfers (ACH, P2P, bill pay). If an overlay-capable app is active in the background, intercept the transfer path. Require out-of-band biometric signing (FIDO2/WebAuthn). Rokarolla's automated transfer flow depends on masking confirmation inputs; changing the verification sequence breaks the script.
Profile changes (password reset, MFA device registration). These are what an attacker goes after to make persistence permanent. On any unverified-environment signal, halt and require live verification or a cooling-off delay, and push the event to your fraud backend for review.
The principle throughout: proportionate response. A clean session sees zero friction. A genuinely compromised one gets contained at the exact moment it matters.
Rokarolla is a good stress test for a mobile security posture because it attacks at the device layer. The defence is to make your app aware of its environment and react before the user transacts.
For developers: one freeRASP integration gives you the malware callback, untrusted-source detection, and screen-capture blocking, all running in the background with a clean Kotlin API.
For architects: local heuristics keep working offline; the App Reputation API adds confirmed-malware coverage online. The combination fails secure either way.
For product owners: detection maps directly to graduated responses — allow, step-up, or block — so security tracks the actual threat level instead of punishing clean users.
No client-side SDK removes a trojan from a phone. But detecting it early, honestly, and acting on it is the difference between a flagged session and a drained account.
class BankApplication : Application() {
override fun onCreate() {
super.onCreate()
val config = TalsecConfig.Builder(EXPECTED_PACKAGE_NAME, SIGNING_HASHES)
.watcherMail("security@yourbank.example")
.supportedAlternativeStores(arrayOf("com.sec.android.app.samsungapps"))
.prod(true)
.killOnBypass(true)
.build()
ThreatListener(threatListener).registerListener(this)
Talsec.start(this, config, TalsecMode.BACKGROUND)
}
}
val detectionConfig = SuspiciousAppDetectionConfig(
// Known Rokarolla hashes (see the link above)
hashes = setOf("755ee39ff11bad65193c4806cadb9cedda41e20663c35494cb7d4e9646ddcf21"),
// Flag any app whose manifest requests one of these permission sets...
requestedPermissions = setOf(
setOf("android.permission.READ_SMS"),
setOf("android.permission.BIND_ACCESSIBILITY_SERVICE"),
setOf("android.permission.REQUEST_INSTALL_PACKAGES")
),
// ...and raise confidence when the dangerous one is actually granted
grantedPermissions = setOf(
setOf("android.permission.BIND_ACCESSIBILITY_SERVICE")
),
// Only look at sideloaded apps; trust Google Play
malwareScanScope = MalwareScanScope(
scanScope = ScopeType.SIDELOADED_ONLY,
trustedInstallSources = listOf("com.android.vending")
),
...
)
...
// Render the screen black to any screen logger
Talsec.blockScreenCapture(activity, true)
How Rokarolla actually works
Why standard app hardening is not enough
The Talsec approach: detect the environment, then react
Integration
Add the dependency
Initialise in your Application class
Handle the Rokarolla-relevant threats
APKs hashes available
Block screen capture on sensitive screens
Mapping detection to product decisions
Summary
1
On-Device Blocklist
The system first checks a customizable local list of known-bad hashes and package names. Any match is flagged immediately without further processing.
2
Installation Origin Check
Next, the system checks where the app was installed from. Apps from trusted sources (Google Play Store, Samsung Galaxy Store, Huawei AppGallery, etc.) receive a trusted badge and skip the deep inspection stages. Apps sideloaded from a browser or unknown source continue down the pipeline.
3
On-Device Detector
Sideloaded apps are scanned locally on the device. The detector analyzes the app's requested permission combinations, looking for high-risk patterns (e.g., an app requesting READ_SMS + BIND_ACCESSIBILITY_SERVICE + BIND_DEVICE_ADMIN).
4
For a final verdict, the local findings can optionally be sent to a cloud-based App Reputation API. The API cross-references the app against a global threat intelligence database by Gen, the parent company of Norton and Avast. If the app turns out to be benign (false alarm), it is cleared. If confirmed as a threat (RAT, SMS stealer, overlay trojan), the system triggers a block.
Note: The defaults called "High Security Configuration" work for most scenarios. Need something tailored? Our experts can suggest the configuration to fit your requirements.
Attackers rarely try to exploit the Android OS directly anymore. Instead, they build specialized malicious apps designed to interfere with your app. These threats are often custom-built and rapidly modified, so universal malware databases struggle to keep up. Talsec's Malware Detection focuses on catching apps specifically engineered for fraud and abuse. The detection signals are built around a set of high-risk permissions that legitimate apps almost never request in combination:
READ_SMS, RECEIVE_SMS, RECEIVE_WAP_PUSH: The core fingerprint of SMS Forwarders and OTP Stealers - trojans that intercept incoming messages to bypass two-factor authentication.
BIND_ACCESSIBILITY_SERVICE: Abused by Overlay Trojans to draw fake login screens over banking apps, and by Keyloggers & Surveillance Spyware to capture keystrokes silently.
BIND_DEVICE_ADMIN: Requested by malware that needs persistent device control - used to prevent uninstallation or enforce remote lockout.
REQUEST_INSTALL_PACKAGES: The hallmark of dropper apps that download and silently install additional malicious payloads after the initial infection.
QUERY_ALL_PACKAGES: Used by spyware to enumerate all installed apps and map the device before targeting specific banking or authentication apps.
Other threat types such as Call-Intercepting Trojans, Clipper Malware, and app Copycats are also detectable by the detection engine.
Talsec evaluates permissions at two levels - requested (declared in the app's manifest) and granted (actively approved by the user) - with the detection scope configurable to match your threat model. Flagging toxic combinations like BIND_ACCESSIBILITY_SERVICE + READ_SMS + BIND_DEVICE_ADMIN at the manifest level means Talsec can catch brand-new, zero-day malware that signature-based antivirus databases have never seen.
Scanning app manifests is only half the picture. The other half is checking what is actually active at the OS level. An app that has been granted elevated system privileges by the user - even a legitimate-looking one - is immediately more dangerous than one that merely declares permissions in its manifest. Talsec monitors both.
Android deliberately gives users more control than iOS. The problem is that malware actively social-engineers users into enabling high-risk settings they don't fully understand. The following Settings areas are the primary targets:
Accessibility Services (Settings > Accessibility > Installed Services): Any non-system app with an active accessibility service can read all on-screen UI content, simulate taps, and capture keystrokes - without any further permission dialog at runtime. Users are routinely tricked into enabling these for fake "performance optimizers" or "battery savers."
Keyboard (IME) apps with Accessibility enabled: A third-party keyboard that also holds an active accessibility service is a textbook keylogger setup. The keyboard sees every character typed; the accessibility service gives it the ability to observe and interact with the surrounding UI.
Default SMS handler: The app registered as the default SMS application has OS-level read and send access to all messages without per-message permission prompts. A malicious app that becomes the default SMS handler can silently forward OTPs as they arrive.
Default phone/dialer app: The app registered to handle outgoing calls can intercept, record, and manipulate call flows without triggering visible permission requests at call time.
Device Administrator apps (Settings > Security > Device Admin Apps): Apps holding device admin rights can lock the screen, enforce password policies, and resist uninstallation. This is the persistence mechanism behind screen-locking ransomware - the user cannot simply uninstall the app without first revoking its admin rights.
Remote access / screen sharing apps: Apps capable of capturing and streaming the device screen (Remote Access Tools, or RATs) can be present on a device without obvious malicious permissions declared in their manifest. Detecting them requires behavioral analysis that goes beyond manifest inspection.
Scanning every app on a device generates noise - and the most significant source of that noise isn't random apps, it's system and OEM pre-installed apps. Consider what comes pre-installed on a typical Android device: screen recorders, diagnostic tools, manufacturer accessibility services, OEM camera or gallery apps. These apps legitimately hold many of the exact high-risk permissions we're scanning for (RECORD_AUDIO, BIND_ACCESSIBILITY_SERVICE, READ_SMS on carrier builds, etc.). Scanning them would produce a flood of hits that are technically correct detections but are expected and safe on that device - not actionable false positives, but noise that slows down the scanner and overwhelms any response logic.
The solution is to skip apps that were installed by the OS or a trusted OEM store. Talsec allows you to configure a whitelist of trusted installation sources. You can set the SDK to ignore apps installed from verified stores (like com.android.vending for Google Play, com.sec.android.app.samsungapps for Samsung, Huawei AppGallery, etc.) and to exclude system-flagged apps entirely.
With those filtered out, the scanner focuses exclusively on user-installed and sideloaded apps - the realistic attack surface - where dangerous permission combinations are genuinely suspicious.
Security tools are only useful if they don't degrade the user experience. Talsec was built with developer ergonomics and runtime performance as priorities:
100% Offline Processing (Optional): In its default configuration, all hash checks, package name blocklists, and permission evaluation happen directly on the device. No app inventory data leaves the phone.
Asynchronous Scanning: Scans run in the background asynchronously and never block the main thread or freeze the UI.
Different applications have different risk profiles. Talsec lets you combine on-device offline scanning with an optional, online App Reputation API to balance security and user friction.
1
Offline Scanning
A purely on-device, privacy-preserving layer that uses customizable hash/package blocklists and permission-based risk scoring to catch zero-days locally.
2
High-Confidence Mode
Relies solely on Talsec's live App Reputation API. It only flags recognized malware. Near 0% false positives - allows teams to automatically block critical actions when malware is detected without risking false blocks on legitimate users.
3
High-Security Mode
Combines the live database with zero-day permission checks. If an app is unknown to the database but was sideloaded and requests high-risk permissions, it triggers a flag.
When Talsec detects a risky app, how should your application respond? Two primary strategies:
Strategy A: Silent Business Logic (No User Friction) Process the list of suspicious apps silently in the background. Use this data on your backend for:
Dynamic Feature Blocking: Allow the user to view their account balance, but temporarily restrict sensitive actions (like outward wire transfers) until the device is clean.
Device Risk Scoring: Feed the data into your existing anti-fraud models.
Threat Intelligence: Monitor emerging fraud patterns targeting your specific user base.
Strategy B: User Involvement (Warning UI) Display a malware warning screen to alert the user why their app access is restricted.
Suggest the user to directly Uninstall the malicious app from within your UI.
Allow the user to Trust/Whitelist the app locally if they know it is legitimate.
As mentioned in the High-Security mode, when the SDK flags an unknown sideloaded app, we recommend handling it through a localized "User Trust" flow:
1
Detection
The SDK flags the sideloaded app because it is unknown to the Reputation API and requests sensitive permissions.
2
Interaction
Your app displays a bottom sheet or dialog to the user: "We detected an app from an unofficial source with potentially dangerous permissions. If you trust this app (e.g., Kaspersky from the official site), you can mark it as safe."
3
Local Whitelisting
If the user confirms, call the SDK method:
This whitelists the app on that specific device without compromising the security of your entire user base.
Consider a concrete example: a user legitimately downloads Kaspersky antivirus directly from the vendor's website via their browser. To the OS, this app is sideloaded and it requests high-level permissions. Under a High-Security configuration, Talsec will correctly flag it as suspicious - this is exactly the scenario the User Trust flow described above is designed for.
Why not just whitelist the package name (com.kms.free) globally? Because attackers frequently spoof package names of legitimate security apps to bypass detection. A global whitelist is a security hole. The per-device User Trust approach avoids this.
Why not send every app to the online API instead of scanning locally? The App Reputation API is effective against known threats, but it cannot catch truly novel (zero-day) malware that hasn't been cataloged yet. On-device heuristic checks (permission combos, installation source analysis) catch unknown malware the cloud database has never seen. Additionally, sending every app to the API adds network latency and unnecessary data transfer. The hybrid local-first, cloud-optional approach gives the best coverage.
How should I communicate detection results to my backend? The SDK provides structured callbacks your app can hook into. In the silent strategy, send threat metadata (detection type, risk level, number of flagged apps) to your backend as part of a device risk score. Use it to gate sensitive operations - transfers, password changes, session elevation - without user-facing alerts. In the user-facing strategy, let the user act on the warning directly in-app, and log their decision (uninstall / trust) back to your backend for audit purposes.
Can I log detected package names to my backend? Be careful here. Google Play treats the list of installed apps as personal and sensitive user data. Under the QUERY_ALL_PACKAGES policy and the Spyware policy, transmitting app inventory data (including package names) to a remote server without prominent user disclosure and explicit consent is a policy violation. This can lead to app removal or developer account termination. Google also holds host app developers responsible for data collected by any embedded SDKs.
The recommended approach: log only anonymized or hashed threat indicators and detection verdicts (e.g., "sideloaded app with high-risk permission combo detected, risk level: high") rather than raw package names. If your security team needs raw package names for incident investigation, implement explicit user consent and a prominent privacy disclosure in your app before collecting that data.
By combining installation source filtering, zero-day permission analysis, and optional live reputation databases, Talsec provides targeted and effective malware detection that works within Google Play's policy constraints.
Did you know? Established stores like Google Play, Samsung Galaxy Store, and Huawei AppGallery all scan apps for known malware before making them available for download - so apps from these sources arrive pre-vetted.
Detection by Requested or Granted Permissions
Active System Settings as an Attack Vector
Check out Demos
Filtering by Installation Source
Performance and Privacy
Configuration Modes
Handling Detections
Example of Difficult Edge Case: Legitimate Sideloaded Apps
Conclusion
Handle App Security with a Single Solution! Check Out Talsec's Premium Offer & Plan Comparison!
Hide malicious activity like bot traffic or credential stuffing
Exfiltrate sensitive data undetected
Attackers often use common VPN apps (NordVPN, ExpressVPN, ProtonVPN) or system-level tunnels to disguise their actions. From a security perspective, detecting VPN usage is like knowing if a user is “wearing a mask”.
Detecting VPNs isn’t trivial—many providers change IPs, use stealth protocols, or blend with normal traffic. DIY solutions (like hardcoding VPN IP ranges) are unreliable and outdated quickly.
Instead, use expert SDKs that:
Actively monitor for VPN interfaces and tunnels
Stay updated against new evasion techniques
Provide callbacks so your app can respond instantly
The most robust, developer-friendly and free choice for iOS.
Aside from VPN detection, it also contains additional security checks
Enterprise grade of checks
Might be expensive for small apps
Integration Example:
Feature
freeRASP
Malwarelytics
Works Offline
Yes
Yes
Easy Integration
Yes
Yes
When evaluating mobile app security and Runtime Application Self-Protection (RASP), developers often compare various Talsec alternatives to find the right fit for their architecture. The "right choice" depends on the specific problem you need to tackle and which vendor offers the best bang for your buck.
The market is diverse, offering different philosophical approaches to protection. Talsec prioritizes top-tier root detection and a balanced security SDK portfolio covering the most popular attack vectors. Meanwhile, some vendors specialize primarily in heavy code obfuscation and compiler-based hardening, while others focus on a drag-and-drop (no-code) integration experience for DevOps-oriented teams. There are also solutions dedicated specifically to API security, active cloud hardening, enterprise compliance, or gaming protection. The most prominent providers alongside Talsec include Guardsquare, Appdome, Promon, Build38, Approov, and AppSealing.
VPN usage can bypass app restrictions and pose security risks, but detection doesn’t have to be DIY or error-prone. Tools like freeRASP provide reliable, continuously updated detection, letting you respond proactively to potential threats.
👉 If you want VPN detection plus root, Frida, emulator, and tampering protection in one free package, start with freeRASP by Talsec.
What is VPN?
import TalsecRuntime
let config = TalsecConfig(
appBundleIds: ["YOUR_APP_BUNDLE_ID"],
appTeamId: "YOUR TEAM ID",
watcherMailAddress: "WATCHER EMAIL ADDRESS",
isProd: true
)
extension SecurityThreatCenter: SecurityThreatHandler {
public func threatDetected(_ securityThreat: TalsecRuntime.SecurityThreat) {
print("Found incident: \(securityThreat.rawValue)")
}
}
public enum SecurityThreat: String, Codable, CaseIterable, Equatable {
// ... other cases ...
case systemVPN
// VPN detected
}
- An advanced security SDK that actively shields your app from reverse engineering, tampering, rooting/jailbreaking, and runtime attacks like hooking or debugging.
(Android & iOS) & - A backend defense system that verifies the integrity of the calling app and device to block bots, scripts, and unauthorized clients from accessing your API.
- Scans the user's device for known malicious packages, suspicious "clones," and risky permissions to prevent fraud and data theft.
This section provides a categorized reference of Android package names that the operating system may report as an installation source. You can use these reference tables to copy and paste exact package identifiers when configuring your RASP or Malware Detection trusted sources.
The tables in the Cookbook below tell you which packages to trust. Where you register them depends on the product and tier:
Product
Free tier
Premium tier
Breaking the Android Sandbox and How to Defend Against It
A deep-dive into CVE-2024-0044 and how Runtime Application Self-Protection can stop it
In this blog, we will be analyzing CVE-2024-0044, a critical run-as any app vulnerability that sent shockwaves through the Android security community.
Marked as High Severity by Google, this bug allowed attackers to bypass the fundamental Application Sandbox on Android 12, 13 and 14 using a surprisingly simple command injection technique and access any app's internal files without even rooting the device.
We will observe how a tiny validation error in the Android Framework allowed anyone with ADB access (Remote or Physical) to trick the system into thinking any production app was debuggable. We will explore what this meant for millions of user devices where private data suddenly became public property for anyone with a USB cable.
OWASP Top 10 For Flutter – M7: Insufficient Binary Protection in Flutter & Dart
Talsec RASP+ and AppiCrypt for Apple TV Apps
TechTalk: Threshold Cryptography with Jan Kvapil (MUNI)
Keynote: Fingerprinting, Device Intel & Context with Martin Makarský (Fingerprint)
How To Detect Video Injection for KYC
Keynote: Cloudflare for AppSec with Anatol Nikiforov (Cloudflare)
Keynote: Communty-Driven Security as Collective Defense with Tomáš Soukal (Talsec)
Keynote: 20 Minutes to Banking-Grade Security with Mateusz Wojtczak (LeanCode)
Keynote: Raising the Bar with Software Protection with Béatrice Creusillet (Quarkslab)
Keynote: Red Teaming in Practice with Adam Žilla (Haxoris)
Keynote: Discovering the Power of AI Pentesting with Pedro Conde (Ethiack)
How to Detect Jailbreak using Capacitor
How to Detect Hooking using Capacitor
freeRASP for Kotlin Multiplatform Guide
Achieving Cloudflare Outage Resilience using AppiCryptWeb
How to Detect Root on React Native
How to Detect Jailbreak on React Native
How to Prevent Magisk Root Hiding and Security Bypass
How to Detect Hooking (Frida) on React Native
How to Detect a Weak Wi-Fi: Guide to In-App Network Security Checks
Future-Proofing for the Data-Driven Ecosystem: Securing Your Application and Data APIs
freeRASP for Unreal Engine: Secure Your Revenue
How to Detect Screen Capture & Recording using Kotlin
How to Detect Developer Mode on Android using Kotlin
How to Detect App Tampering & Repackaging using Kotlin
How to Detect Jailbreak on Flutter
How to Detect Root on Flutter
How to Detect Hooking (Frida) on Flutter
How Secure Are Flutter Apps?
How to Detect Emulator in Kotlin
How to Detect Root using Kotlin
How to Detect Jailbreak using Swift
How to Detect Hooking (Frida) using Kotlin
How to Detect Hooking (Frida) using Swift
How to Detect VPN using Swift
How to Detect VPN using Kotlin
AppiCrypt Against Time Spoofing: From Free Trial Abuse to License Fraud and Audit Log Corruption
Preventing Piracy and Cheating in Games: A Guide to Countering GameGuardian with Talsec
iOS Keychain vs. Android Keystore
Introducing Multi-Instancing Detection for freeRASP
Introducing the Talsec Portal: A New Way to Monitor Your App — Try It Now!
How to Achieve Root-Like Control Without Rooting: Shizuku's Perils & Talsec's Root Detection
freeRASP for Unity Guide [new!]
ApkSignatureKiller: How it Works and How Talsec Protects Your Apps
OWASP Top 10 For Flutter – M6: Inadequate Privacy Controls in Flutter & Dart
Simple Root Detection: Implementation and verification
Flutter - M5: Insecure Communication for Flutter and Dart
OWASP Top 10 For Flutter – M4: Insufficient Input/Output Validation in Flutter
OWASP Top 10 For Flutter – M3: Insecure Authentication and Authorization in Flutter
OWASP Top 10 For Flutter – M2: Inadequate Supply Chain Security in Flutter
OWASP Top 10 For Flutter - M1: Mastering Credential Security in Flutter
🚀A Developer’s Guide to Implement End-to-End Encryption in Mobile Apps 🛡️
Flutter Security 101: Restricting Installs to Protect Your App from Unofficial Sources
Learn how to implement the Secure Storage in Flutter and understand storage restrictions.
Dive into our full guide as Himesh Panchal walks you through creating a robust and secure authentication flow!
Introduction: Root Detection Basics
OWASP Top 10 For Flutter – M2: Inadequate Supply Chain Security in Flutter
Hook, Hack, Defend: Frida's Impact on Mobile Security & How to Fight Back
Emulators in Gaming: Threats and Detections
Exclusive Research: Unlocking Reliable Crash Tracking with PLCrashReporter for iOS SDKs
How to Block Screenshots, Screen Recording, and Remote Access Tools in Android and iOS Apps
How do you test a RASP? This guide will walk you through the entire process of RASP evaluation. It is written for penetration testers and RASP integrators.
Fact about the origin of the Talsec name
React Native Secure Boilerplate 2024: Ignite with freeRASP
Hacking and protection of Mobile Apps and backend APIs | 2024 Talsec Threat Modeling Exercise
Dynamic TLS Pinning - Prevents Man-in-the-Middle (MitM) attacks by validating server certificates that can be updated remotely without needing to publish a new app version.
Secret Vault - A secure storage solution that encrypts and obfuscates sensitive data (like API keys or tokens) to prevent them from being extracted during reverse engineering.
RASP+ - An advanced security SDK that actively shields your app from reverse engineering, tampering, rooting/jailbreaking, and runtime attacks like hooking or debugging.
AppiCrypt (Android & iOS) & AppiCrypt for Web - A backend defense system that verifies the integrity of the calling app and device to block bots, scripts, and unauthorized clients from accessing your API.
Malware Detection - Scans the user's device for known malicious packages, suspicious "clones," and risky permissions to prevent fraud and data theft.
- Prevents Man-in-the-Middle (MitM) attacks by validating server certificates that can be updated remotely without needing to publish a new app version.
- A secure storage solution that encrypts and obfuscates sensitive data (like API keys or tokens) to prevent them from being extracted during reverse engineering.
By teaming up with Gen, the parent company of Norton and Avast, we bring you an unparalleled malware database. It continuously evolves, drawing top-tier threat intelligence from a massive network of 500 million global users.
RASP+ - An advanced security SDK that actively shields your app from reverse engineering, tampering, rooting/jailbreaking, and runtime attacks like hooking or debugging.
AppiCrypt (Android & iOS) & AppiCrypt for Web - A backend defense system that verifies the integrity of the calling app and device to block bots, scripts, and unauthorized clients from accessing your API.
Malware Detection - Scans the user's device for known malicious packages, suspicious "clones," and risky permissions to prevent fraud and data theft.
- Prevents Man-in-the-Middle (MitM) attacks by validating server certificates that can be updated remotely without needing to publish a new app version.
- A secure storage solution that encrypts and obfuscates sensitive data (like API keys or tokens) to prevent them from being extracted during reverse engineering.
supportedAlternativeStores in TalsecConfig (supportedStores on Flutter).
In the Supported Alternative Stores section in the .
Malware Detection
trustedInstallSources in SuspiciousAppDetectionConfig.
trustedInstallationSources in the JSON payload for Malware Configuration API.
These represent legitimate distribution channels. Add the stores relevant to your application's distribution strategy and target market to your trusted sources to prevent false positives.
Package Name
Store / Channel Name
Add to RASP?
Add to Malware Detection?
Notes
com.android.vending
Google Play
No, it's included
✅ Yes
These system components execute user-driven sideloads.
Package Name
Platform Context
Add to RASP?
Add to Malware?
com.google.android.packageinstaller
Default package installer.
❌ No
❌ No
com.android.packageinstaller
When a user manually installs an APK via another application on Android 11 or newer, the Talsec SDK reports that specific app as the installer. Adding these to your trusted sources would permit all apps installed via these specific channels.
Package Name
App / Service
Add to RASP?
Add to Malware?
com.android.chrome
Google Chrome
❌ No
❌ No
org.telegram.messenger
When apps are transferred to a new device using a cloner or migration tool, Talsec does not recognize the cloner as an official installation source. Apps that arrived this way are therefore evaluated as having an untrusted origin.
Package Name
App / Service
Add to RASP?
Add to Malware?
com.miui.huanji
Mi Mover (Xiaomi)
⚠️ Evaluate
⚠️ Evaluate
com.xiaomi.midrop
When the Android OS cannot provide a valid installer package name, the Talsec SDK normalizes missing values into specific string markers. These are not actual Android package names, but you can include the exact strings below in your trusted installation sources just like standard package identifiers.
Marker String
Context
Add to RASP?
Add to Malware?
Notes
adb
Application installed via Android Debug Bridge (adb install).
⚠️ Dev Only
⚠️ Dev Only
Android Configurations Only
The following trusted source configurations apply exclusively to Android applications.
This topic is not relevant on iOS.
Configuring Trusted Sources
RASP
Official & OEM Stores
System Package Installers
Critical Security Risk
Adding any of the system installers below to your trusted sources effectively permits all manual sideloading (e.g., users tapping on an APK in their file manager). Doing so bypasses core security evaluations and is strongly discouraged in production environments.
Common Sideload Installers
Cloners & Movers
Configuration Strategy for Migration Tools
By default, Talsec SDK treats cloner-installed apps as untrusted for both checks. Migration tools are a known vector for malware delivery — an attacker can inject modified apps into the migration payload, and the cloner becomes their attributed installer.
Adding cloners to your trusted sources is only recommended if your specific threat model explicitly tolerates post-migration apps running without re-verification from an official store. For security-sensitive applications (banking, healthcare, enterprise), keep cloners out of both configurations.
Talsec-Defined Markers for ADB and Unknown Sources
Development Use Only
Most integrations do not need this section. Markers are intended for development, QA, and CI builds. They should never appear in your production trusted sources, as they would silently permit any app installed via ADB or from an undetermined source — including attacker-initiated sideloads.
Finally, we will look beyond the OS patch. We will demonstrate how Runtime Application Self-Protection (RASP) technologies, like Talsec freeRASP, could have prevented this exploit from succeeding even on non-rooted unpatched devices by detecting the anomaly the moment the attacker tried to break in.
Android applications run in one of two build states:
Debuggable
Production
Debuggable state is designed for developers. It grants deep access to the app's data and internal files. However, this can be dangerous in the hands of an attacker, as it exposes the configuration files that control the app's behavior.
Production state is for apps distributed publicly. These builds are not debuggable, ensuring that private internal files are protected (at least on non-rooted devices). We simply need to set android:debuggable="false" in the manifest file to secure our authentication tokens and databases.
This distinction was considered a hard security boundary. CVE-2024-0044 broke it.
Another important thing to understand is how the package manager installation process works so the OS creates a record of the installed package.
The Android OS maintains multiple registries and XML files containing configuration for processes on the device. One of these files is packages.list - registry that stores info about installed packages. Since it resides in the privileged /data/system/ directory, it can only be written to by the Package Manager.
It stores the configuration of each app on the device in this format:
The Package Manager writes these lines through Settings.writePackageListLPr by concatenating the fields. This straightforward appending of fields turned out to be a massive vulnerability in the context of this bug.
To understand the exploit, we need to look into the tool it tricks the run-as binary. This is an Android command-line tool that is designed specifically for debuggable apps of the device that acts as superuser of data of the debuggable apps.
The run-as tool allows a user to execute commands as a target application.
It grants read/write access to the data directories of the target app.
It also grants the shell user ability to impersonate the target application's UID's user.
Due to these privileges provided by this tool , it is only allowed to work for debuggable apps.
To know if the app is debuggable or not, the run-as binary checks the debuggable_flag field of the packages.list file and totally relies on that for this validation.It also parses the Data Directory and UID fields from the packages.list file to call setuid and setgid without further verification
To decide whether an app is debuggable, run-as checks the debuggable_flag field in packages.list and fully trusts it. It also parses the Data Directory and UID fields from that file and uses them in setuid and setgid calls without further validation.
The vulnerable code can be traced to commit I840c9c9af5752b3901d4719a13e7908faa43ab04.
Here the first half of the vulnerability lies in the part where there is no verification apart from the length and null checking of the packageName. Also ADB is allowed to override the installing Package Name of the package installed giving the attacker ability to inject the payload using the -i flag.
The -i flag in the command pm install .... allows the user to set the installing Package name of a package. By default, it is com.android.vending that refers to the Google PlayStore. This is written as the last field of the configurations inside the packages.list file discussed before .
The second half of the vulnerability lies inside the run-as tool parsing that does not parse using any XML parser but parses the file line by line thinking every newline means configuration a new app. A person can simply inject a carefully crafted malicious payload to change the configurations of an application inside the device.
For the POC, we are using a physical Xiaomi Redmi Note 11 5G device with Android 13 which is affected by this vulnerability.
In the POC video, we can observe that on a normal adb shell we are not allowed to iterate into the private directories of non-debuggable apps like the production grade Google Chrome app and the run-as tool denies that the app is non-debuggable.
Then we run exploit binary on the local system attached using wireless debugger with the Android phone.
Using the injection vulnerability inside the Package Manager's package.list file and the lack of validation checks allows us to change the contents of this file according to our desire.
In a normal adb shell, we cannot enter the private directory of a non-debuggable app such as Google Chrome.
The run-as tool correctly denies access because the app is not debuggable.
Next, we run the local exploit binary while connected to the phone through wireless debugging.
The payload abuses the Package Manager write path and rewrites packages.list with attacker-controlled data.
After that, run-as parses the malicious entry and treats Chrome as debuggable.
Because the payload injects a fake alias and fake directory path, we can use run-as <fake_name> to enter the target app’s private directory.
This makes non-debuggable apps accessible even on non-rooted devices.
The demo also uses tar -cf streaming to copy data into /data/local/tmp, where it can be pulled through a normal ADB shell.
The exploit POC for the vulnerability contains mostly helper functions which run ADB shell commands to let the attacker choose any package from the available devices and prepare the exploit payload for that specific package.
The main payload looks like this:
Here is what it does:
It opens an adb shell session.
It uses a crafted pm install -i value with an injected newline.
It inserts the target app’s private directory and UID into a forged entry.
That produces content like this inside packages.list:
Once that entry exists, run-as grants privileges based on the forged record.
Google mitigated this vulnerability by adding some more verification in the function responsible for package installation using ADB pm command. It not just checked the length of the installer package name but also validated the name using a separate function.
This new function restricted the use of digits and underscores as the first character of the package name. Also it banned use of special characters like \n in the name causing our malicious payload for this vulnerability to fail.
This update in the Android OS code was distributed on millions of devices soon to prevent any severe effects of this exploit in any device globally. But what if the attacker himself owns the device ? He will not update the device and then easily can have a privileged shell inside a non-rooted device.
The most alarming aspect of CVE-2024-0044 wasn't just that it existed, but where it struck - the production grade apps. For years, the security model of Android relied on a simple rule: "If the app is not debuggable, its data is safe on a non-rooted device." This vulnerability shattered that assumption.
By tricking the OS into treating a production app as debuggable, attackers gained the same level of access as the developers of the application. This meant the Application Sandbox which is the primary wall separating one app's data from another effectively vanished and the security rule of the Android OS broke.
The impact was catastrophic as financial apps rely heavily on the sandbox to protect local storage. With run-as access, an attacker could:
Bypass biometrics: Modify local configuration files to disable client-side checks or flags.
Cookie stealing: Standard Android sandboxing makes this folder impossible to read. With run-as, the attacker can simply copy the Cookies database file and steal important webviews data of the application.
Mobile games often store game state locally to ensure easier offline experience.
Economy Exploits: Attackers could easily modify local XML files to give themselves unlimited currency or premium items and other advantages regarding in-app purchases.
Save File Tampering: Competitive integrity was compromised as users could edit their stats or inventory directly in the file system without needing a rooted device.
Security teams often rely on a standard checklist of defenses: Root Detection, Signature Verification, and Anti-Tampering. None of these worked against CVE-2024-0044.
Root Detection was Useless: The device was not rooted. The attacker was using a legitimate feature of the Android OS (run-as) that was simply misbehaving. Since the su binary wasn't present and the system partition wasn't modified, standard root detection libraries inside most of the prominent fintech and banking apps saw nothing wrong.
Tamper Detection Failed: The attack did not modify the APK file or tampered with any of its memory region. The application signature remained valid, and the checksums matched. The integrity of the installer was compromised, not the app package itself.
This is where the necessity of active self-protection arises instead of just passive checking. We need a security layer that detects the anomalies inside the application in real-time and check the memory of the application in runtime, regardless of what is described by the OS. This brings us to Runtime Application Self-Protection.
RASP technology operates independently of the Operating System, they do not rely on the corrupted packages.list file or system permissions. Instead, they actively monitor the application's runtime memory for the specific signatures of an attack such as a debugger presence or an active ADB connection in the device. Because the exploit requires these tools to function, RASP detects the intrusion instantly and terminates the app before the attacker can execute a single command, effectively neutralizing the threat for a production app even on a vulnerable device.
Built around the idea of Security for Everyone, freeRASP provides a lightweight, community-driven layer against common Android attack vectors, including the ones used here: debugging, ADB access, and dynamic instrumentation.
Unlike basic root detection, freeRASP does not just ask the OS whether something is wrong. It actively monitors the app’s runtime memory and integrity.
If an attacker attaches a debugger or uses a run-as-style path to interfere with the app, freeRASP can detect it independently of the OS view and react before private data is exposed.
Integrating freeRASP to block the CVE-2024-0044 attack path is straightforward. The SDK provides callbacks for events such as debugger attachment and active ADB access. That lets you crash the app, block the session, or wipe sensitive state as soon as the attack starts.
CVE-2024-0044 is a reminder that even well-established security boundaries can be undermined by a single missing validation. A newline character in an installer package name was all it took to corrupt Android’s app registry and hand an attacker developer-level access to any app on the device - no root required.
The OS patch from Google closes the specific injection vector. But it does not help users on unpatched devices, and it illustrates a broader point: passive defenses that ask the OS for the ground truth are only as reliable as the OS itself.
Runtime Application Self-Protection represents a different model - one that monitors what is actually happening inside the app at runtime, independent of whatever the system reports. Against an attack that works precisely by corrupting the system’s own records, that independence is the difference between detection and compromise.
Malware Detection scanner (onMalwareDetected) — package/hash blocklists + permission-based detection; the online App Reputation API confirms known Rokarolla APK samples.
available both in freeMalwareDetection (basic protection) and Malware Detection. App Reputation API is available only on premium plan.
Fake login & lock-screen overlays drawn on top of your app
Device identifier is any value your app can read that distinguishes one physical device from another. It covers everything from a hardware-burned serial number to a random UUID you generate yourself and stash in the Keychain.
Identifiers sit on a spectrum of scope:
Device-wide (hardware-scoped) - tied to the physical device (IMEI, serial number, the Widevine DRM ID). One value, shared by every app and every user on the device.
App-scoped / vendor-scoped - the same value only within your app or your publisher's family of apps (Android's ANDROID_ID, iOS's identifierForVendor).
Install-scoped - dies when the app is uninstalled (Firebase Installation ID, a UUID in UserDefaults).
The tighter the scope, the friendlier to privacy, and the less useful it is for the cross-app tracking that regulators, Apple, and Google have spent the last decade dismantling.
Device identifiers serve two broad camps. Both want to recognise a device, but they want different things from the identifier, and this shapes which one is a good fit.
Used to collect personalised data and preferences and also to serve targeted ads. This camp cares about counting and attributing activity rather than stopping a determined user, so a resettable identifier is usually enough.
Typical uses:
Measuring unique users and installs.
Attributing an install to the ad or campaign that drove it.
Personalising content, preferences, and recommendations.
Frequency capping and grouping users into A/B test cohorts.
Here the user should be able to opt out, so the platforms push toward resettable, consent-based identifiers. iOS gates the advertising identifier behind App Tracking Transparency, and Android makes the Advertising ID resettable and lets the user opt out. Persistence is not the priority, and long-lived hardware identifiers are usually the wrong tool for this camp.
The main goal is to identify a device across sessions (app launches, installations, and even factory resets) so we can block malicious devices. The difference from the analysis camp is the adversary. The person holding the device may be actively trying to change, hide, or forge the identifier, so persistence and spoof-resistance matter far more than reach.
Typical uses:
Blocking a device that has already abused a service.
Preventing promo and sign-up bonus abuse and multi-accounting.
Detecting bot farms, emulators, and automated devices.
Rate limiting and defending against account takeover.
Because the value must survive reinstalls, resets, and deliberate tampering, this camp leans toward hardware-backed and attested signals rather than freely resettable strings. No single freely readable identifier meets every requirement, which is why security use cases often combine several signals.
Ideal identifier has following attributes:
Uniqueness - any two devices from the pool of devices shouldn't have colliding value of identifier.
Persistence - identifier should survive any malicious manipulation such as rebooting, reinstallation of the app, factory reset, or OS update.
Resettability - the user can and should be able to wipe it intentionally. A wipeable identifier is better for privacy, but a disadvantage for security.
Each identifier below is described with its persistence behavior, its advantages, and its disadvantages. The wording of the persistence bullets is kept consistent so entries can be compared directly.
Android exposes several identifiers with very different persistence and privacy trade-offs. The options range from freely readable strings to hardware-backed attestation.
Android ID, also called SSAID, is the default no-permission identifier on Android. It is a 64-bit hex value read via Settings.Secure.ANDROID_ID.
Since Android 8.0 the value is derived from the combination of the app signing key, the user profile, and the device. The same physical device therefore returns a different value to apps signed by different keys, and a different value in each user profile. Apps signed with the same key share the value.
Persistance
Survives reboots and OS updates.
Survives app reinstall while the signing key stays the same.
Reset by factory reset.
Changes if the signing key changes.
Advantages
No permissions required.
Stable for the common case.
Isolated per app, which is privacy-reasonable.
Disadvantages
Reset by factory reset, so a wiped device looks new.
Scoped per user profile, which complicates multi-user and work-profile devices.
Plain string, so it can be spoofed on a rooted or hooked device.
The Advertising ID, also called GAID or AAID, is a resettable UUID from Google Play services meant only for ads and profiling. It is device-wide and shared across all apps, which is what makes it suitable for cross-app ad attribution and unsuitable for anything the user is meant to be able to escape. It is read through the Google Play services Advertising ID API.
Persistance
Survives reboots, OS updates, and app reinstall.
Gets a new value on factory reset.
The user can reset it at any time from settings.
Returns a zeroed value when the user opts out of ad personalisation.
Advantages
Cross-app by design.
Available on all Play-certified devices.
Disadvantages
Unstable, because the user can reset it at any time.
Returns no usable value when the user opts out.
Requires the AD_ID permission on Android 13 and later.
The interesting one for the security camp. It is a hardware-backed value exposed by the DRM subsystem, read via MediaDrm.getPropertyByteArray(PROPERTY_DEVICE_UNIQUE_ID) against the Widevine UUID. It is provisioned when the device sets up DRM, so it is the same for every app and every user on the device and does not depend on app or OS state. This makes it the most persistent value an app can read without special permissions.
Persistance
Survives reboots, OS updates, and app reinstall.
Usually survives factory reset, because it is rooted in DRM provisioning rather than app or OS state.
Not resettable by the user.
Advantages
No permissions required.
Device-wide, so it is shared across apps and user profiles.
Strongest persistence of any freely readable Android identifier.
Harder to spoof than a settings string.
Disadvantages
Missing on devices without hardware Widevine, such as many emulators, some AOSP builds like GrapheneOS, and some low-end hardware.
Collisions are possible, because devices of the same manufacturer or model can share a value.
Can still be spoofed on rooted devices using LSPosed or kernel-level modules that randomize it per profile.
Identifies a group of apps that belong to the same developer account and is read through the Google Play services App Set ID API without a prompt. Unlike the Advertising ID, the user cannot reset it manually, but it is not permanent either.
Persistance
Survives reboots, OS updates, and app reinstall while at least one app in the set remains installed.
Reset by factory reset.
Reset when all apps in the set are uninstalled.
Reset after about 13 months without use.
Advantages
No permissions required.
Built for analytics and fraud prevention, according to Google.
Disadvantages
Cannot be used for ad personalisation or linked to the Advertising ID.
Plain string, so it can be spoofed on a rooted or hooked device.
Available only on Android devices with Google Play services.
These are identifiers stamped onto the physical device at the factory. The IMEI (usually 15 digits, viewable by dialing *#06#) identifies the phone's cellular hardware to the mobile network, and is separate from the SIM, which identifies the subscriber. The MEID is the older equivalent from CDMA networks and is mostly legacy today. The serial number is the manufacturer's label for the unit and has nothing to do with cellular, so a Wi-Fi-only device has one but no IMEI. All three are globally unique and burned into the hardware, so they survive reinstalls and factory resets. That permanence is exactly why access to them is now heavily restricted.
Persistance
Permanent, because the value is burned into the hardware or modem.
Survives factory reset.
Not resettable by the user.
Advantages
Device-wide and non-resettable
Disadvantages
Restricted to privileged apps since Android 10, so normal apps cannot read them.
The value is meaningful and counts as sensitive data, which conflicts with the privacy attribute.
IMEI and MEID exist only on devices with a cellular modem.
The MAC address is the hardware address of the device network interface. It was once a convenient device-wide identifier, but both the platform and the hardware vendors now hide the real value.
Persistance
The real hardware address is permanent, but apps can no longer read it.
Since Android 10 the device uses a randomised MAC per network by default.
The randomised value changes per network, so it is not stable.
Advantages
None that are usable in practice today.
Disadvantages
Apps read a randomised or placeholder value, not the real address.
The factory address is hidden behind a privileged permission.
Randomisation changes the value per network, so it cannot be used for identification.
This is not a value you read, but a key you create. You generate a key pair inside the Android Keystore, backed by the TEE (Trusted Execution Environment) or by StrongBox, a separate tamper-resistant chip. The private key cannot leave secure hardware. Key Attestation then produces a certificate chain that your server can verify to confirm the key was generated in real hardware. Instead of trusting a value the client reports, your server verifies a signature the client cannot forge.
Persistance
The key survives reboots and OS updates.
The key is tied to the app and is lost on uninstall unless you design around it.
Not a device-wide value, so it does not identify a device across apps on its own.
Advantages
The private key cannot be copied off the device.
Your server verifies it cryptographically, so it does not rely on a reported string.
Strongly resistant to spoofing.
No permissions required.
Disadvantages
More work to implement than reading a value.
Attestation coverage and quality vary between manufacturers.
StrongBox is not available on every device.
The key is lost on uninstall, so it is not a persistent device identifier on its own.
Play Integrity is not an identifier. It is a signal from Google that tells your server whether the app is genuine and unmodified, whether the device is genuine, and whether the app came from an official source. You request a token on the device and verify it on your server. It answers whether you can trust the client, not which device it is.
Persistance
Not applicable, because it returns a per-request verdict rather than a stored value.
Advantages
Strong, server-verified signal of app and device genuineness.
Hardware-backed on modern devices, so it is hard to spoof.
Designed for abuse and fraud protection.
Disadvantages
Cannot be used as an identifier, because there is no stable value to store.
Depends on Google Play services and is subject to rate limits and outages.
Can produce failures on custom setups such as GrapheneOS or rooted devices, which can lock out genuine users.
The GSF ID is a device-wide value created when the device registers with the Google Services Framework, the component behind Google Play services. It is read by querying an internal content provider (content://com.google.android.gsf.gservices, key android_id) and returns the same value to every app on the device. It is not an official or documented identifier API, and Google does not recommend relying on it.
Persistence
Survives reboots, OS updates, and app reinstall.
Reset by factory reset.
Reset when Google Services Framework data is cleared or the device re-registers with Google.
Not resettable by the user through a normal setting.
Advantages
Device-wide, so it is shared across apps and user profiles.
No dedicated permission for the query in practice.
Disadvantages
Not an official or documented API, so it can change or break without notice.
Available only on devices with Google services, so it is missing on non-GMS devices.
Tied to the Google registration and shared across apps, which is a privacy concern.
The Firebase Installation ID identifies one installation of your app on one device. It is provided by the Firebase Installations SDK, read via FirebaseInstallations.getInstance().getId(), and is used internally by Firebase services such as Cloud Messaging, Analytics, and Remote Config. It is available on both Android and iOS when you use Firebase.
Persistence
Survives reboots and OS updates.
Lost on app uninstall, because it is tied to the installation.
A new value is created on reinstall.
Can be deleted and regenerated through the API.
Advantages
Simple to use if you already use Firebase.
Cross-platform, available on Android and iOS.
Per-install scope, which is privacy-reasonable.
Disadvantages
Identifies an installation, not a device, so a reinstall looks like a new identity.
Not suitable for device blocklisting.
Requires the Firebase SDK.
Instance ID was the older Firebase and Google Cloud Messaging identifier that provided a unique ID per app instance together with messaging tokens. It has been deprecated and split into two replacements: the Firebase Installation ID for the identifier, and Cloud Messaging registration tokens for messaging. It is listed here mainly so you recognise it in older code.
Persistence
Behaved like the Firebase Installation ID: tied to the app installation and lost on uninstall.
Advantages
None today, because it is deprecated.
Disadvantages
Deprecated and replaced by Firebase Installations and Cloud Messaging tokens.
Should not be used in new code.
Apple does not provide a stable device-wide identifier to third-party apps by design. The options below are either scoped to your own apps, resettable, or integrity mechanisms rather than identifiers.
The identifier for vendor, or IDFV, is a UUID that iOS assigns to all apps from the same vendor on a device. Vendor is determined by the first parts of the bundle identifier, for example com.example. It is read via UIDevice.current.identifierForVendor. It is the standard no-permission identifier for first-party analytics across your own apps, and it is the closest iOS has to Android ID.
Persistance
Survives reboots and OS updates.
Stays the same while at least one app from the vendor is installed.
Reset when the user removes all of the vendor apps, so a single app gets a new value after reinstall.
Reset by factory reset.
Advantages
No permission and no tracking prompt required.
Available immediately when the app launches.
Shared across all of your own apps on the device.
Disadvantages
Resets when the user removes all of your apps.
Scoped to your vendor account, so it cannot match users across other publishers.
Plain value, so it can be spoofed on a jailbroken device.
The UDID was the original device-wide identifier on iOS, and the MAC address was a common substitute after it was removed. Both are now closed to third-party apps and are listed here mainly so you recognise them in older code.
Persistance
Both were permanent when they were available, but neither is accessible to apps today.
Advantages
None today
Disadvantages
The UDID has not been available to third-party apps for many years.
The MAC address returns a fixed placeholder value since iOS 7.
Neither can be used for device identification.
When the platform identifiers do not fit, a common pattern is to generate your own UUID and store it in the Keychain. The Keychain is not cleared when the app is deleted, unlike UserDefaults, so the value can survive reinstalls. This gives you an identifier you fully control.
Persistance
Survives reboots, OS updates, and app reinstall in practice, because the Keychain is not cleared on delete.
Reset by factory reset.
Not resettable by the user unless you provide a way.
Advantages
Fully under your control.
Survives app reinstall in practice.
No permissions required.
Disadvantages
Survival across reinstall is not guaranteed by Apple.
Scoped to your app, not the whole device.
Client-side value, so it can be spoofed on a jailbroken device.
DeviceCheck is not an identifier. It gives you two bits of storage per device that Apple keeps on its own servers, and those bits survive app deletion and reinstall. A common use is to record whether a device has already used a one-time offer, such as a free trial. Your server reads and writes the bits through Apple, and the token the device produces via DCDevice is different on every call.
Persistance
The two bits survive reboots, app reinstall, and app deletion, because Apple stores them server-side.
The token itself is not persistent, because it changes on every call.
Not resettable by the user.
Advantages
Server-verified state that survives reinstall.
Cannot be cleared by reinstalling the app.
No permissions required.
Disadvantages
Only two bits of state, not an identifier.
Cannot uniquely identify a device.
Requires your server to call Apple to read or write the bits.
App Attest is the iOS equivalent of Android Key Attestation. It uses a hardware-backed key in the Secure Enclave together with attestation to prove that a genuine copy of your app is running on a genuine Apple device. Like Play Integrity, it answers whether you can trust the client rather than which device it is.
Persistance
The attestation key lives in the Secure Enclave and is tied to the app.
Not a stable device identifier, because it is an integrity mechanism.
Advantages
Hardware-backed and verified on your server.
Strongly resistant to spoofing.
The right tool when the question is whether to trust the client.
Disadvantages
Not an identifier, so there is no stable value to store.
More work to implement, and it needs a network call to attest.
Available on iOS 14 and later.
Serving and measuring targeted advertising.
Enforcing licensing and entitlements.
Coverage - should be available for every device, including different OEMs, older hardware, and emulators.
Privacy - the identifier shouldn't collect sensitive information just for the sake of identifying. The identifier itself shouldn't carry any meaning.
Resistant - it should be impossible to spoof or forge.
Not directly resettable by the user.
Google policy forbids linking it to other PII or persistent identifiers.
Unavailable on devices without Google Play services.
Not resettable by the user.
Google recommends against using it as the only allow or deny decision.
Plain value read from a provider, so it can be spoofed on a rooted or hooked device.
Not directly resettable by the user.
What do we use them for?
Growth and Analysis
Security and Integrity
What ideal identifier contains?
Commonly used identifiers
Android
Quick rundown analysis through Android identifiers
The value is anchored to your signing key. That is reliable when you own the app, but you cannot match it against apps you do not sign.
MediaDRM is not unique enough on its own.
Identifiers built on it usually combine the MediaDRM ID with the device model. The device model absorbs collision risk and the DRM value provides persistence.
Historically used, but practically dead for normal app use today.
Like IMEI, the MAC address is effectively unavailable for device identification today.
+
This is an integrity mechanism, not a stored identifier.
Use it to prove a request comes from genuine hardware, not to recognise a device across installs.
Treat this as one signal among several. It tells you whether to trust a device, not how to identify one, and it should not be your only gate.
Google Services Framework ID (GSF ID)
This is an unofficial identifier read from an internal provider. Prefer the App Set ID or a value you generate yourself.
Use this to identify an app installation for Firebase features, not to recognise a device across reinstalls.
Deprecated. Use the Firebase Installation ID and Cloud Messaging tokens instead.
iOS
Do not design around these. They are no longer available to apps.
Apple has stated that Keychain persistence after app deletion was never a documented contract, only an implementation detail that could change.
Build on it, but design for the day it stops behaving.
Use this to remember a small fact about a device, not to identify it.
Like Key Attestation on Android, this proves trust in a client. It does not identify a device across installs.
Each is a critical piece of the mobile security puzzle.
In this tenth and final article, we focus on .
Let me tell you about the scariest code review I’ve ever done.
A few years ago, I was asked to review a financial app. It handled millions of dollars in transactions. The team used encryption everywhere. They had secure storage. They’d thought about authentication.
But their crypto implementation used DES. The key was hardcoded. It was literally the word password padded to 8 bytes.
DES was considered insecure by the late 90s. . This was in 2021.
The developers weren’t incompetent. They were talented engineers. They simply hadn’t kept up with cryptographic best practices. They copied code from a Stack Overflow answer from 2008. They assumed it was fine.
That’s why this final article exists.
covers:
weak algorithms
poor key management
improper implementations
insecure random number generation
Let’s get into it.
Before we get into code, it helps to know who breaks cryptographic systems. It also helps to know how.
Crypto issues attract motivated attackers. Breaking encryption exposes everything it was meant to protect.
Who
Motivation
Attack methods
OWASP rates exploitability as AVERAGE. It’s harder than SQL injection. But it’s devastating when it works.
Attackers rarely break modern algorithms directly. They exploit implementation mistakes.
Common examples:
predictable random numbers
reused nonces
hardcoded keys
deprecated algorithms
Here are the cryptographic weaknesses I see most often in Flutter apps:
Weak or deprecated algorithms: MD5, SHA-1, DES, 3DES, RC4
Insufficient key lengths: AES-128 when AES-256 is required, RSA < 2048 bits
Hardcoded keys: keys embedded in source
Each one is an opportunity for attackers. Let’s avoid them.
Cryptographic standards exist for a reason. Don’t reinvent this per project.
Use this for most “encrypt data” cases.
Algorithm
Key size
Use case
Status
My default is AES-256-GCM. It’s fast on modern devices. It’s widely supported. It gives integrity and confidentiality.
ChaCha20-Poly1305 is an excellent alternative. It can outperform AES on devices without AES hardware.
Use this for key exchange and digital signatures.
Algorithm
Key size
Use case
Status
For new projects, I lean toward X25519 and Ed25519. RSA-OAEP with 2048+ bits is still fine.
Password hashing is not general-purpose hashing.
Algorithm
Use case
Status
Argon2id, bcrypt, and scrypt are deliberately slow. That’s a feature.
Add these to pubspec.yaml:
The cryptography package is my default. It’s well maintained. It supports modern algorithms.
This is a complete example using AES-256-GCM and secure key storage.
Rules:
Never store passwords in plaintext.
Never use fast hashes for passwords (MD5/SHA-1/SHA-256).
Always use a unique salt per password.
Use Argon2id, bcrypt, or scrypt.
OWASP guidance (as of 2023) recommends 310,000+ iterations for PBKDF2-SHA256.
Crypto is only as strong as your key management.
Never use Random() for security. Use Random.secure() or let the crypto library generate keys.
Don’t store keys in plaintext preferences or files.
Android: Keystore-backed secure storage
iOS: Keychain-backed secure storage
Use signatures to verify authenticity and detect tampering.
Random() is for UI and games. It’s not a CSPRNG.
Use Random.secure() for security.
Use this to audit your crypto.
Algorithm selection
☐ Use AES-256-GCM or ChaCha20-Poly1305.
☐ Avoid MD5 / SHA-1 / DES / 3DES.
AES-GCM: 256-bit key, 96-bit nonce, 128-bit tag
ChaCha20-Poly1305: 256-bit key, 96-bit nonce
RSA: 2048-bit minimum (3072-bit recommended)
Cryptography is powerful. It’s also easy to get wrong.
The difference between secure and insecure crypto is usually details:
Random.secure() vs Random()
AES-GCM vs AES-ECB
Argon2id vs SHA-256 for passwords
If you follow the patterns here and stick to well-tested libraries, you’ll avoid most real-world crypto failures.
Malicious insiders
Data exfiltration
Key theft, algorithm manipulation
Competitors
Industrial espionage
Decryption of trade secrets
Security researchers
Finding vulnerabilities
Protocol analysis, side-channel attacks
Predictable IVs: reused IVs or sequential IVs
Insecure random generation: using Random() instead of Random.secure()
Missing authenticated encryption: AES-CBC without HMAC
Poor password hashing: SHA-256 instead of bcrypt / Argon2id
Improper key storage: SharedPreferences or plain files
Each is a critical piece of the mobile security puzzle.
In this eighth article, we focus on , a vulnerability that often hides in plain sight. Unlike the complex code vulnerabilities we discussed earlier, misconfigurations are usually simple oversights. A flag left enabled. A permission not restricted. A default setting unchanged. These mistakes are easy to make. They also go unnoticed.
This hits Flutter devs hard. We ship multiple configuration layers at once. Dart code, Android’s AndroidManifest.xml, iOS’s Info.plist, Gradle files, Xcode settings, and more. Each layer adds its own failure modes. A review that only covers Dart misses a big chunk of the attack surface.
I’ve reviewed many Flutter projects. Security misconfigurations are among the most common issues I see. The good news is simple. They’re also among the easiest to fix.
Let’s break down what security misconfiguration means for Flutter apps. Let’s harden your configs.
Security misconfiguration occurs when security settings are defined, implemented, or maintained incorrectly. Think of it like leaving your front door unlocked. It’s not a flaw in the lock itself. It’s how you’re using (or not using) the security mechanism.
In mobile apps, security misconfiguration takes many forms:
Insecure default settings left unchanged
Debug features enabled in production
Unnecessary permissions requested
The following diagram illustrates the various categories of security misconfiguration:
Here's a reality check for Flutter developers: you're responsible for configuring two completely different platforms correctly, plus managing Dart-level configurations. A single misconfiguration on either Android or iOS can compromise your entire app, regardless of how secure your Dart code is.
Let me break down what you’re actually managing:
Configuration layer
Android
iOS
Flutter/Dart
That's a lot of surface area to secure. And here's the thing: most Flutter tutorials and documentation focus on the Dart layer. The platform-specific security configurations are often an afterthought, or worse, copy-pasted from StackOverflow without understanding what they do.
What can actually go wrong with security misconfigurations? According to OWASP, the consequences include:
Unauthorized data access: Attackers exploit exposed components and read user data.
Account hijacking: Weak session or auth configs let attackers take over accounts.
Data breaches: Backups extracted from unprotected storage end up leaked or sold.
So let's get into the specific misconfigurations to watch out for.
Android configuration is particularly prone to security issues because of its flexibility and the sheer number of settings available. Let's walk through the most critical misconfigurations I encounter when reviewing Flutter apps.
This one is the classic "oops" moment. Releasing an app with android:debuggable="true" is like shipping a car with the hood permanently unlatched. Anyone can look inside.
What it looks like:
Why this is catastrophic:
When debug mode is enabled, attackers can:
Attach debuggers to your running app and step through code
Inspect and modify memory contents at runtime
Set breakpoints to bypass security checks
Extract sensitive data directly from memory
I've seen production apps with this flag enabled—it happens more often than you'd think, especially when developers manually override build configurations for testing and forget to revert.
The good news: Flutter's build system handles this correctly by default. The debuggable flag is set to true only in debug builds. However, you should still verify your release builds, especially if you've ever modified build configurations manually:
Expected output for a correctly configured release build:
If you see value='true' or debuggable="true", stop and fix your build configuration before shipping.
Explicitly ensure debug is disabled in release builds:
For extra safety, explicitly set the flag in your . Belt and suspenders approach:
Here's a subtle one that catches many developers off guard. By default, Android . Sounds helpful, right? The problem is that this backup might include sensitive information: authentication tokens, cached user data, and encryption keys stored in SharedPreferences.
The problem in action:
How attackers exploit this:
The following sequence shows how backup extraction works in practice:
An attacker with brief physical access to a device (think: borrowed phone, lost device, or malicious app with ADB access) can extract your entire app's data:
Output:
Nuance on flutter_secure_storage: If you configure it with AndroidOptions(encryptedSharedPreferences: true), the encryption key lives in the and is not included in backups. The extracted XML will contain ciphertext that is useless without the key.
However, when using the default configuration (or older package versions < 5.0), the key material may be stored alongside the data. That makes backup extraction a real threat.
The fix:
Explicitly disable backups. Or, if you need selective backup for user convenience, carefully exclude sensitive files. See the for the full attribute reference:
For Android 12+ (API 31+), create android/app/src/main/res/xml/data_extraction_rules.xml:
For older Android versions, create android/app/src/main/res/xml/backup_rules.xml:
And reference it:
In 2026, there's really no excuse for allowing unencrypted HTTP traffic. Yet I still see Flutter apps with this misconfiguration regularly, usually because developers enabled it "temporarily" for local testing and forgot to disable it.
The problematic setting:
When this flag is enabled, your app can communicate over unencrypted HTTP. Any attacker on the same network (coffee shop WiFi, compromised router, or hostile network) can see everything your app sends and receives: authentication tokens, personal data, everything.
The fix:
Create a proper . This approach gives you fine-grained control and makes your intent explicit. Create android/app/src/main/res/xml/network_security_config.xml:
Reference it in your manifest:
If your app communicates with sensitive backend services (especially for financial or health data), consider adding certificate pinning. This prevents attackers from intercepting traffic even if they manage to install a rogue CA (Certificate Authority) certificate on the device.
Here's how to add certificate pinning in your network security config:
Generate pin hash from your server's certificate:
Output:
Use this Base64 string as the <pin> value in your config.
Important: Always include at least two pins (a backup), and set an expiration date. If your certificate rotates and you only have one pin, your app will stop working.
This is one of the most frequently overlooked security issues in Android development. Components marked as can be accessed by any other app on the device. This includes activities, services, broadcast receivers, and content providers.
Since Android 12 (API 31), the android:exported attribute is required for every component that declares an <intent-filter>. Builds targeting
The problem:
Why this matters for Flutter:
Flutter's main activity is often exported for deep linking. While this is necessary for handling deep links, you need to be extremely careful about validating any data that comes through:
The Fix:
Set exported="false" for internal components
Add permission requirements for exported components
Validate all inputs from intent data
Validate deep link data in Flutter:
The following flow shows how every incoming deep link should be validated before the app acts on it:
Example output when processing deep links:
This is one of those areas where I see a lot of "it works, ship it" mentality. Requesting unnecessary permissions increases your app's attack surface and violates the principle of least privilege. Every permission you request is a potential vector for abuse—by malicious code in your dependencies, by attackers who compromise your app, or by you accidentally leaking data you shouldn't have access to.
I've reviewed apps that request camera, contacts, location, SMS, microphone, and storage access... for a simple note-taking app. Each of those permissions opens a door. The more doors you open, the more you have to defend.
The problematic approach:
The better approach:
Only request what you actually need, and request it at runtime with proper explanation. Users have become increasingly permission-aware, they'll uninstall your app if you ask for things that don't make sense.
Request permissions properly in Flutter:
Console output (example flow):
Now let's shift our attention to iOS. While iOS has a reputation for being more secure than Android (and in some ways it is), it's not immune to misconfiguration issues. In fact, some iOS-specific security features are so easy to disable that developers do it without realizing the implications.
is Apple's way of enforcing secure network connections. It requires HTTPS by default, with modern TLS versions and cipher suites. It's a fantastic security feature that protects your users from man-in-the-middle attacks.
And yet, one of the most common Stack Overflow answers to "my app can't connect to my server" is "just disable ATS." This is terrible advice that has made its way into countless production apps.
The problematic configuration:
When you add this to your Info.plist, you're telling iOS "I don't care about network security, let me talk to any server over any protocol." Your app can then be tricked into communicating with malicious servers, or have its traffic intercepted on insecure networks.
The secure approach:
If you absolutely must connect to a server that doesn't support HTTPS (and please, pressure them to fix this), use targeted exceptions rather than disabling ATS entirely:
Best practice: Don't disable ATS at all. If you're hitting HTTP endpoints, the right fix is to update those servers to use HTTPS, not to weaken your app's security. makes free certificates available to everyone—there's no excuse for HTTP anymore.
iOS requires you to explain why your app needs access to sensitive features—camera, location, contacts, etc. This isn't just a formality; it's a privacy protection that helps users make informed decisions about what they're allowing.
Here's the fun part: if you request a permission without providing the corresponding usage description, your app doesn't show a generic dialog. It crashes. Immediately. And this will definitely get caught in App Store review if you somehow missed it in testing.
What happens without descriptions:
No graceful error handling, no fallback—just a crash. So make sure you add all necessary descriptions to ios/Runner/Info.plist:
The iOS is one of the most secure places to store sensitive data on the device, but only if you configure it correctly. The Keychain has different accessibility levels that determine when your data can be accessed, and choosing the wrong one can leave your users' data exposed.
The problematic approach (in native code):
Using kSecAttrAccessibleAlways means the data can be read even when the device is locked. If someone steals the phone, they can potentially extract this data without knowing the passcode.
The secure approach in Flutter (using flutter_secure_storage):
The good news is that flutter_secure_storage gives you control over Keychain accessibility. Here's how to configure it properly:
Output:
Understanding Keychain Accessibility Options:
Choosing the right accessibility level requires balancing security with user experience. Here’s a quick breakdown:
Option
When accessible
Synced to iCloud
kSecAttrAccessibleAlways and kSecAttrAccessibleAlwaysThisDeviceOnly have been . Any code still targeting these values will trigger App Store review warnings.
Migrate to first_unlock_this_device or unlocked_this_device.
For most sensitive data like auth tokens, I recommend first_unlock_this_device. This provides strong protection while still allowing background operations (like push notification handling) to access the data after the user has unlocked their device at least once since reboot.
Custom URL schemes are a convenient way to open your app from links, but they come with a significant security risk: any app can register the same URL scheme. If a malicious app registers your scheme first (or the user installs a malicious app that does), it can intercept links meant for your app.
The problematic approach:
There's nothing stopping a bad actor from creating an app that also registers the myapp:// scheme. When a user taps a link, iOS might open their malicious app instead of yours, and they could capture OAuth callbacks, payment confirmations, or other sensitive deep link data.
The secure solution:
Instead of custom URL schemes, use Universal Links. These are tied to a domain you own and cryptographically verified by Apple. No other app can intercept them.
You'll also need to host an apple-app-site-association file at your domain's root (served over HTTPS, no redirect):
This file must be served at https://yourapp.com/.well-known/apple-app-site-association. Apple will fetch and verify this file when your app is installed, ensuring only your app can handle links to your domain.
Beyond Android and iOS platform configurations, there are security considerations in your Dart code as well. Let's look at some common issues.
Your app should behave differently in debug versus release mode. Sensitive endpoints, verbose logging, and development shortcuts should never be available in production builds. Here's a pattern I use to manage this:
Output (debug build):
Output (release build):
One of the most dangerous patterns I see in Flutter codebases is disabling certificate validation "to make development easier." The problem is, this often gets left in production code, or worse, it's deliberately added to bypass certificate errors without understanding why those errors exist.
Output:
Why badCertificateCallback and not a plugin? Dart's HttpClient gives you direct access to the TLS handshake. For package:http or Dio users, you can pass a custom SecurityContext or HttpClient to get the same effect. The trade-off: native-level pinning (e.g., network_security_config.xml) fires before Dart code runs, so it blocks non-Dart traffic too.
If you're seeing certificate errors, the solution is to fix the server's certificate configuration, not to tell your app to ignore security errors.
SharedPreferences is incredibly convenient for storing small bits of data, but it's not encrypted. On a rooted or jailbroken device, anyone can read its contents. I've seen apps store auth tokens, API keys, and even passwords in SharedPreferences. Don't be one of those apps.
Output:
The rule is simple: if you wouldn't want it on the front page of a newspaper, don't put it in SharedPreferences.
Logging is essential for debugging, but it's also a common source of security leaks. I've seen production apps that logged full user credentials, API keys, and payment information—all visible to anyone with access to device logs.
Debug-mode output:
Even in debug mode, be thoughtful about what you log. Screenshots and screen recordings can capture log output, and you never know where those might end up.
Here's a checklist you can use to audit your Flutter app's security configuration. I recommend going through this checklist before every major release, it's saved me from shipping vulnerable code more than once.
AndroidManifest.xml
android:debuggable is NOT set to true (or is absent)
android:allowBackup="false" or properly configured backup rules
android:usesCleartextTraffic="false"
build.gradle
minifyEnabled true for release builds
shrinkResources true for release builds
Release signing configured properly
network_security_config.xml
cleartextTrafficPermitted="false" as default
Certificate pinning for sensitive endpoints
No overly broad exceptions
Info.plist
No NSAllowsArbitraryLoads set to true
Specific domain exceptions only if necessary
All privacy usage descriptions present and accurate
Entitlements
Only necessary entitlements enabled
Associated Domains configured for Universal Links
Keychain sharing groups are appropriate
Xcode Settings
Code signing configured properly
Debug builds don't use release certificates
Bitcode settings appropriate for your needs
Code configuration
No hardcoded secrets or API keys
Proper environment configuration
Secure storage used for sensitive data
HTTP client validates certificates
Dependencies
All packages are from trusted sources
No known vulnerabilities in dependencies
Minimum necessary permissions for plugins
Manual checklists are great, but humans make mistakes, especially when we're rushing to meet deadlines. That's why I strongly recommend implementing automated security checks in your CI/CD pipeline. Here's a GitHub Actions workflow that catches common misconfigurations before they reach production:
This workflow won't catch everything, but it will catch the most common and dangerous misconfigurations. I've seen this simple check prevent several "oops, I shipped with debug mode enabled" incidents.
For an extra layer of protection, you can add runtime checks that validate your app's configuration at startup. This is particularly useful for catching issues that might slip through static analysis:
Output (debug, non-production package):
Output (release, production package accidentally in debug):
Security misconfiguration is one of the most common vulnerabilities in mobile apps, and honestly, one of the most frustrating because it's so preventable. Unlike complex vulnerabilities that require deep security expertise to understand, misconfigurations are simply settings that someone forgot to change or didn't realize were insecure.
As Flutter developers, we have the added responsibility of managing configurations across multiple platforms simultaneously. Every time you configure Android's AndroidManifest.xml, you need to remember to check iOS's Info.plist too. Every permission you add to Gradle needs a corresponding entry in Xcode. It's a lot to keep track of.
Here's what I want you to take away from this article:
Disable debug features in production builds. Verify before release.
Disable or restrict backups so attackers can’t extract user data.
Enforce HTTPS everywhere. Add pinning for high-security cases.
The key insight is that a single misconfiguration can undermine all your other security efforts. You can implement perfect encryption, bulletproof authentication, and thorough input validation—but if you leave android:debuggable="true" in your release build, attackers can bypass it all.
Make configuration review a standard part of your development process. Add it to your pull request checklist. Run automated scans on every commit. It's boring work, but it's the kind of boring work that prevents headlines.
In the next article, we'll explore M9: Insecure Data Storage, where we'll dive deep into how to properly store sensitive data on mobile devices. Spoiler alert: it's more nuanced than just "use encrypted storage."
<!-- BAD: Default allows full backup -->
<application
android:allowBackup="true"> <!-- Data can be extracted via ADB or cloud backup -->
</application>
# Attacker with physical access can extract app data
adb backup -f backup.ab -noapk com.yourapp.app
# Convert and extract
java -jar abe.jar unpack backup.ab backup.tar
tar -xvf backup.tar
# Now attacker has access to SharedPreferences, databases, files
cat apps/com.yourapp.app/sp/FlutterSecureStorage.xml
$ adb backup -f backup.ab -noapk com.yourapp.app
Now unlock your device and confirm the backup operation...
$ java -jar abe.jar unpack backup.ab backup.tar
Strong password not specified. Using empty password.
$ tar -xvf backup.tar
apps/com.yourapp.app/sp/FlutterSecureStorage.xml
apps/com.yourapp.app/db/app_database.db
# Get the certificate
openssl s_client -connect api.yourapp.com:443 < /dev/null 2>/dev/null | \
openssl x509 -outform DER | \
openssl dgst -sha256 -binary | \
openssl enc -base64
K87NG0IfQKa2X5VPz8cz66M5heCTKmMpXs+nDB85Nss=
<!-- BAD: Activity accessible by any app -->
<activity
android:name=".DeepLinkActivity"
android:exported="true"> <!-- Any app can launch this -->
<intent-filter>
<action android:name="android.intent.action.VIEW"/>
<category android:name="android.intent.category.DEFAULT"/>
<data android:scheme="myapp"/>
</intent-filter>
</activity>
<!-- BAD: Content Provider accessible by any app -->
<provider
android:name=".data.MyContentProvider"
android:authorities="com.yourapp.provider"
android:exported="true" <!-- Data can be read by any app -->
android:grantUriPermissions="true"/>
<!-- GOOD: Minimal permissions -->
<uses-permission android:name="android.permission.INTERNET"/>
<uses-permission android:name="android.permission.ACCESS_NETWORK_STATE"/>
<!-- Only if actually needed, with maxSdkVersion where applicable -->
<uses-permission
android:name="android.permission.READ_EXTERNAL_STORAGE"
android:maxSdkVersion="32"/> <!-- Not needed on Android 13+ with scoped storage -->
import 'package:permission_handler/permission_handler.dart';
import 'package:flutter/material.dart';
class PermissionService {
/// Request permission with explanation
Future<bool> requestCameraPermission(BuildContext context) async {
// Check current status
final status = await Permission.camera.status;
if (status.isGranted) {
return true;
}
if (status.isDenied) {
// Show explanation before requesting
final shouldRequest = await _showPermissionExplanation(
context,
title: 'Camera Permission Required',
explanation: 'We need camera access to scan QR codes for secure login. '
'Your camera feed is processed locally and never stored or transmitted.',
icon: Icons.camera_alt,
);
if (!shouldRequest) return false;
final result = await Permission.camera.request();
return result.isGranted;
}
if (status.isPermanentlyDenied) {
// Guide user to settings
await _showSettingsDialog(context, 'camera');
return false;
}
return false;
}
Future<bool> _showPermissionExplanation(
BuildContext context, {
required String title,
required String explanation,
required IconData icon,
}) async {
return await showDialog<bool>(
context: context,
builder: (context) => AlertDialog(
title: Row(
children: [
Icon(icon, color: Theme.of(context).primaryColor),
const SizedBox(width: 8),
Text(title),
],
),
content: Text(explanation),
actions: [
TextButton(
onPressed: () => Navigator.pop(context, false),
child: const Text('Not Now'),
),
ElevatedButton(
onPressed: () => Navigator.pop(context, true),
child: const Text('Continue'),
),
],
),
) ?? false;
}
Future<void> _showSettingsDialog(BuildContext context, String permission) async {
await showDialog(
context: context,
builder: (context) => AlertDialog(
title: const Text('Permission Required'),
content: Text(
'The $permission permission was denied. Please enable it in Settings to use this feature.',
),
actions: [
TextButton(
onPressed: () => Navigator.pop(context),
child: const Text('Cancel'),
),
ElevatedButton(
onPressed: () {
Navigator.pop(context);
openAppSettings();
},
child: const Text('Open Settings'),
),
],
),
);
}
}
[Permission] Camera status: PermissionStatus.denied
[Permission] Showing explanation dialog…
[Permission] User accepted explanation — requesting camera…
[Permission] Camera result: PermissionStatus.granted ✅
<!-- GOOD: ios/Runner/Info.plist -->
<key>NSAppTransportSecurity</key>
<dict>
<!-- Only allow specific exceptions if absolutely necessary -->
<key>NSExceptionDomains</key>
<dict>
<key>legacy-api.example.com</key>
<dict>
<key>NSExceptionAllowsInsecureHTTPLoads</key>
<true/>
<key>NSExceptionMinimumTLSVersion</key>
<string>TLSv1.2</string>
<key>NSIncludesSubdomains</key>
<false/>
</dict>
</dict>
</dict>
// This will crash if NSCameraUsageDescription is missing from Info.plist
await Permission.camera.request();
<!-- Camera -->
<key>NSCameraUsageDescription</key>
<string>We need camera access to scan QR codes for secure login.</string>
<!-- Photo Library -->
<key>NSPhotoLibraryUsageDescription</key>
<string>We need photo library access to let you upload profile pictures.</string>
<!-- Location -->
<key>NSLocationWhenInUseUsageDescription</key>
<string>We need your location to show nearby stores.</string>
<key>NSLocationAlwaysAndWhenInUseUsageDescription</key>
<string>We need background location to send you arrival notifications.</string>
<!-- Microphone -->
<key>NSMicrophoneUsageDescription</key>
<string>We need microphone access for voice messages.</string>
<!-- Contacts -->
<key>NSContactsUsageDescription</key>
<string>We need contacts access to help you find friends.</string>
<!-- Face ID -->
<key>NSFaceIDUsageDescription</key>
<string>We use Face ID for quick and secure login.</string>
<!-- Bluetooth -->
<key>NSBluetoothAlwaysUsageDescription</key>
<string>We use Bluetooth to connect to your fitness tracker.</string>
<key>NSBluetoothPeripheralUsageDescription</key>
<string>We use Bluetooth to connect to your fitness tracker.</string>
// BAD: Data accessible when device is locked
let query: [String: Any] = [
kSecClass: kSecClassGenericPassword,
kSecAttrAccessible: kSecAttrAccessibleAlways, // INSECURE!
kSecAttrAccount: "auth_token",
kSecValueData: tokenData
]
import 'package:flutter_secure_storage/flutter_secure_storage.dart';
class SecureStorageService {
// Configure with appropriate accessibility
final FlutterSecureStorage _storage = const FlutterSecureStorage(
iOptions: IOSOptions(
accessibility: KeychainAccessibility.first_unlock_this_device,
// Only accessible after first unlock, not synced to other devices
),
aOptions: AndroidOptions(
encryptedSharedPreferences: true,
),
);
Future<void> saveAuthToken(String token) async {
await _storage.write(
key: 'auth_token',
value: token,
iOptions: const IOSOptions(
accessibility: KeychainAccessibility.first_unlock_this_device,
),
);
}
Future<String?> getAuthToken() async {
return await _storage.read(key: 'auth_token');
}
Future<void> deleteAuthToken() async {
await _storage.delete(key: 'auth_token');
}
}
import 'package:flutter/foundation.dart';
import 'dart:developer' as developer;
class SecureLogger {
static void log(String message, {Object? error, StackTrace? stackTrace}) {
if (kDebugMode) {
developer.log(message, error: error, stackTrace: stackTrace);
}
// In release mode, send to crash reporting without PII
}
// BAD: Logging sensitive data - NEVER do this
static void logLoginBad(String email, String password) {
debugPrint('Login attempt: $email / $password'); // NEVER DO THIS!
}
// GOOD: Sanitized logging
static void logLoginGood(String email) {
if (kDebugMode) {
// Even in debug, mask part of the email
final maskedEmail = _maskEmail(email);
developer.log('Login attempt: $maskedEmail');
}
}
static String _maskEmail(String email) {
final parts = email.split('@');
if (parts.length != 2) return '***';
final local = parts[0];
final domain = parts[1];
if (local.length <= 2) {
return '***@$domain';
}
return '${local.substring(0, 2)}***@$domain';
}
// GOOD: Never log these - this method exists only as documentation
static void neverLog({
String? password,
String? token,
String? creditCard,
String? ssn,
String? apiKey,
}) {
// These parameters exist only to document what should NEVER be logged
throw UnsupportedError('This method should never be called');
}
}
[log] Login attempt: ma***@example.com
# .github/workflows/security-scan.yml
name: Security Configuration Scan
on: [push, pull_request]
jobs:
android-security:
runs-on: ubuntu-latest
steps:
- uses: actions/checkout@v4
- name: Check AndroidManifest.xml
run: |
# Check for debuggable
if grep -q 'android:debuggable="true"' android/app/src/main/AndroidManifest.xml; then
echo "ERROR: debuggable=true found in manifest"
exit 1
fi
# Check for allowBackup
if grep -q 'android:allowBackup="true"' android/app/src/main/AndroidManifest.xml; then
echo "WARNING: allowBackup=true - ensure this is intentional"
fi
# Check for cleartext traffic
if grep -q 'android:usesCleartextTraffic="true"' android/app/src/main/AndroidManifest.xml; then
echo "WARNING: Cleartext traffic allowed"
fi
- name: Check for hardcoded secrets
run: |
# Search for potential secrets in Dart files
if grep -rE "(api_key|apiKey|secret|password)\s*[:=]\s*['\"][^'\"]+['\"]" lib/; then
echo "WARNING: Potential hardcoded secrets found"
exit 1
fi
ios-security:
runs-on: macos-latest
steps:
- uses: actions/checkout@v4
- name: Check Info.plist
run: |
# Check for ATS disabled
if grep -A2 'NSAllowsArbitraryLoads' ios/Runner/Info.plist | grep -q 'true'; then
echo "ERROR: NSAllowsArbitraryLoads is true"
exit 1
fi
- name: Verify entitlements
run: |
# Check entitlements file exists and is properly configured
if [ -f ios/Runner/Runner.entitlements ]; then
echo "Entitlements file found"
cat ios/Runner/Runner.entitlements
fi
import 'dart:io';
import 'package:flutter/foundation.dart';
import 'package:package_info_plus/package_info_plus.dart';
class SecurityConfigValidator {
static Future<List<String>> validateConfiguration() async {
final issues = <String>[];
// Check if running in debug mode in what should be production
if (kDebugMode && await _isProductionEnvironment()) {
issues.add('CRITICAL: Debug mode detected in production environment');
}
// Check for common misconfigurations
if (Platform.isAndroid) {
issues.addAll(await _validateAndroidConfig());
} else if (Platform.isIOS) {
issues.addAll(await _validateIOSConfig());
}
return issues;
}
static Future<bool> _isProductionEnvironment() async {
final packageInfo = await PackageInfo.fromPlatform();
// Check if package name indicates production
return !packageInfo.packageName.contains('.dev') &&
!packageInfo.packageName.contains('.staging');
}
static Future<List<String>> _validateAndroidConfig() async {
final issues = <String>[];
// Add Android-specific runtime checks
// These are limited but can catch some issues
return issues;
}
static Future<List<String>> _validateIOSConfig() async {
final issues = <String>[];
// Add iOS-specific runtime checks
return issues;
}
static void assertSecureConfiguration() {
if (kReleaseMode) {
// In release mode, validate configuration on startup
validateConfiguration().then((issues) {
if (issues.isNotEmpty) {
// Log to crash reporting (without exposing details)
// Consider preventing app from running if critical issues found
for (final issue in issues) {
debugPrint('Security Issue: $issue');
}
}
});
}
}
}
Each is a critical piece of the mobile security puzzle.
In this seventh article, we focus on M7: Insufficient Binary Protection, a risk that doesn't hide in your code logic, network calls, or database queries. Instead, it targets something more fundamental: the compiled Flutter app itself. When you ship your app to users, you're essentially handing over a complete package of your business logic, algorithms, and sometimes your secrets too. Without proper protection, attackers can reverse engineer, tamper with, or redistribute your application as they see fit.
I've seen this vulnerability underestimated more times than I can count. Developers often assume that because Dart code gets compiled to native machine code, it's somehow "safe." The reality? It's just a different challenge for attackers, not an impossible one. Tools like Ghidra, Frida, and even Flutter-specific utilities like reFlutter make binary analysis more accessible than ever.
Let's get started.
Binary protection is about safeguarding your compiled app from being analyzed, modified, or misused. To really get why it matters, just think about what actually happens when you build a Flutter app.
Your Dart code doesn't stay as readable source code — it gets compiled into machine code for iOS or a combination of native libraries and Dart AOT (Ahead-of-Time) snapshots for Android. This compiled binary is what users download from app stores, and here's the uncomfortable truth: it contains everything:
Your business logic and proprietary algorithms
Hardcoded secrets (API keys, encryption keys—yes, even if you think you've hidden them)
I know what you're thinking, "But it's compiled, surely that's secure enough?" I've heard that reasoning a lot. Without adequate protection, attackers can do more than you'd expect:
I've been asked many times whether Flutter apps are inherently safer than React Native or web apps.
The honest answer is as I always say: it depends.
Flutter has real strengths, but also some quirks that make it a unique target.
Take Dart's Ahead-of-Time (AOT) compilation, for example. Your Dart code gets turned into native machine code before execution, unlike Just-in-Time (JIT) compilation, which happens at runtime. That's more secure than shipping plaintext JavaScript, no doubt. But it's not immune to reverse engineering. Skilled attackers with the right tools can still extract meaningful information from that compiled code.
What catches many developers off guard is where that compiled code actually lives—I'll walk you through the exact package structure in a moment, but once you see it, the need for protection becomes obvious.
The cross-platform nature of Flutter is a double-edged sword here too. Once an attacker cracks your Android app, the same techniques usually work directly on iOS—because it's the same Dart codebase underneath.
And as Flutter keeps growing in enterprise, fintech, and high-value consumer products, it's drawing more attention from attackers. That's just how it goes: the higher the stakes, the more motivated the attackers.
Before we get into the technical details, I want to spend a moment on the business side of this. In my experience, binary protection is often deprioritized because it feels abstract—until something goes wrong.
According to the , insufficient binary protection can lead to significant damage across multiple dimensions:
Impact Type
Description
Example
I've personally seen startups lose months of competitive advantage because a competitor extracted their core algorithm from an unprotected APK. I've also witnessed companies face unexpected cloud bills when attackers extracted API keys and used them for their own purposes. These aren't hypothetical scenarios, they happen regularly, and they often happen to apps whose developers assumed "nobody would bother."
Before we talk about defense, we need to look at the app the same way an attacker does. I find this exercise genuinely useful, once you see what's exposed, the motivation to protect it becomes a lot more concrete.
When you run flutter build apk, Flutter produces an APK file that follows a specific structure. Understanding this structure helps you appreciate where your code ends up and why certain files are targeted:
See that libapp.so file? That's the crown jewel for attackers. It contains your entire Dart application compiled to native code. Every widget, every service class, every business logic function, it's all in there. While it's compiled to machine code (not human-readable Dart), skilled reverse engineers can still extract a surprising amount of information from it.
The iOS story is similar. When you archive your Flutter app for iOS distribution, the IPA contains:
Just like Android's libapp.so, the App.framework/App binary contains your compiled Dart code. iOS apps benefit from Apple's code signing requirements and stricter app review process, but once someone has your IPA file, they can analyze it using the same reverse engineering techniques.
Let me show you something that might make you uncomfortable. Consider this seemingly innocent code that many developers write without thinking twice:
You might think that breaking up the string or using a method makes it harder to find. It doesn't. An attacker running the strings command on your binary—or using more advanced tools like Ghidra, can easily locate these:
The folder tree looks like this:
Then run (Linux/macOS):
Output: you may see many matches. These are the ones to look for:
It really is that simple. If you've hardcoded secrets in your Dart code, consider them already compromised the moment you publish your app.
Now that we understand what's inside a Flutter app, let's examine the specific techniques attackers use. Understanding these attack vectors isn't about learning to attack, it's about knowing what you're defending against.
Static analysis involves examining your app without running it. Attackers use disassemblers and decompilers to dig into your binary and understand its structure. It's like reading a book—they don't need the app to be running to learn from it.
Common Tools Used Against Flutter Apps:
Here's a look at the tools attackers commonly use. Most of these are freely available and well-documented:
Tool
Platform
Purpose
That last one——deserves special attention. It's specifically designed to reverse engineer Flutter apps, and it's particularly dangerous because it understands Flutter's architecture:
Notice how it reveals function names like LicenseChecker.verifyPremium? An attacker now knows exactly where to look if they want to bypass your premium features.
While static analysis is like reading a book, dynamic analysis is like watching a movie—attackers observe (and manipulate) your app while it's running. Tools like Frida allow attackers to "hook" into your app at runtime and modify its behavior on the fly.
Here's a real example of a Frida script that could bypass a license check in a Flutter app:
The attacker doesn't need to understand your entire codebase. They just need to find the function that checks for premium access and make it always return true. With the function names exposed by static analysis, this becomes a focused attack rather than a blind search.
Sometimes attackers don't bother with real-time manipulation, they simply modify your app's binary directly and redistribute it. This is particularly common for apps with premium features, in-app purchases, or ad-supported business models.
The steps are surprisingly simple:
Once the modified APK is created, it can be uploaded to third-party app stores, shared on forums, or distributed through other channels. Users who install these cracked versions get your premium features for free, and you lose revenue. Worse, if the attacker injected malicious code alongside the cracks, those users' devices (and your app's reputation) are compromised.
Let me walk you through a realistic attack scenario to make this more concrete. Imagine you've built a Flutter fintech app with premium trading features:
Here's how an attacker would compromise this:
Step 1: Use reFlutter to dump function names, discovering TradingFeatures.isPremiumUser and TradingFeatures.executeAdvancedTrade
Step 2: Use Ghidra or IDA Pro to locate the check for isPremiumUser in the compiled binary
The entire process might take an experienced attacker a few hours. Your premium features are now available to anyone who downloads the cracked APK.
Let's shift to defense. You can't make your app completely unbreakable (nothing is), but you can make attacking it significantly more difficult, time-consuming, and unreliable. The goal is to make the cost of attacking your app higher than the potential reward.
Code obfuscation is your first line of defense. It doesn't prevent reverse engineering entirely, but it makes the attacker's job much harder by replacing meaningful names with gibberish and making the code structure more difficult to follow.
The good news? Flutter provides that you should always enable for release builds. It's a simple flag, but it's surprising how many developers forget to use it.
Enabling Flutter Obfuscation
Here's how to build your app with obfuscation enabled:
What does --obfuscate actually do?
It renames your classes, methods, and fields to meaningless names. The result is that your stack traces become unreadable (without the symbol map), and reverse engineers have a much harder time understanding what each function does.
Before obfuscation:
After obfuscation:
Now, instead of immediately knowing that LicenseChecker.verifyPremium is the function to target, an attacker sees qR.sT() and has no idea what it does without significant additional analysis.
Preserving Debug Information
"But wait," you might be thinking, "if my stack traces are unreadable, how do I debug production crashes?"
Great question! The --split-debug-info flag is the answer. It saves the symbol mapping to a separate directory that you keep secure but don't ship with your app. When a crash occurs, you can use these symbols to translate the obfuscated stack trace back to meaningful code:
The key is to upload the debug symbols to your crash reporting service. This way, you see readable crash reports in your dashboard, but attackers only see obfuscated gibberish:
Advanced Obfuscation with ProGuard (Android)
For Android, you can add an extra layer of protection using ProGuard (or R8, which is now the default). While Flutter's Dart code is obfuscated by the --obfuscate flag, any Kotlin/Java code (including plugin code) benefits from ProGuard.
Configure it in your android/app/build.gradle:
Then create android/app/proguard-rules.pro with rules to keep Flutter's necessary classes while obfuscating everything else:
This is perhaps the most critical section of this entire article. I cannot stress this enough: never hardcode secrets in your Dart code. Not API keys, not encryption keys, not tokens, nothing. They will be extracted.
Let's look at some alternatives, from simple to more advanced:
Using Environment Variables (Build-time)
The simplest improvement is to use Dart's String.fromEnvironment to inject secrets at build time rather than embedding them in source code:
Important caveat: While this keeps secrets out of your source code repository (a good practice for version control), the strings still end up in the compiled binary. An attacker examining your libapp.so can still find them. This approach is better for organization and CI/CD practices. But it's not a security silver bullet.
Using Native Code for Extra Protection
If you absolutely must include a secret in your app (though I'd encourage you to question whether that's really necessary), storing it in native code adds an extra layer of difficulty for attackers. Native code (C/C++) is generally harder to reverse engineer than Dart code.
Here's an example of how to set this up:
Android (Kotlin) - Create a method channel:
C++ Native Library (secrets.cpp) - Add simple obfuscation:
Dart side - Call the native method:
A word of caution: Native code makes extraction harder, not impossible. A determined attacker with Ghidra and enough time can still figure it out. This is a speed bump, not a wall.
Using Secure Remote Configuration
Here's the truth that many developers don't want to hear: the most secure approach is to never ship secrets with your app at all. Instead, fetch sensitive configuration from a secure server at runtime.
Firebase Remote Config is one popular option for this pattern:
With this approach, even if an attacker completely reverse engineers your app, they won't find the API key because it was never there to begin with. They'd have to intercept network traffic or compromise your Firebase project, both of which are significantly more difficult than extracting a string from a binary.
Obfuscation and secret management are about making attack harder. But what about detecting when an attack has already happened? Integrity verification allows your app to check whether it has been modified, and respond appropriately.
The idea is simple: your app knows what it should look like. If something's different, sound the alarm.
Signature Verification (Android)
Android apps are digitally signed before distribution. When you upload your app to the Play Store, it's signed with your release key. If an attacker modifies your app and re-signs it (which they must do for the modified APK to install), the signature changes.
Here's how to implement signature verification:
The Android native implementation does the heavy lifting:
App Integrity Check with Hash Verification
Beyond signature checking, you can also verify that your binary files haven't been modified by computing and comparing hash values:
This approach requires you to generate the expected hash during your build process and embed it in the app. There's an inherent chicken-and-egg problem here: the hash lives inside the binary, but computing the hash changes the binary. The standard workaround is to hash a file other than the one containing the expected value (e.g., hash libflutter.so or specific asset files), or perform the verification entirely on the server by uploading the hash at startup. A purely client-side self-check will always have this limitation.
Building a Comprehensive Integrity Service
In practice, you'll want to combine multiple integrity checks into a single service that can assess your app's overall security posture:
Here is a screenshot of the decompiled app in JADX:
A rooted Android device or jailbroken iOS device gives users (and attackers) elevated privileges that bypass the normal security sandbox. On such devices, other apps can read your app's private storage, attach debuggers, and intercept communications.
Detecting these compromised environments is an important defense layer. Here's a comprehensive approach:
The Android implementation needs to check multiple indicators because advanced rooting tools like Magisk actively try to hide themselves:
Debuggers are powerful tools, for developers and attackers alike. In a production app, there's no legitimate reason for a debugger to be attached. Detecting debugger attachment can help identify when your app is being analyzed at runtime.
On Android, you can also detect Frida specifically, which is the tool of choice for many attackers:
Android implementation with Frida detection:
A word of caution: determined attackers can hook your anti-debugging code and make it always return "no debugger found." This is why defense in depth matters, no single check is sufficient, but multiple layers make attacks significantly harder.
Implementing all these protections from scratch is a significant undertaking. Fortunately, there are libraries that package these protections together. One excellent option for production apps is by Talsec, which provides comprehensive Runtime Application Self-Protection.
What I appreciate about freeRASP is that it handles the cross-platform complexity for you—writing native security code for both Android and iOS is time-consuming, and getting it wrong can create false security. Here's how to integrate it:
I've saved this for last, but it's probably the most important concept in this entire article: never trust the client. No matter how much protection you add to your app, a sufficiently determined attacker can eventually bypass it. The only truly secure approach is to validate critical operations server-side. This is sometimes called the "zero trust client" principle — see the for why client-side checks alone are never sufficient.
Think about it this way: every line of code that runs on a user's device is potentially compromised. The server, on the other hand, is under your control. Here's how this plays out in practice:
Server-side validation:
Before we wrap up the defensive strategies, let's talk about protecting specific high-value assets in your Flutter app. Different types of assets require different protection approaches.
If your Flutter app includes embedded AI or machine learning models (increasingly common with or models), these represent significant intellectual property investments. An attacker who extracts your model can use it without paying licensing fees, or worse, sell it to competitors.
Here's an approach to encrypt your models:
Remember: the decryption key is still a secret that needs protection, so this loops back to our earlier discussion about not hardcoding secrets.
This is a philosophical point as much as a technical one. Ask yourself: does this logic need to be on the client? For critical business rules, pricing algorithms, fraud detection, premium feature gates, the answer is often "no."
Compare these two approaches:
Before deploying your Flutter app, run through this checklist. I've organized it by when in your development process you should address each item:
Enable --obfuscate flag for all release builds
Use --split-debug-info and securely store symbols
Configure ProGuard/R8 for Android
No hardcoded API keys or secrets in Dart code
Use --dart-define for build-time configuration
Store sensitive keys in native code (if must be in app)
Implement signature verification
Add root/jailbreak detection
Include debugger detection
Use integrity checking
Never trust client-side license checks alone
Validate app signature on server
Implement device binding for licenses
Log and monitor suspicious activity
Only distribute through official stores
Monitor for unauthorized app copies
Implement app attestation
(, )
Here's something many developers overlook: you should test your own app using the same tools attackers use. This isn't about becoming a hacker, it's about validating that your protections actually work.
If you find sensitive strings or unobfuscated function names, you know you have work to do before shipping.
You can (and should) automate these checks in your CI/CD pipeline. Here's a GitHub Actions workflow that catches common issues before they reach production:
If there's one thing I want you to take away from this article, it's that protecting your Flutter app's binary is an ongoing process, not a one-time checkbox. Attackers continuously evolve their techniques, and your defenses must evolve too.
Here are the key principles to remember:
Always obfuscate release builds with --obfuscate, it's free and significantly raises the bar for attackers
Never hardcode secrets, they will be extracted, it's only a matter of time
Implement defense in depth, no single protection is enough, but layers make attacks impractical
Remember: the goal isn't to make your app impossible to crack. That's not achievable—given unlimited time and resources, any client-side protection can be defeated. The real goal is twofold: make attacking your app expensive enough that attackers move on to easier targets, and detect attacks quickly so you can respond before significant damage occurs.
In the next article, we'll explore M8: Security Misconfiguration, where we'll examine how seemingly innocent configuration settings can create serious vulnerabilities in your Flutter apps.
Stay secure, Flutter engineers!
OWASP Top 10 For Flutter – M9: Insecure Data Storage in Flutter & Dart
Runner.app/
├── Info.plist
├── Runner # Main executable
├── Frameworks/
│ ├── Flutter.framework/ # Flutter engine
│ └── App.framework/ # YOUR DART CODE (AOT compiled)
│ └── App # The actual binary
├── flutter_assets/
└── _CodeSignature/
// Example: Hardcoded API key that attackers can find
class ApiConfig {
// BAD: This string is easily extractable from the binary
static const String apiKey = 'sk-prod-a1b2c3d4e5f6g7h8i9j0';
static const String secretToken = 'super_secret_token_123';
// BAD: Even "hidden" in variables, strings are visible
static String getApiKey() {
return 'sk-prod-' + 'a1b2c3d4' + 'e5f6g7h8i9j0';
}
}
# Extracting strings from a Flutter Android binary
unzip app-release.apk -d extracted/
# reFlutter can dump your Dart code's structure
$ reflutter app-release.apk
# Output reveals function names, class structures, and more
[+] Dumping functions from libapp.so
[+] Found 2,847 Dart functions
[+] UserAuthService.login
[+] PaymentProcessor.processPayment
[+] LicenseChecker.verifyPremium
...
// Frida script to bypass a license check in a Flutter app
Java.perform(function () {
// Hook into the Flutter engine
var libapp = Module.findBaseAddress('libapp.so');
// Find and hook the license verification function
Interceptor.attach(libapp.add(0x1a2b3c), {
onEnter: function (args) {
console.log('License check called');
},
onLeave: function (retval) {
// Force return true (licensed)
retval.replace(1);
console.log('License check bypassed!');
},
});
});
// Original code in a premium trading app
class TradingFeatures {
bool isPremiumUser = false;
Future<void> checkLicense() async {
final response = await api.verifyLicense(userId);
isPremiumUser = response.isValid;
}
void executeAdvancedTrade(TradeOrder order) {
// BAD: Client-side only check
if (!isPremiumUser) {
showUpgradeDialog();
return;
}
// Execute premium trading algorithm
_runProprietaryAlgorithm(order);
}
}
# Build with obfuscation enabled
flutter build apk --release --obfuscate --split-debug-info=./debug-info
# For iOS
flutter build ios --release --obfuscate --split-debug-info=./debug-info
# For App Bundle (recommended for Play Store)
flutter build appbundle --release --obfuscate --split-debug-info=./debug-info
// In your app, you can still get readable crash reports
import 'package:firebase_crashlytics/firebase_crashlytics.dart';
void main() {
FlutterError.onError = (errorDetails) {
FirebaseCrashlytics.instance.recordFlutterFatalError(errorDetails);
};
runApp(MyApp());
}
# Upload symbols to Firebase Crashlytics
firebase crashlytics:symbols:upload --app=YOUR_APP_ID ./debug-info
# Flutter specific rules
-keep class io.flutter.app.** { *; }
-keep class io.flutter.plugin.** { *; }
-keep class io.flutter.util.** { *; }
-keep class io.flutter.view.** { *; }
-keep class io.flutter.** { *; }
-keep class io.flutter.plugins.** { *; }
# Keep your model classes if using reflection
-keep class com.yourapp.models.** { *; }
# Obfuscate everything else aggressively
-repackageclasses ''
-allowaccessmodification
// Define in your build command or CI/CD
// flutter build apk --dart-define=API_KEY=your_key_here
class SecureConfig {
// Loaded at compile time, not visible as plain string in source
static const String apiKey = String.fromEnvironment('API_KEY');
// Validate it exists
static void validateConfig() {
if (apiKey.isEmpty) {
throw StateError('API_KEY not configured. Build with --dart-define=API_KEY=xxx');
}
}
}
// android/app/src/main/kotlin/com/yourapp/SecretProvider.kt
package com.yourapp
import io.flutter.embedding.engine.plugins.FlutterPlugin
import io.flutter.plugin.common.MethodChannel
class SecretProvider : FlutterPlugin {
private lateinit var channel: MethodChannel
override fun onAttachedToEngine(binding: FlutterPlugin.FlutterPluginBinding) {
channel = MethodChannel(binding.binaryMessenger, "com.yourapp/secrets")
channel.setMethodCallHandler { call, result ->
when (call.method) {
"getApiKey" -> {
// Return from native code (still extractable but harder)
result.success(getSecretFromNative())
}
else -> result.notImplemented()
}
}
}
private external fun getSecretFromNative(): String
companion object {
init {
System.loadLibrary("secrets")
}
}
override fun onDetachedFromEngine(binding: FlutterPlugin.FlutterPluginBinding) {
channel.setMethodCallHandler(null)
}
}
#include <jni.h>
#include <string>
// XOR decryption for the API key (simple obfuscation)
extern "C" JNIEXPORT jstring JNICALL
Java_com_yourapp_SecretProvider_getSecretFromNative(JNIEnv *env, jobject /* this */) {
// Encoded key: each byte is the original char XOR'd with the mask 0x5A.
// Original plaintext "sk-prod" was encoded offline with the same mask.
unsigned char encoded[] = {0x29, 0x31, 0x77, 0x2A, 0x28, 0x35, 0x3E};
unsigned char mask = 0x5A;
std::string decoded;
for (unsigned char c : encoded) {
decoded += (char)(c ^ mask);
}
// decoded now equals "sk-prod"
return env->NewStringUTF(decoded.c_str());
}
import 'package:flutter/foundation.dart';
import 'package:flutter/services.dart';
class NativeSecrets {
static const _channel = MethodChannel('com.yourapp/secrets');
static Future<String> getApiKey() async {
try {
final key = await _channel.invokeMethod<String>('getApiKey');
return key ?? '';
} catch (e) {
debugPrint('Failed to get API key: $e');
return '';
}
}
}
// Usage
void main() async {
final apiKey = await NativeSecrets.getApiKey();
// Use the key...
}
import 'package:firebase_remote_config/firebase_remote_config.dart';
import 'package:flutter_secure_storage/flutter_secure_storage.dart';
class SecureConfigService {
final _remoteConfig = FirebaseRemoteConfig.instance;
final _secureStorage = const FlutterSecureStorage();
Future<void> initialize() async {
await _remoteConfig.setConfigSettings(RemoteConfigSettings(
fetchTimeout: const Duration(minutes: 1),
minimumFetchInterval: const Duration(hours: 1),
));
await _remoteConfig.fetchAndActivate();
}
Future<String> getApiKey() async {
// First, try to get from secure storage (cached)
final cached = await _secureStorage.read(key: 'api_key');
if (cached != null) return cached;
// Fetch from remote config
final key = _remoteConfig.getString('api_key');
// Cache securely
await _secureStorage.write(key: 'api_key', value: key);
return key;
}
}
import 'dart:io';
import 'package:flutter/services.dart';
class IntegrityChecker {
static const _channel = MethodChannel('com.yourapp/integrity');
/// Verify the app's signing certificate
static Future<bool> verifySignature() async {
if (!Platform.isAndroid) return true;
try {
final isValid = await _channel.invokeMethod<bool>('verifySignature');
return isValid ?? false;
} catch (e) {
// If we can't verify, assume compromised
return false;
}
}
/// Get the current signature hash for comparison
static Future<String?> getSignatureHash() async {
if (!Platform.isAndroid) return null;
try {
return await _channel.invokeMethod<String>('getSignatureHash');
} catch (e) {
return null;
}
}
}
// android/app/src/main/kotlin/com/yourapp/IntegrityPlugin.kt
package com.yourapp
import android.content.pm.PackageManager
import android.os.Build
import io.flutter.embedding.engine.plugins.FlutterPlugin
import io.flutter.plugin.common.MethodChannel
import java.security.MessageDigest
class IntegrityPlugin : FlutterPlugin {
private lateinit var channel: MethodChannel
private lateinit var context: android.content.Context
// Your release signing certificate SHA-256 hash
private val VALID_SIGNATURES = listOf(
"A1:B2:C3:D4:E5:F6:G7:H8:I9:J0:K1:L2:M3:N4:O5:P6:Q7:R8:S9:T0:U1:V2:W3:X4"
)
override fun onAttachedToEngine(binding: FlutterPlugin.FlutterPluginBinding) {
context = binding.applicationContext
channel = MethodChannel(binding.binaryMessenger, "com.yourapp/integrity")
channel.setMethodCallHandler { call, result ->
when (call.method) {
"verifySignature" -> result.success(verifyAppSignature())
"getSignatureHash" -> result.success(getAppSignatureHash())
else -> result.notImplemented()
}
}
}
private fun verifyAppSignature(): Boolean {
val currentHash = getAppSignatureHash() ?: return false
return VALID_SIGNATURES.contains(currentHash)
}
private fun getAppSignatureHash(): String? {
return try {
val packageInfo = if (Build.VERSION.SDK_INT >= Build.VERSION_CODES.P) {
context.packageManager.getPackageInfo(
context.packageName,
PackageManager.GET_SIGNING_CERTIFICATES
)
} else {
@Suppress("DEPRECATION")
context.packageManager.getPackageInfo(
context.packageName,
PackageManager.GET_SIGNATURES
)
}
val signatures = if (Build.VERSION.SDK_INT >= Build.VERSION_CODES.P) {
packageInfo.signingInfo.apkContentsSigners
} else {
@Suppress("DEPRECATION")
packageInfo.signatures
}
val signature = signatures.firstOrNull() ?: return null
val md = MessageDigest.getInstance("SHA-256")
val digest = md.digest(signature.toByteArray())
digest.joinToString(":") { "%02X".format(it) }
} catch (e: Exception) {
null
}
}
override fun onDetachedFromEngine(binding: FlutterPlugin.FlutterPluginBinding) {
channel.setMethodCallHandler(null)
}
}
import 'dart:io';
import 'dart:convert';
import 'package:crypto/crypto.dart';
import 'package:flutter/foundation.dart';
import 'package:flutter/services.dart';
class BinaryIntegrityChecker {
static const _channel = MethodChannel('com.yourapp/integrity');
// Expected hash of your release binary (generate during build)
static const String _expectedLibappHash = 'abc123...'; // SHA-256
/// Verifies that libapp.so has not been tampered with.
/// The native library path must be resolved from native code
/// because Dart's path_provider cannot locate it reliably.
static Future<bool> verifyBinaryIntegrity() async {
if (!Platform.isAndroid) return true;
try {
// Delegate to native code, which uses
// context.applicationInfo.nativeLibraryDir to locate libapp.so
final hash = await _channel.invokeMethod<String>('getLibappHash');
if (hash == null) return false;
return hash == _expectedLibappHash;
} catch (e) {
debugPrint('Integrity check failed: $e');
return false;
}
}
}
import 'package:flutter/foundation.dart';
enum IntegrityStatus {
valid,
signatureMismatch,
debuggerAttached,
emulatorDetected,
rootDetected,
tamperingDetected,
unknown,
}
class AppIntegrityService {
static final AppIntegrityService _instance = AppIntegrityService._internal();
factory AppIntegrityService() => _instance;
AppIntegrityService._internal();
final List<IntegrityStatus> _violations = [];
List<IntegrityStatus> get violations => List.unmodifiable(_violations);
bool get isCompromised => _violations.isNotEmpty;
Future<void> performFullCheck() async {
_violations.clear();
// Check signature
if (!await IntegrityChecker.verifySignature()) {
_violations.add(IntegrityStatus.signatureMismatch);
}
// Check for debugger (in release mode)
if (kReleaseMode && await _isDebuggerAttached()) {
_violations.add(IntegrityStatus.debuggerAttached);
}
// Check for emulator
if (await _isRunningOnEmulator()) {
_violations.add(IntegrityStatus.emulatorDetected);
}
// Check for root/jailbreak
if (await _isDeviceRooted()) {
_violations.add(IntegrityStatus.rootDetected);
}
}
Future<bool> _isDebuggerAttached() async {
// Platform-specific implementation
return false; // Placeholder
}
Future<bool> _isRunningOnEmulator() async {
// Check various emulator indicators
return false; // Placeholder
}
Future<bool> _isDeviceRooted() async {
// Check for root indicators
return false; // Placeholder
}
void handleViolations() {
if (!isCompromised) return;
for (final violation in _violations) {
switch (violation) {
case IntegrityStatus.signatureMismatch:
// Critical: App has been re-signed
_handleCriticalViolation('Application signature mismatch detected');
break;
case IntegrityStatus.debuggerAttached:
// High: Someone is debugging in production
_handleHighViolation('Debugger detected');
break;
case IntegrityStatus.rootDetected:
// Medium: Running on rooted device
_handleMediumViolation('Rooted device detected');
break;
default:
break;
}
}
}
void _handleCriticalViolation(String message) {
// Log to security backend
// Clear sensitive data
// Show warning or exit app
debugPrint('CRITICAL SECURITY VIOLATION: $message');
}
void _handleHighViolation(String message) {
debugPrint('HIGH SECURITY VIOLATION: $message');
}
void _handleMediumViolation(String message) {
debugPrint('MEDIUM SECURITY VIOLATION: $message');
}
}
private fun isDebuggerAttached(): Boolean {
return android.os.Debug.isDebuggerConnected() ||
android.os.Debug.waitingForDebugger()
}
// More advanced: Check for Frida
private fun isFridaDetected(): Boolean {
// Check for Frida server port
try {
val socket = java.net.Socket("127.0.0.1", 27042)
socket.close()
return true
} catch (e: Exception) {
// Port not open, good
}
// Check for Frida libraries in memory
try {
val maps = File("/proc/self/maps").readText()
if (maps.contains("frida") || maps.contains("gadget")) {
return true
}
} catch (e: Exception) {
// Couldn't read maps
}
return false
}
import 'package:flutter/foundation.dart';
import 'package:freerasp/freerasp.dart';
class SecurityService {
late Talsec _talsec;
Future<void> initialize() async {
// Configure Talsec
final config = TalsecConfig(
androidConfig: AndroidConfig(
packageName: 'com.yourapp.app',
signingCertHashes: [
// Your release signing certificate SHA-256
'AKoRuyLMM91E7lX/Zqp3u4jMmd0A7hH/Iqozu0TMVd0='
],
supportedStores: ['com.android.vending'], // Google Play only
malwareConfig: MalwareConfig(
blacklistedPackageNames: [
'com.known.malware.app',
],
suspiciousPermissions: [
['android.permission.CAMERA', 'android.permission.RECORD_AUDIO'],
],
),
),
iosConfig: IOSConfig(
bundleIds: ['com.yourapp.app'],
teamId: 'YOUR_TEAM_ID',
),
watcherMail: 'security@yourapp.com',
isProd: true,
);
// Set up threat callbacks
final callback = ThreatCallback(
onAppIntegrity: () => _handleThreat('App integrity violation'),
onDebug: () => _handleThreat('Debugger detected'),
onDeviceBinding: () => _handleThreat('Device binding violation'),
onDeviceID: () => _handleThreat('Device ID manipulation'),
onHooks: () => _handleThreat('Hooking framework detected'),
onPasscode: () => _handleThreat('No device passcode'),
onPrivilegedAccess: () => _handleThreat('Root/jailbreak detected'),
onSecureHardwareNotAvailable: () => _handleThreat('No secure hardware'),
onSimulator: () => _handleThreat('Running on simulator'),
onUnofficialStore: () => _handleThreat('Installed from unofficial store'),
);
// Start protection
_talsec = Talsec.instance;
await _talsec.start(config, callback: callback);
}
void _handleThreat(String threat) {
debugPrint('SECURITY THREAT: $threat');
// Options:
// 1. Log to analytics
// 2. Show warning to user
// 3. Disable sensitive features
// 4. Force logout
// 5. Exit app
// Example: Disable sensitive features
AppState.instance.setSensitiveFeaturesEnabled(false);
// Example: Report to backend
SecurityReporter.reportThreat(threat);
}
}
// Client-side code
class LicenseService {
Future<bool> checkPremiumAccess() async {
// Local check (can be bypassed)
final localLicense = await _secureStorage.read(key: 'license');
if (localLicense == null) return false;
// CRITICAL: Always verify with server for sensitive operations
try {
final response = await _api.verifyLicense(
licenseKey: localLicense,
deviceId: await _getDeviceId(),
appSignature: await IntegrityChecker.getSignatureHash(),
);
if (!response.isValid) {
// Server says license is invalid - trust the server
await _secureStorage.delete(key: 'license');
return false;
}
return true;
} catch (e) {
// Network error - fall back to cached state with caution
return false; // Or implement grace period
}
}
}
import 'dart:convert';
import 'dart:typed_data';
import 'package:flutter/services.dart';
class ModelProtectionService {
/// Load encrypted model
Future<Uint8List> loadProtectedModel(String modelName) async {
// Load encrypted model from assets
final encryptedData = await rootBundle.load('assets/models/$modelName.enc');
// Get decryption key from secure source
final key = await NativeSecrets.getModelDecryptionKey();
// Decrypt in memory
final decrypted = _decryptModel(encryptedData.buffer.asUint8List(), key);
// Clear key from memory
// (In Dart, we can't guarantee this, but minimize exposure)
return decrypted;
}
Uint8List _decryptModel(Uint8List encrypted, String key) {
// Use AES-256-GCM for authenticated encryption.
// The first 12 bytes are the IV; the remainder is ciphertext + auth tag.
final keyBytes = base64Decode(key);
final iv = encrypted.sublist(0, 12);
final ciphertext = encrypted.sublist(12);
// Decrypt using the pointycastle package (add to pubspec.yaml):
// pointycastle: ^3.7.4
// See https://pub.dev/packages/pointycastle for full AES-GCM example.
final cipher = GCMBlockCipher(AESEngine())
..init(false, AEADParameters(KeyParameter(keyBytes), 128, iv, Uint8List(0)));
return cipher.process(ciphertext);
}
}
// Approach 1: All logic on client (vulnerable)
class PricingCalculator {
double calculatePrice(Product product, User user) {
double basePrice = product.price;
// Complex pricing logic that could be reverse engineered
if (user.isPremium) {
basePrice *= 0.85; // 15% discount
}
if (user.loyaltyYears > 5) {
basePrice *= 0.90; // Additional 10% discount
}
// ... more business rules
return basePrice;
}
}
// Approach 2: Logic on server (secure)
class PricingService {
final ApiClient _api;
Future<double> getPrice(String productId) async {
// Server calculates based on user context (from auth token)
final response = await _api.get('/pricing/$productId');
return response.data['price'];
}
}
# 1. Check for exposed strings
strings lib/arm64-v8a/libapp.so | grep -E "api|key|secret|token|password"
# 2. Use apktool to unpack and inspect
apktool d app-release.apk -o unpacked/
grep -r "apiKey\|secretKey" unpacked/
# 3. Use jadx to check for exposed Java/Kotlin code
jadx -d output/ app-release.apk
# 4. Use Ghidra for deep binary analysis
# (GUI tool - import libapp.so and analyze)
# 5. Test with Frida
frida -U -f com.yourapp.app -l test_hooks.js
# .github/workflows/security-check.yml
name: Security Scan
on: [push, pull_request]
jobs:
security:
runs-on: ubuntu-latest
steps:
- uses: actions/checkout@v4
- name: Setup Flutter
uses: subosito/flutter-action@v2
with:
channel: stable
- name: Build Release APK
run: |
flutter build apk --release --obfuscate --split-debug-info=./debug-info
- name: Run MobSF Scan
run: |
# Install and run MobSF CLI for static analysis
# See https://github.com/MobSF/Mobile-Security-Framework-MobSF
pip install mobsf
mobsf --scan build/app/outputs/flutter-apk/app-release.apk --type apk
- name: Check for hardcoded secrets
run: |
# Unpack APK
unzip -q build/app/outputs/flutter-apk/app-release.apk -d ./unpacked
# Search for potential secrets
if strings ./unpacked/lib/arm64-v8a/libapp.so | grep -iE "api.?key|secret|password|token" | grep -v "keystore"; then
echo "⚠️ Potential hardcoded secrets found!"
exit 1
fi
- name: Verify obfuscation
run: |
# Check that class names are obfuscated
if strings ./unpacked/lib/arm64-v8a/libapp.so | grep -E "UserService|PaymentProcessor|AuthManager"; then
echo "⚠️ Obfuscation may not be effective!"
exit 1
fi
Source code: All code examples from this article are available as a runnable Flutter project on GitHub:
Flutter's Binary Architecture: Know Your Attack Surface
Android APK Structure
iOS IPA Structure
What Attackers Can Extract
Attack Vectors: How Attackers Target Flutter Apps
1. Static Analysis (Reverse Engineering)
2. Dynamic Analysis (Runtime Attacks)
3. Binary Patching (Code Tampering)
4. Real-World Attack Scenario
Protecting Your Flutter Apps: Defense Strategies
1. Code Obfuscation
Note: The directive -optimizationpasses is ignored by R8 (Android's default shrinker since AGP 3.4). R8 determines the optimal number of passes internally. If you're on a recent Android Gradle Plugin version, you're already using R8; the ProGuard format is accepted for compatibility, but R8-specific flags may differ.
See the R8 compatibility FAQ.
2. Protecting Sensitive Strings and Keys
3. Integrity Verification and Anti-Tampering
4. Root/Jailbreak Detection
5. Anti-Debugging Protection
6. Using freeRASP for Comprehensive Protection
7. Server-Side Validation: The Most Important Defense
Each is a critical piece of the mobile security puzzle.
In this ninth article, we focus on M9: Insecure Data Storage.
Let me start with a story that still makes me cringe.
A few years ago, I was doing a security review of a health-tracking app. I discovered that the developers stored complete medical records in a plain JSON file. No encryption. No access controls. Readable by anyone with a few minutes of physical access to the device.
The developers weren’t malicious. They simply didn’t realize that “saving to a file” on mobile isn’t like saving to a server behind a firewall. Mobile devices get lost, stolen, backed up to cloud services, and sometimes compromised by malware. Every piece of data you store becomes a potential liability.
OWASP M9: Insecure Data Storage addresses exactly this problem. It’s the improper protection of sensitive data at rest. It’s also one of the most common vulnerabilities in mobile apps.
Flutter’s cross-platform nature adds an extra layer of complexity. When you call SharedPreferences.setString(), do you know where that data ends up on Android versus iOS? Do you know who can access it?
Let’s get into it.
Before we get to the solutions, I want to give you a clear picture of what you're actually defending against. The threat isn't abstract. There are real people (and automated tools) that go after insecure storage.
You might be surprised how many different types of attackers care about what your app stores:
Who
Motivation
Attack Method
Hackers
Data extraction, credential theft
Reverse engineering, file system access
Malicious Insiders
Privilege abuse, data exfiltration
Direct database/file access
You might think your app isn't a big enough target to worry about. But here's the thing: automated tools don't discriminate. A script that scans backup files for stored credentials doesn't care whether your app has 1,000 users or 1,000,000.
The exploitability of insecure data storage is rated EASY by OWASP. That's the highest exploitability rating, and it's accurate.
Physical device access: even a few minutes with an unlocked device can be enough. Think lost phones, repair shops, or handing your phone over “just to see the photo”.
Rooted/jailbroken devices: sandboxes don’t help. Malware with privileged access can read your app’s private storage.
Backup extraction: a common blind spot. Backups to iCloud or Google may include app data in plain text.
Malware: a malicious app can read other apps' insecure storage on rooted devices. It can also abuse backup mechanisms.
Social engineering: tricking users into installing apps that request broad permissions and harvest stored data.
The security weaknesses I see most often in Flutter apps fall into predictable patterns:
Before we get to the solutions, it helps to understand exactly what you're dealing with.
Flutter gives you several built-in ways to store data locally, and each one has a completely different security profile.
The bad news? Three of the four most commonly used options are completely insecure for sensitive data.
SharedPreferences is the go-to solution for storing simple key-value pairs in Flutter.
It's convenient, easy to use, and completely insecure for sensitive data. I see it misused constantly. Developers store auth tokens, API keys, and sometimes even passwords here.
Here's what I mean by misuse:
"But wait," you might say, "isn't app data protected by the OS sandbox?" Technically yes, but let me show you where this data actually ends up.
On Android, SharedPreferences are stored in XML files at:
And the contents look like this:
On iOS, NSUserDefaults are stored in plist files at:
Both locations are easily readable on rooted/jailbroken devices, through backup extraction, or with forensic tools. The sandbox provides no protection against these attack vectors.
The rule is simple: SharedPreferences is for preferences (dark mode, language, onboarding completed), not for secrets.
Example output (what an attacker sees after extraction):
Writing files to the app's document or cache directory is another common pattern. Without encryption, you're essentially creating a readable archive of sensitive data:
I've seen this pattern in production apps handling financial data, medical records, and legal documents. The developers assumed that because the file was in "their app's directory," it was safe. It wasn't.
Example output (plain JSON an attacker reads):
Flutter apps using sqflite or similar packages often create databases that seem more "serious" than SharedPreferences or JSON files. But without encryption, they're just as vulnerable:
The database file at /data/data/com.example.app/databases/user_data.db can be extracted and opened with any SQLite viewer. I once demonstrated this to a client by pulling their entire user database off a test device in under 30 seconds.
Example output (what an attacker dumps):
This one catches a lot of developers off guard. Debug logging that seemed harmless during development persists in production builds and can leak sensitive information:
Example console output (credentials visible to anyone with ADB — Android Debug Bridge):
So what should you use instead? The good news is that both Android and iOS provide solid secure storage mechanisms. The key is understanding how to use them properly from Flutter.
Android’s Keystore system is the gold standard for secure storage on the platform.
When available (which is most modern devices), it provides hardware-backed cryptographic key storage. This means the encryption keys literally never leave a secure hardware module. Even the operating system can't extract them.
What makes Android Keystore special:
Feature
Description
Hardware Backing
Keys stored in TEE (Trusted Execution Environment) or StrongBox (Pixel, Samsung Knox)
Key Extraction Prevention
Private keys never leave secure hardware
User Authentication
Can require biometrics/PIN before key use
The important thing to understand is that when you use flutter_secure_storage on Android, your data is encrypted with keys that are protected by this hardware security.
Even if an attacker extracts your encrypted data, they can't decrypt it without access to the secure hardware. That requires physical possession of the specific device.
iOS takes a slightly different approach with its Keychain Services. Rather than giving you direct access to encryption keys, the Keychain handles both key management and data storage. You put secrets in, and iOS keeps them encrypted with hardware-protected keys. On devices with a Secure Enclave, cryptographic keys created with the kSecAttrTokenIDSecureEnclave flag never leave that hardware—but note that general Keychain items are protected by the device’s Data Protection keys, not stored directly inside the Enclave.
One of the most important decisions you'll make with iOS Keychain is choosing the right accessibility level. This determines when your data can be accessed and whether it gets included in backups:
Level
Description
Use Case
WhenPasscodeSetThisDeviceOnly
Most restrictive; deleted if passcode removed
Highly sensitive (banking credentials)
WhenUnlockedThisDeviceOnly
Accessible only when unlocked, not backed up
Session tokens, temporary secrets
For most sensitive data, I recommend AfterFirstUnlockThisDeviceOnly. This provides strong protection while still allowing background operations like push notifications to access the data when needed. The "ThisDeviceOnly" suffix means the data won't be included in iCloud backups, which is important for secrets you don't want floating around in the cloud.
With the platform picture in mind, here's how to put it to work from your Flutter code.
The flutter_secure_storage package is the standard solution for secure storage in Flutter. It provides a unified API that uses Android Keystore on Android and iOS Keychain on iOS:
Example output:
For applications that need to store more structured data, plain SQLite isn't enough. The sqflite_sqlcipher package provides transparent database encryption using SQLCipher, which is widely trusted in the security community.
The key insight here is that you need to store the database encryption keys securely—which brings us back to flutter_secure_storage. Here's the pattern I recommend:
With this setup, even if someone extracts the database file, they'll just see encrypted gibberish. The decryption key lives in the hardware-backed secure storage, making the data practically unreadable without access to the specific device.
Example output:
Sometimes you need to store larger files, documents, images, or exported data that don't fit well in a database or key-value store. Here's how to handle that securely:
Example output:
Three things in this implementation are worth highlighting:
Unique IV per encryption: A fresh IV is generated for every file.
Reusing the same IV with the same key in AES-GCM breaks security guarantees.
AES-GCM mode: Galois/Counter Mode gives you confidentiality and authenticity in one pass.
Tamper with the ciphertext and decryption fails.
Secure deletion: secureDelete overwrites the file with random bytes before deleting.
Not a perfect guarantee on flash storage, but it raises recovery effort.
Caveat — flash storage and wear leveling: Modern mobile devices use NAND flash (a solid-state memory technology) with wear-leveling controllers. Overwriting a file does not guarantee the original physical blocks are erased.
For the strongest guarantees, rely on full-disk encryption (enabled by default on Android 10+ and all iOS devices) so that discarded blocks remain encrypted even if they aren’t zeroed.
Individual APIs are one thing, but in a real app you want a single place where all storage decisions live. The rule I follow: your UI and repository layers should never touch encryption keys or platform storage APIs directly. That concern belongs in a dedicated security layer:
Here's what that security layer looks like in practice. It supports three sensitivity tiers—because a user preference and a banking credential shouldn't be stored the same way:
Secure storage protects data at rest, but sensitive information leaks through side channels that most developers don't think about until something goes wrong. I've seen each of the following cause real incidents: debug logs submitted in support tickets, screenshots captured by the OS app switcher, clipboard content harvested by other apps.
A print() call that felt harmless in development quietly persists into your release build and ends up in support logs, ADB output, and crash reports. Here's a logger that makes it structurally difficult to accidentally expose sensitive values:
Output (debug console):
This logger does several important things: it completely disables logging in release mode, and even in debug mode, it automatically redacts patterns that look like tokens, credit cards, SSNs (Social Security Numbers), and passwords. You can expand the pattern matching for your specific use cases.
When users copy sensitive data (like account numbers or recovery codes), that data sits in the system clipboard where any app can read it. Here's how to auto-clear the clipboard after a short period:
Thirty seconds is usually enough time for users to paste what they copied, but short enough to limit exposure. For extremely sensitive data, you might reduce this to 10–15 seconds.
For apps handling sensitive information (banking, health, legal), you should prevent screenshots of sensitive screens. Here's how to implement this with platform channels:
Android Implementation (MainActivity.kt):
On Android, we use the FLAG_SECURE window flag which prevents screenshots and also hides the app content in the recent apps list:
iOS Implementation (AppDelegate.swift):
iOS doesn't have an exact equivalent, but we can show a blur or overlay when the app goes to the background (which is when screenshots are typically captured):
This is an advanced topic, but important for truly sensitive data. When you store a password or key in a Dart string, that string sits in memory until the garbage collector cleans it up, which might be a while. On a compromised device, memory can be dumped and searched for sensitive patterns.
Here's a pattern for handling sensitive data that clears memory as soon as it's no longer needed:
Note that Dart strings are immutable, so we can't truly "clear" them—we work with byte arrays instead. This is a limitation of the language, but using this pattern still reduces the window of exposure.
Example output:
Abstract advice only gets you so far. Here's what these attacks actually look like when they happen—and exactly what stops each one.
The attack: An attacker gains access to a user's iCloud or Google account (through phishing, password reuse, etc.) and downloads device backups. They extract your app's data from the backup and find authentication tokens stored in plain SharedPreferences.
What happens next: The attacker uses those tokens to access the user's account, potentially stealing personal information, making unauthorized purchases, or worse.
With the secure implementation, even if the attacker gets the backup, the tokens are encrypted with device-specific keys that aren't included in the backup.
The attack: A user's device is compromised by malware (perhaps from a malicious app or sideloaded software). The malware has root access and reads files from your app's private directory.
Example output (device security checks):
The attack: During a support investigation, someone shares device logs with a third party (or posts them online asking for help). Those logs contain authentication tokens that were printed during debugging and never removed.
This one happens more often than you'd think. I've seen production apps that logged full API responses including auth tokens to the console.
I run through something like this before every major release. It takes twenty minutes and has caught real issues more than once:
If there's one thing I hope you take away from this article, it's that data storage security isn't optional—it's a fundamental responsibility we have to our users. When someone trusts your app with their health records, financial information, or personal details, they're trusting you to protect that data. Insecure storage betrays that trust.
The good news is that Flutter gives us access to excellent platform-level security through packages like flutter_secure_storage. The hardware-backed encryption provided by Android Keystore and iOS Keychain is genuinely difficult to break when used correctly. You just need to use it.
Remember: the effort you put into secure storage pays dividends in user trust, regulatory compliance, and avoiding the nightmare of a data breach disclosure. It's one of those areas where doing it right from the start is much easier than fixing it after a security incident.
In the next article, we'll explore M10: Insufficient Cryptography, where we'll dive into proper cryptographic implementations, key management, and the common crypto mistakes I see in Flutter applications. Because encryption done wrong can be worse than no encryption at all—it gives you a false sense of security.
// ✅ SECURE: Encrypted SQLite database
import 'package:sqflite_sqlcipher/sqflite.dart';
import 'package:path/path.dart';
import 'package:flutter_secure_storage/flutter_secure_storage.dart';
import 'dart:math';
class SecureDatabase {
Database? _database;
final _secureStorage = const FlutterSecureStorage();
static const _dbKeyStorageKey = 'database_encryption_key';
// Generate or retrieve database encryption key
Future<String> _getDatabaseKey() async {
String? key = await _secureStorage.read(key: _dbKeyStorageKey);
if (key == null) {
// Generate a strong random key
key = _generateSecureKey(32);
await _secureStorage.write(key: _dbKeyStorageKey, value: key);
}
return key;
}
String _generateSecureKey(int length) {
const charset = 'abcdefghijklmnopqrstuvwxyzABCDEFGHIJKLMNOPQRSTUVWXYZ0123456789!@#\$%^&*';
final random = Random.secure();
return List.generate(length, (_) => charset[random.nextInt(charset.length)]).join();
}
Future<Database> get database async {
if (_database != null) return _database!;
final dbPath = await getDatabasesPath();
final encryptionKey = await _getDatabaseKey();
_database = await openDatabase(
join(dbPath, 'secure_user_data.db'),
version: 1,
password: encryptionKey, // SQLCipher encryption
onCreate: (db, version) async {
await db.execute('''
CREATE TABLE sensitive_data (
id INTEGER PRIMARY KEY AUTOINCREMENT,
data_type TEXT NOT NULL,
encrypted_value TEXT NOT NULL,
created_at INTEGER NOT NULL,
updated_at INTEGER NOT NULL
)
''');
// Create index for faster lookups
await db.execute(
'CREATE INDEX idx_data_type ON sensitive_data(data_type)'
);
},
);
return _database!;
}
Future<void> close() async {
await _database?.close();
_database = null;
}
}
[SecureDB] ✅ Generated encryption key (length: 32).
[SecureDB] ✅ Key stored in flutter_secure_storage (hardware-backed).
[SecureDB] ✅ Database opened with SQLCipher encryption.
[SecureDB] Path: <databases>/secure_user_data.db
[SecureDB] Cipher: AES-256 (via SQLCipher)
[SecureDB] Key storage: database_encryption_key → Keystore/Keychain
[SecureDB]
[SecureDB] Even if extracted, the .db file is unreadable without
[SecureDB] the device-specific hardware-backed key.
// ✅ SECURE: Encrypted file storage
import 'dart:convert';
import 'dart:io';
import 'dart:typed_data';
import 'package:encrypt/encrypt.dart' as encrypt;
import 'package:flutter_secure_storage/flutter_secure_storage.dart';
import 'package:path_provider/path_provider.dart';
import 'dart:math';
class SecureFileStorage {
final _secureStorage = const FlutterSecureStorage();
static const _fileKeyStorageKey = 'file_encryption_key';
Future<encrypt.Key> _getEncryptionKey() async {
String? keyBase64 = await _secureStorage.read(key: _fileKeyStorageKey);
if (keyBase64 == null) {
// Generate a new AES-256 key
final key = encrypt.Key.fromSecureRandom(32);
keyBase64 = key.base64;
await _secureStorage.write(key: _fileKeyStorageKey, value: keyBase64);
return key;
}
return encrypt.Key.fromBase64(keyBase64);
}
/// Encrypt and save data to a file
Future<void> saveEncryptedFile(String filename, String data) async {
final key = await _getEncryptionKey();
// Generate a unique IV for each encryption
final iv = encrypt.IV.fromSecureRandom(16);
// Create encrypter with AES-GCM (authenticated encryption)
final encrypter = encrypt.Encrypter(
encrypt.AES(key, mode: encrypt.AESMode.gcm),
);
// Encrypt the data
final encrypted = encrypter.encrypt(data, iv: iv);
// Combine IV and ciphertext for storage
final combined = {
'iv': iv.base64,
'data': encrypted.base64,
};
// Save to file
final directory = await getApplicationDocumentsDirectory();
final file = File('${directory.path}/$filename.enc');
await file.writeAsString(jsonEncode(combined));
}
/// Read and decrypt data from a file
Future<String?> readEncryptedFile(String filename) async {
try {
final directory = await getApplicationDocumentsDirectory();
final file = File('${directory.path}/$filename.enc');
if (!await file.exists()) return null;
final content = await file.readAsString();
final combined = jsonDecode(content) as Map<String, dynamic>;
final key = await _getEncryptionKey();
final iv = encrypt.IV.fromBase64(combined['iv'] as String);
final encrypter = encrypt.Encrypter(
encrypt.AES(key, mode: encrypt.AESMode.gcm),
);
return encrypter.decrypt64(combined['data'] as String, iv: iv);
} catch (e) {
// Decryption failed: tampered data, wrong key, or corrupted file.
// Avoid logging the error — it may contain ciphertext fragments.
return null;
}
}
/// Securely delete a file (overwrite before deletion)
Future<void> secureDelete(String filename) async {
final directory = await getApplicationDocumentsDirectory();
final file = File('${directory.path}/$filename.enc');
if (await file.exists()) {
// Overwrite with random data before deletion
final length = await file.length();
final random = Random.secure();
final randomData = List.generate(length, (_) => random.nextInt(256));
await file.writeAsBytes(Uint8List.fromList(randomData));
// Now delete
await file.delete();
}
}
}
[SecureFile] ✅ AES-256-GCM encryption:
[SecureFile] Plaintext length : 48 bytes
[SecureFile] IV (base64) : <random-base64>
[SecureFile] Ciphertext (b64) : <random-base64>…
[SecureFile] Key stored in : flutter_secure_storage
[SecureFile]
[SecureFile] File written: <documents>/medical.enc
[SecureFile] Format: { "iv": "<base64>", "data": "<base64>" }
[SecureFile] 🗑️ Secure delete:
[SecureFile] Step 1: Overwrite 2048 bytes with random data
[SecureFile] Step 2: Delete file from filesystem
[SecureFile] ⚠️ Note: flash wear-leveling means original blocks
[SecureFile] may persist — rely on full-disk encryption too.
// ✅ SECURE: Comprehensive secure storage service
import 'dart:convert';
import 'package:flutter/foundation.dart';
import 'package:flutter_secure_storage/flutter_secure_storage.dart';
import 'package:local_auth/local_auth.dart';
enum StorageSensitivity {
/// Standard encryption, no biometrics
standard,
/// Requires biometric authentication
biometric,
/// Highest security: biometrics + device-only storage
critical,
}
class SecureStorageService {
final FlutterSecureStorage _standardStorage;
final FlutterSecureStorage _biometricStorage;
final FlutterSecureStorage _criticalStorage;
final LocalAuthentication _localAuth;
SecureStorageService()
: _standardStorage = const FlutterSecureStorage(
aOptions: AndroidOptions(
encryptedSharedPreferences: true,
),
iOptions: IOSOptions(
accessibility: KeychainAccessibility.first_unlock,
),
),
_biometricStorage = FlutterSecureStorage(
aOptions: AndroidOptions.biometric(
enforceBiometrics: true,
biometricPromptTitle: 'Verify your identity',
),
iOptions: const IOSOptions(
accessibility: KeychainAccessibility.unlocked,
),
),
_criticalStorage = FlutterSecureStorage(
aOptions: AndroidOptions.biometric(
enforceBiometrics: true,
biometricPromptTitle: 'High security verification required',
),
iOptions: const IOSOptions(
accessibility: KeychainAccessibility.passcode,
synchronizable: false, // Don't sync to iCloud
),
),
_localAuth = LocalAuthentication();
FlutterSecureStorage _getStorage(StorageSensitivity sensitivity) {
switch (sensitivity) {
case StorageSensitivity.standard:
return _standardStorage;
case StorageSensitivity.biometric:
return _biometricStorage;
case StorageSensitivity.critical:
return _criticalStorage;
}
}
/// Store a string value securely
Future<void> write({
required String key,
required String value,
StorageSensitivity sensitivity = StorageSensitivity.standard,
}) async {
final storage = _getStorage(sensitivity);
await storage.write(key: key, value: value);
}
/// Read a string value
Future<String?> read({
required String key,
StorageSensitivity sensitivity = StorageSensitivity.standard,
}) async {
final storage = _getStorage(sensitivity);
return await storage.read(key: key);
}
/// Store a complex object as JSON
Future<void> writeObject<T>({
required String key,
required T value,
required Map<String, dynamic> Function(T) toJson,
StorageSensitivity sensitivity = StorageSensitivity.standard,
}) async {
final jsonString = jsonEncode(toJson(value));
await write(key: key, value: jsonString, sensitivity: sensitivity);
}
/// Read a complex object from JSON
Future<T?> readObject<T>({
required String key,
required T Function(Map<String, dynamic>) fromJson,
StorageSensitivity sensitivity = StorageSensitivity.standard,
}) async {
final jsonString = await read(key: key, sensitivity: sensitivity);
if (jsonString == null) return null;
try {
final json = jsonDecode(jsonString) as Map<String, dynamic>;
return fromJson(json);
} catch (e) {
debugPrint('Failed to parse stored object: $e');
return null;
}
}
/// Delete a specific key
Future<void> delete({
required String key,
StorageSensitivity sensitivity = StorageSensitivity.standard,
}) async {
final storage = _getStorage(sensitivity);
await storage.delete(key: key);
}
/// Check if biometrics are available
Future<bool> canUseBiometrics() async {
try {
final isAvailable = await _localAuth.canCheckBiometrics;
final isDeviceSupported = await _localAuth.isDeviceSupported();
return isAvailable && isDeviceSupported;
} catch (e) {
return false;
}
}
/// Clear all secure storage
Future<void> clearAll() async {
await Future.wait([
_standardStorage.deleteAll(),
_biometricStorage.deleteAll(),
_criticalStorage.deleteAll(),
]);
}
}
// ✅ SECURE: Clear sensitive data from memory
import 'dart:typed_data';
class SecureMemory {
/// Securely clear a byte array by overwriting with zeros
static Uint8List clearBytes(Uint8List data) {
for (var i = 0; i < data.length; i++) {
data[i] = 0;
}
return data;
}
/// Create a secure string wrapper that clears on dispose
static SecureString createSecureString(String value) {
return SecureString(value);
}
}
class SecureString {
late Uint8List _data;
bool _isCleared = false;
SecureString(String value) {
_data = Uint8List.fromList(value.codeUnits);
}
String get value {
if (_isCleared) {
throw StateError('SecureString has been cleared');
}
return String.fromCharCodes(_data);
}
void clear() {
if (!_isCleared) {
SecureMemory.clearBytes(_data);
_isCleared = true;
}
}
}
// Usage in authentication
class LoginService {
Future<void> login(String email, SecureString password) async {
try {
await _api.login(email, password.value);
} finally {
// Always clear password from memory
password.clear();
}
}
}
[SecureMemory] Created SecureString: [SecureString(13 bytes)]
[SecureMemory] Value accessible: 13 chars
[SecureMemory] (simulating API login call…)
[SecureMemory] After clear(): [CLEARED]
[SecureMemory] ✅ Access denied: Bad state: SecureString has been cleared
// ❌ VULNERABLE: Data included in backups
class VulnerableStorage {
Future<void> saveTokens(String accessToken, String refreshToken) async {
final prefs = await SharedPreferences.getInstance();
await prefs.setString('access_token', accessToken);
await prefs.setString('refresh_token', refreshToken);
// These will be included in device backups!
}
}
// ✅ SECURE: Exclude from backups
class SecureStorage {
final _storage = const FlutterSecureStorage(
aOptions: AndroidOptions(
encryptedSharedPreferences: true,
),
iOptions: IOSOptions(
accessibility: KeychainAccessibility.passcode,
synchronizable: false, // Exclude from iCloud sync
),
);
Future<void> saveTokens(String accessToken, String refreshToken) async {
await _storage.write(key: 'access_token', value: accessToken);
await _storage.write(key: 'refresh_token', value: refreshToken);
}
}
// ✅ SECURE: Detect compromised device and respond appropriately
// Uses freeRASP — callback names may differ across versions.
// See https://pub.dev/packages/freerasp for the latest API.
import 'package:freerasp/freerasp.dart';
import 'package:flutter_secure_storage/flutter_secure_storage.dart';
class SecurityService {
bool _isDeviceSecure = true;
Future<void> initialize() async {
final config = TalsecConfig(
androidConfig: AndroidConfig(
packageName: 'com.example.app',
signingCertHashes: ['your_cert_hash'],
supportedStores: ['com.sec.android.app.samsungapps'],
),
iosConfig: IOSConfig(
bundleIds: ['com.example.app'],
teamId: 'YOUR_TEAM_ID',
),
watcherMail: 'security@example.com',
);
// Register callbacks before calling start()
final callback = ThreatCallback(
onPrivilegedAccess: _onRootOrJailbreakDetected,
onAppIntegrity: _onTamperDetected,
// Provide no-op handlers for threats you only want to monitor
onDebug: () {},
onSimulator: () {},
onUnofficialStore: () {},
onHooks: () {},
onDeviceBinding: () {},
onObfuscationIssues: () {},
);
Talsec.instance.attachListener(callback);
await Talsec.instance.start(config);
}
void _onRootOrJailbreakDetected() {
_isDeviceSecure = false;
_clearSensitiveData();
_showSecurityWarning();
}
void _onTamperDetected() {
_isDeviceSecure = false;
_clearSensitiveData();
_blockAccess();
}
Future<void> _clearSensitiveData() async {
final storage = const FlutterSecureStorage();
await storage.deleteAll();
}
void _showSecurityWarning() {
// Alert user about compromised device
}
void _blockAccess() {
// Prevent access to sensitive features
}
bool get canAccessSensitiveData => _isDeviceSecure;
}
[Security] Running device security checks…
[Security] ✅ Root/jailbreak: not detected
[Security] ✅ App integrity: valid
[Security] ✅ Debug mode: not attached
[Security] ✅ Emulator: not detected
[Security] Device is secure — sensitive features enabled.
[Security] Simulating root/jailbreak detection…
[Security] 🚨 Root/jailbreak DETECTED!
[Security] 🗑️ Sensitive data cleared from secure storage.
[Security] 🔒 Sensitive features BLOCKED.
[Security] canAccessSensitiveData = false
// ❌ VULNERABLE: Logging sensitive data
class VulnerableAuthService {
Future<void> login(String email, String password) async {
print('Attempting login for $email with password $password');
final response = await _api.login(email, password);
print('Got token: ${response.token}');
}
}
// ✅ SECURE: No sensitive data in logs
class SecureAuthService {
final _logger = SecureLogger();
Future<void> login(String email, String password) async {
_logger.info('Attempting login for user');
final response = await _api.login(email, password);
_logger.info('Login successful');
// Never log tokens or credentials
}
}
class SecureLogger {
void info(String message) {
if (!kReleaseMode) {
developer.log('[INFO] $message');
}
}
void error(String message, [Object? error]) {
if (!kReleaseMode) {
developer.log('[ERROR] $message', error: error);
}
// In production, send to secure error tracking (without PII)
}
}
Source code: All code examples from this article are available as a runnable Flutter project on GitHub: